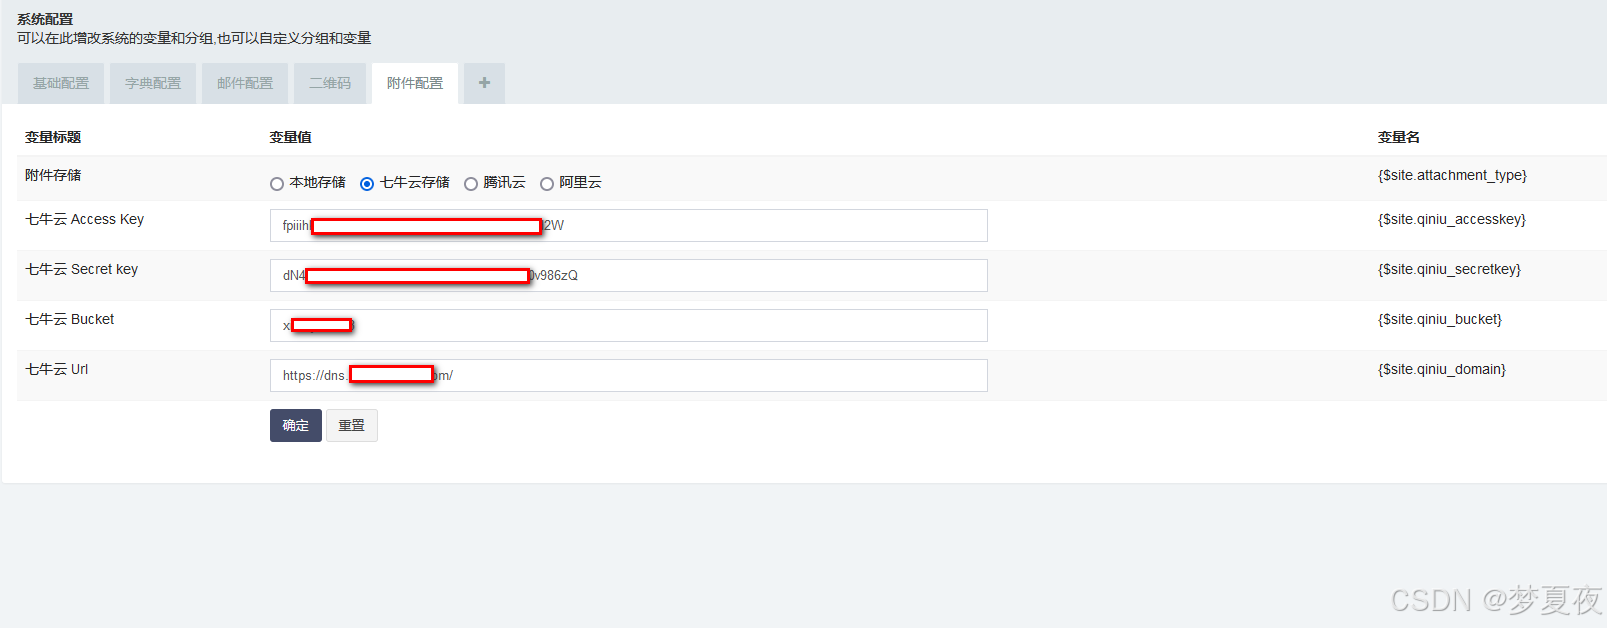
本文主要是介绍fastadmin 文件上传七牛云,希望对大家解决编程问题提供一定的参考价值,需要的开发者们随着小编来一起学习吧!
1-安装七牛云官方SDK
composer require qiniu/php-sdk2-七牛云配置
<?phpnamespace app\common\controller;use Qiniu\Storage\BucketManager;
use think\Config;
use Qiniu\Auth;
use Qiniu\Storage\UploadManager;
use think\Controller;
use think\Db;/*** 七牛基类*/
class Qiniu extends Controller
{/** * 上传* @param array $file 图片参数* @return array*/public function uploadOne($config){$data = $this->request->file();$info = $data['file']->getInfo();$domain = $config['qiniu_domain'];$bucket = $config['qiniu_bucket'];$auth = new Auth($config['qiniu_accesskey'], $config['qiniu_secretkey']);// 生成上传Token$token = $auth->uploadToken($bucket);$parts = explode('.', $info['name']);$extension = end($parts);$filename=hash('md5', uniqid()).mt_rand(1,99).'.'.$extension;// 构建 UploadManager 对象$uploadMgr = new UploadManager();list($ret, $err) = $uploadMgr->putFile($token, 'uploads/'.$filename, $info['tmp_name']);if ($err !== null) {return ['code' => 0,  'msg' => '上传失败'];} else {//返回图片的完整URLDb::name('attachment')->insert(['filesize'    => $info['size'],'imagetype'   => $info['type'],'imageframes' => 0,'mimetype'    => $info['type'],'filename'    => $filename,'url'         => $ret['key'],'createtime'  => time(),'updatetime'  => time(),'uploadtime'  => time(),'storage'     => 'qiniu','sha1'        => '','type'        => 2,'type_url'    => $domain,'extparam'    => '',]);return ['code' => 1, 'msg' => '上传完成', 'data' => ($domain . $ret['key'])];}}public function deleteOne($imageName,$config){// 构建认证$auth = new Auth($config['qiniu_accesskey'], $config['qiniu_secretkey']);// 构建请求$bucketMgr = new BucketManager($auth);// 要删除的文件的名称,包括你设置的前缀$key = $imageName;// 要删除文件的空间$bucket = $config['qiniu_bucket'];list($ret, $err) = $bucketMgr->delete($bucket, $key);if ($err !== null) {// 处理错误Checking::writeLog($err->message(),'删除失败','qiniu.log');} else {// 删除成功Checking::writeLog('删除成功','ok','qiniu.log');}}
}
接下来修改fastadmin 上传文件 api/controller/Common.php 文件下的 upload 方法
<?phpnamespace app\api\controller;use app\common\controller\Api;
use app\common\exception\UploadException;
use app\common\library\Upload;
use app\common\model\Area;
use app\common\model\Version;
use fast\Random;
use think\captcha\Captcha;
use think\Config;
use think\Db;
use think\Hook;/*** 公共接口*/
class Common extends Api
{protected $noNeedLogin = ['init', 'captcha','upload'];protected $noNeedRight = '*';protected $config;public function _initialize(){if (isset($_SERVER['HTTP_ORIGIN'])) {header('Access-Control-Expose-Headers: __token__');//跨域让客户端获取到}//跨域检测check_cors_request();if (!isset($_COOKIE['PHPSESSID'])) {Config::set('session.id', $this->request->server("HTTP_SID"));}parent::_initialize();$this->config=Db::name('config')->where(['group'=>'attachment'])->column('value','name');}/*** 加载初始化** @param string $version 版本号* @param string $lng 经度* @param string $lat 纬度*/public function init(){if ($version = $this->request->request('version')) {$lng = $this->request->request('lng');$lat = $this->request->request('lat');//配置信息$upload = Config::get('upload');//如果非服务端中转模式需要修改为中转if ($upload['storage'] != 'local' && isset($upload['uploadmode']) && $upload['uploadmode'] != 'server') {//临时修改上传模式为服务端中转set_addon_config($upload['storage'], ["uploadmode" => "server"], false);$upload = \app\common\model\Config::upload();// 上传信息配置后Hook::listen("upload_config_init", $upload);$upload = Config::set('upload', array_merge(Config::get('upload'), $upload));}$upload['cdnurl'] = $upload['cdnurl'] ? $upload['cdnurl'] : cdnurl('', true);$upload['uploadurl'] = preg_match("/^((?:[a-z]+:)?\/\/)(.*)/i", $upload['uploadurl']) ? $upload['uploadurl'] : url($upload['storage'] == 'local' ? '/api/common/upload' : $upload['uploadurl'], '', false, true);$content = ['citydata'    => Area::getCityFromLngLat($lng, $lat),'versiondata' => Version::check($version),'uploaddata'  => $upload,'coverdata'   => Config::get("cover"),];$this->success('', $content);} else {$this->error(__('Invalid parameters'));}}/*** 上传文件* @ApiMethod (POST)* @param File $file 文件流*/public function upload(){Config::set('default_return_type', 'json');//必须设定cdnurl为空,否则cdnurl函数计算错误Config::set('upload.cdnurl', '');$chunkid = $this->request->post("chunkid");if ($chunkid) {if (!Config::get('upload.chunking')) {$this->error(__('Chunk file disabled'));}$action = $this->request->post("action");$chunkindex = $this->request->post("chunkindex/d");$chunkcount = $this->request->post("chunkcount/d");$filename = $this->request->post("filename");$method = $this->request->method(true);if ($action == 'merge') {$attachment = null;//合并分片文件try {$upload = new Upload();$attachment = $upload->merge($chunkid, $chunkcount, $filename);} catch (UploadException $e) {$this->error($e->getMessage());}$this->success(__('Uploaded successful'), ['url' => $attachment->url, 'fullurl' => cdnurl($attachment->url, true)]);} elseif ($method == 'clean') {//删除冗余的分片文件try {$upload = new Upload();$upload->clean($chunkid);} catch (UploadException $e) {$this->error($e->getMessage());}$this->success();} else {//上传分片文件//默认普通上传文件$file = $this->request->file('file');try {$upload = new Upload($file);$upload->chunk($chunkid, $chunkindex, $chunkcount);} catch (UploadException $e) {$this->error($e->getMessage());}$this->success();}} else {switch ($this->config['attachment_type']){case 2:$qiniu = new \app\common\controller\Qiniu;$attachment = $qiniu->uploadOne($this->config);if ($attachment["code"] == 0) {$this->error($attachment["msg"]);}$this->success(__('Uploaded successful'), '', ['url' => $attachment['data'], 'fullurl' => cdnurl($attachment['data'], true)]);break;case 3:$tencent= new \app\common\controller\Tencent;$attachment = $tencent->uploadToTencentCloud($this->config);if ($attachment["code"] == 0) {$this->error($attachment["msg"]);}$this->success(__('Uploaded successful'), '', ['url' => $attachment['data'], 'fullurl' => cdnurl($attachment['data'], true)]);break;case 4:break;default://默认普通上传文件$attachment = null;//默认普通上传文件$file = $this->request->file('file');try {$upload = new Upload($file);$attachment = $upload->upload();} catch (UploadException $e) {$this->error($e->getMessage());}$this->success(__('Uploaded successful'), '', ['url' => $attachment->url, 'fullurl' => cdnurl($attachment->url, true)]);break;}
//            $attachment = null;
//            //默认普通上传文件
//            $file = $this->request->file('file');
//            try {
//                $upload = new Upload($file);
//                $attachment = $upload->upload();
//            } catch (UploadException $e) {
//                $this->error($e->getMessage());
//            } catch (\Exception $e) {
//                $this->error($e->getMessage());
//            }
//
//            $this->success(__('Uploaded successful'), ['url' => $attachment->url, 'fullurl' => cdnurl($attachment->url, true)]);}}/*** 验证码* @param $id* @return \think\Response*/public function captcha($id = ""){\think\Config::set(['captcha' => array_merge(config('captcha'), ['fontSize' => 44,'imageH'   => 150,'imageW'   => 350,])]);$captcha = new Captcha((array)Config::get('captcha'));return $captcha->entry($id);}
}
接下来修改附件选择器 admin/controller/general/Attachment.php 下的index方法
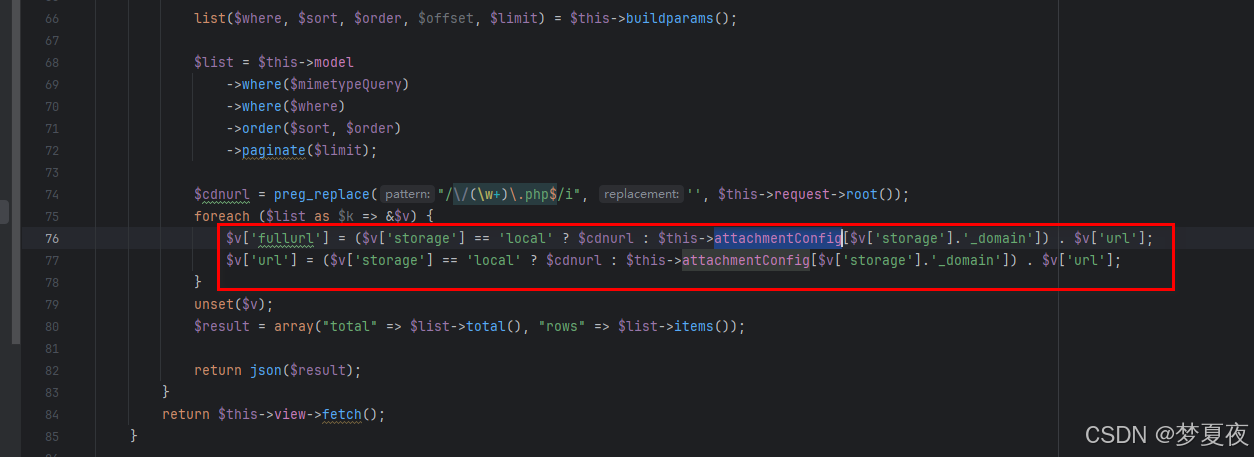
这篇关于fastadmin 文件上传七牛云的文章就介绍到这儿,希望我们推荐的文章对编程师们有所帮助!


