本文主要是介绍详细介绍AIDL 的使用,希望对大家解决编程问题提供一定的参考价值,需要的开发者们随着小编来一起学习吧!
本文转自本文为博主许佳佳原创文章,转载请务必注明出处http://blog.csdn.net/double2hao/article/details/51626347 尊重原创
为何要开启多进程?主要有两种情况:
一、一个应用由于自身需要采用多进程模式来实现。比如播放器之类,如果仅仅在service中运行会影响主线程的响应速度,很可能会造成ANR,一般情况下不会这么写;如果仅仅在子线程中运行,一旦开启该线程的Activity被杀死后,线程也被杀死,无法实现后台运行效果,更加不合理。而如果在另外一个进程中使用service后台运行,就显得十分恰当了。
二、由于Android对单个应用所使用的最大内存做了限制,为了加大一个应用可使用的内存,所以通过多进程来获取多份内存空间。
本篇文章demo重点:(demo源码在文章结尾)
1、开启多进程
2、两个进程之间使用AIDL进行通信
开启多进程:
在Android中常用的使用多进程只有一种办法,那就是在AndroidManifest中为四大组件(Activity、Service、Broadcast Receiver、ContentProvier)指定android:process属性。笔者demo中的远程service如下图:

最终绑定该service后在DDMS中进程的显示情况如下图:
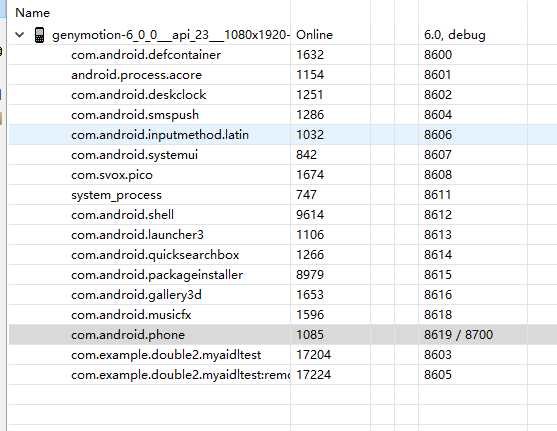
可以看到最后的两个进程都是同一个包名,只是第二个是“:remote”。这样就非常简单的开启了多进程。
讲到此处,很多好奇的读者定然有疑问了,“android:process”中的参数到底代表了什么?简单来讲就是代表了新开的这个进程的id。如果两个应用要共享同一个进程就需要用到这个了。
那么笔者此处写的“:remote”又是什么意思呢?“remote”不是关键,这个完全可以自己随意取名字,“:”冒号才是关键。
进程名以“:”开头的进程属于当前应用的私有进程,其他应用的组件不可以和它跑在同一个进程中。而进程名不以“:”开头的进程属于全局进程,其他应用可以通过某些方式和它跑在同一个进程中。
两个进程之间使用AIDL进行通信:
笔者此篇文章实现的主要效果:
能够在当前进程中MainActivity,运行另一个进程中开启的Service中实现的方法testMethod(),方法与最终效果如下:

界面上主要有两个按钮,第一个是开启远程进程中的Service,另一个为执行该方法。

主要实现步骤:(主要有三条,分别为AIDL、Service、和调用处(demo中为MainActivity))
1、创建一个AIDL接口,并写入自己要在进程间通信用的抽象方法。
myAIDL.aidl:
- package com.example.double2.myaidltest;
-
- interface myAIDL {
-
- void testMethod();
- }
创建AIDL文件与创建Java文件等类似,直接右击创建即可。android studio中就十分方便,会自动在main文件下创建一个aidl文件夹,并在该文件夹创建于你项目名相同的包名。
可能遇到的小问题:
笔者第一次创建AIDL,在Service中发现找不到该AIDL的包。遇到相同问题的读者可以在创建AIDL并写完抽象方法之后使用build->make project重新构建一下项目。
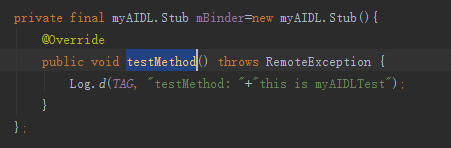
2、创建一个远程Service,在Service中创建一个类继承AIDL接口中的Stub类并实现Stub中的抽象方法,最后不要忘记在onBind中返回这个类的对象。
- public class AIDLRemoteService extends Service {
- private static final String TAG = "AIDLRemoteService";
-
- private final myAIDL.Stub mBinder=new myAIDL.Stub(){
- @Override
- public void testMethod() throws RemoteException {
- Log.d(TAG, "testMethod: "+"this is myAIDLTest");
- }
- };
-
- @Override
- public IBinder onBind(Intent intent) {
- return mBinder;
- }
- }
3、在要调用的地方(笔者demo中就为MainActivity中)绑定该Service,将Service返回的Binder对象转换成AIDL接口所属的类型,接着直接调用AIDL的方法。
在成功连接之后,将Service返回的Binder对象转换成AIDL接口所属的类型:
- private myAIDL mMyAIDL;
- private ServiceConnection mServiceConnection = new ServiceConnection() {
- @Override
- public void onServiceConnected(ComponentName name, IBinder service) {
- Log.e(TAG, "onServiceConnected");
- mMyAIDL = myAIDL.Stub.asInterface(service);
- }
-
- @Override
- public void onServiceDisconnected(ComponentName name) {
- Log.e(TAG, "onServiceDisconnected");
- mMyAIDL = null;
- }
- };
在调用处直接使用:
- btnStartMethod.setOnClickListener(new View.OnClickListener() {
- @Override
- public void onClick(View v) {
-
- try {
- mMyAIDL.testMethod();
- } catch (RemoteException e) {
- Toast.makeText(MainActivity.this, "服务被异常杀死,请重新开启。", Toast.LENGTH_SHORT).show();
- }
-
- }
- });
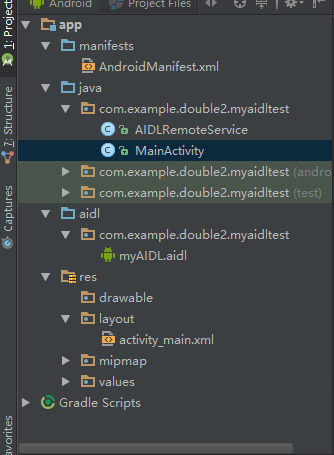
demo项目结构:
myAIDL.aidl:
- package com.example.double2.myaidltest;
-
- interface myAIDL {
-
- void testMethod();
- }
AIDLRemoteService:
- package com.example.double2.myaidltest;
-
- import android.app.Service;
- import android.content.Intent;
- import android.os.IBinder;
- import android.os.RemoteException;
- import android.util.Log;
-
-
-
-
-
-
-
- public class AIDLRemoteService extends Service {
- private static final String TAG = "AIDLRemoteService";
-
- private final myAIDL.Stub mBinder=new myAIDL.Stub(){
- @Override
- public void testMethod() throws RemoteException {
- Log.d(TAG, "testMethod: "+"this is myAIDLTest");
- }
- };
-
- @Override
- public IBinder onBind(Intent intent) {
- return mBinder;
- }
- }
MainActivity:
- package com.example.double2.myaidltest;
-
- import android.content.ComponentName;
- import android.content.Context;
- import android.content.Intent;
- import android.content.ServiceConnection;
- import android.os.Bundle;
- import android.os.IBinder;
- import android.os.RemoteException;
- import android.support.v7.app.AppCompatActivity;
- import android.util.Log;
- import android.view.View;
- import android.widget.Button;
- import android.widget.Toast;
-
- public class MainActivity extends AppCompatActivity {
-
- private static final String TAG = "MainActivity";
- private Button btnBindService;
- private Button btnStartMethod;
-
- private myAIDL mMyAIDL;
- private ServiceConnection mServiceConnection = new ServiceConnection() {
- @Override
- public void onServiceConnected(ComponentName name, IBinder service) {
- Log.e(TAG, "onServiceConnected");
- mMyAIDL = myAIDL.Stub.asInterface(service);
- }
-
- @Override
- public void onServiceDisconnected(ComponentName name) {
- Log.e(TAG, "onServiceDisconnected");
- mMyAIDL = null;
- }
- };
-
- @Override
- protected void onCreate(Bundle savedInstanceState) {
- super.onCreate(savedInstanceState);
- setContentView(R.layout.activity_main);
-
- initView();
- }
-
- private void initView() {
- btnBindService = (Button) findViewById(R.id.btn_bind_service);
- btnStartMethod = (Button) findViewById(R.id.btn_start_method);
- btnBindService.setOnClickListener(new View.OnClickListener() {
- @Override
- public void onClick(View v) {
- Intent intent = new Intent(MainActivity.this, AIDLRemoteService.class);
- bindService(intent, mServiceConnection, Context.BIND_AUTO_CREATE);
- }
- });
-
- btnStartMethod.setOnClickListener(new View.OnClickListener() {
- @Override
- public void onClick(View v) {
-
- try {
- mMyAIDL.testMethod();
- } catch (RemoteException e) {
- Toast.makeText(MainActivity.this, "服务被异常杀死,请重新开启。", Toast.LENGTH_SHORT).show();
- }
-
- }
- });
- }
-
- @Override
- protected void onDestroy() {
- super.onDestroy();
- unbindService(mServiceConnection);
- }
- }
activity_main:
- <?xml version="1.0" encoding="utf-8"?>
- <LinearLayout
- xmlns:android="http://schemas.android.com/apk/res/android"
- android:layout_width="match_parent"
- android:layout_height="match_parent"
- android:orientation="vertical"
- >
-
- <Button
- android:id="@+id/btn_bind_service"
- android:layout_width="match_parent"
- android:layout_height="wrap_content"
- android:textSize="20sp"
- android:text="bindService"/>
-
- <Button
- android:id="@+id/btn_start_method"
- android:layout_width="match_parent"
- android:layout_height="wrap_content"
- android:textSize="20sp"
- android:text="startMethod"/>
-
- </LinearLayout>
AndroidManifest:
- <?xml version="1.0" encoding="utf-8"?>
- <manifest xmlns:android="http://schemas.android.com/apk/res/android"
- package="com.example.double2.myaidltest">
-
- <application
- android:allowBackup="true"
- android:icon="@mipmap/ic_launcher"
- android:label="@string/app_name"
- android:supportsRtl="true"
- android:theme="@style/AppTheme">
- <activity android:name=".MainActivity">
- <intent-filter>
- <action android:name="android.intent.action.MAIN"/>
-
- <category android:name="android.intent.category.LAUNCHER"/>
- </intent-filter>
- </activity>
-
- <service android:name=".AIDLRemoteService"
- android:process=":remote"/>
- </application>
-
- </manifest>
demo源码地址:http://download.csdn.net/detail/double2hao/9545551
这篇关于详细介绍AIDL 的使用的文章就介绍到这儿,希望我们推荐的文章对编程师们有所帮助!


