本文主要是介绍Nginx 超级指南:从零到英雄的旅程,希望对大家解决编程问题提供一定的参考价值,需要的开发者们随着小编来一起学习吧!
Nginx 超级指南:从零到英雄的旅程
文章目录
- Nginx 超级指南:从零到英雄的旅程
- @[toc]
- Nginx 全面解析:高性能 Web 服务器与反向代理的秘密武器
- 引言
- 历史与发展
- 主要特点
- 应用场景
- 配置示例
- 最佳实践
- 结论
- 源码编译安装nginx
- 关闭nginx的debug功能,减少nginx所占存储
- nginx的平滑升级和回滚
- 平滑回滚
- nginx的常用参数
- -s参数解释
- -g参数解释
- **nginx服务启动脚本文件编写**
- nginx的全局配置参数优化调整
- nginx配置中的root和alias的使用以及区别
- nginx配置中的root和alias的使用
- nginx配置中的root和alias的区别
- nginx-location用法详解
- nginx的用户认证
- 注意:在进行浏览器访问测试时,需要提前做好本地域名解析服务
- 浏览器访问测试
- nginx自定义错误页面
- 浏览器访问测试
- nginx自定义日志
- nginx中的文件检测
- nginx中的长链接管理
- nginx下载服务器的设定以及优化
- 浏览器访问测试
- 下载速度测试
- nginx的状态页面
- 浏览器访问测试
- nginx的数据压缩功能
- nginx中的变量详解
- nginx的内置参数
- nginx的自定义参数
- nginx-rewrite模块功能
- if模块
- break模块
- return模块
- 临时重定向(redirect)与永久重定向(permanent)
- break和last
- nginx-rewrite的企业示例以及防盗链
- 企业示例(全站加密)
- 浏览器访问测试
- 防盗链
Nginx 全面解析:高性能 Web 服务器与反向代理的秘密武器
引言
Nginx 是一款广泛使用的高性能 HTTP 和反向代理 Web 服务器,它以稳定、轻量且高效著称。自从 2004 年首次发布以来,Nginx 已经成为互联网上最受欢迎的 Web 服务器之一,被众多大型网站和应用程序所采用。
历史与发展
- 起源:Nginx 由俄罗斯软件工程师 Igor Sysoev 开发,最初是为了应对 C10K 问题(即单一服务器同时处理成千上万个并发连接的能力)。
- 发展:随着时间的推移,Nginx 不断添加了新功能,并逐渐演进为一个全面的 Web 服务平台,支持 HTTPS、负载均衡、缓存等多种高级特性。
- 社区与商业:除了活跃的开源社区外,Nginx Inc. 也提供了一系列商业产品和服务,包括企业版 Nginx Plus、监控工具等。
主要特点
- 高并发能力:Nginx 使用异步事件驱动模型,能够在单个进程中处理大量并发连接。
- 低内存消耗:相比其他 Web 服务器,Nginx 在处理大量并发请求时占用的内存更少。
- 灵活的配置:Nginx 提供了丰富的配置选项,允许用户根据需要进行高度定制。
- 强大的反向代理:作为反向代理服务器,Nginx 可以实现负载均衡、SSL 终止等功能。
- 静态文件服务:对于静态文件服务,Nginx 表现得非常出色,能够快速响应并有效缓存。
- 模块化设计:Nginx 支持通过安装第三方模块来扩展其功能,如 Lua 模块、Redis 模块等。
应用场景
- Web 服务器:直接作为 Web 服务器,为网站提供静态内容。
- 反向代理:用于负载均衡,将客户端请求分发到多个后端服务器。
- 负载均衡:基于多种策略(如轮询、最少连接数等)分配流量。
- 安全网关:实施 SSL/TLS 加密,提高网站安全性。
- API 网关:为微服务架构提供统一的入口点,进行认证、限流等操作。
配置示例
以下是一个简单的 Nginx 配置示例:
user nginx;
worker_processes auto;events {worker_connections 1024;
}http {include       mime.types;default_type  application/octet-stream;sendfile        on;tcp_nopush     on;tcp_nodelay    on;keepalive_timeout  65;server {listen       80;server_name  localhost;location / {root   /usr/share/nginx/html;index  index.html index.htm;}error_page   500 502 503 504  /50x.html;location = /50x.html {root   /usr/share/nginx/html;}}
}
最佳实践
- 性能调优:调整
worker_connections、keepalive_timeout等参数以适应不同的工作负载。 - 安全设置:启用 SSL/TLS 加密、限制 IP 访问、隐藏版本信息等。
- 监控与日志:利用 Nginx 的内置日志记录功能,配合外部工具(如 Grafana、Prometheus)进行监控。
- 定期更新:确保运行的是最新版本的 Nginx 以获得最新的安全补丁和功能改进。
结论
Nginx 以其出色的性能和灵活性,在 Web 服务器领域占据了一席之地。无论是小型个人网站还是大规模的企业应用,Nginx 都能够提供强大的支持。通过不断学习和实践,你可以充分发挥 Nginx 的潜力,构建出更加高效可靠的 Web 服务环境。
源码编译安装nginx
[root@nginx ~]# ls
anaconda-ks.cfg  nginx-1.24.0.tar.gz# 解压nginx压缩包
[root@nginx ~]# tar -zxf nginx-1.24.0.tar.gz
[root@nginx ~]# ls
anaconda-ks.cfg  nginx-1.24.0  nginx-1.24.0.tar.gz
[root@nginx ~]# cd nginx-1.24.0/
[root@nginx nginx-1.24.0]# ls
auto  CHANGES  CHANGES.ru  conf  configure  contrib  html  LICENSE  man  README  src# 安装所需要的软件库依赖
[root@nginx nginx-1.24.0]#  dnf install gcc pcre-devel zlib-devel openssl-devel -y# 创建nginx用户
[root@nginx nginx-1.24.0]# useradd -s /sbin/nologin -M nginx
[root@nginx nginx-1.24.0]# id nginx
用户id=1001(nginx) 组id=1001(nginx) 组=1001(nginx)# 检测nginx的安装环境,并且附加了指定的参数
[root@nginx nginx-1.24.0]# ./configure --prefix=/usr/local/nginx \
> --user=nginx \
> --group=nginx \
> --with-http_ssl_module \
> --with-http_v2_module \
> --with-http_realip_module \
> --with-http_stub_status_module \
> --with-http_gzip_static_module \
> --with-pcre \
> --with-stream \
> --with-stream_ssl_module \
> --with-stream_realip_module# 参数
./configure --prefix=/usr/local/nginx --user=nginx --group=nginx --with-http_ssl_module --with-http_v2_module --with-http_realip_module --with-http_stub_status_module --with-http_gzip_static_module --with-pcre --with-stream --with-stream_ssl_module --with-stream_realip_modulechecking for struct tm.tm_gmtoff ... found
checking for struct dirent.d_namlen ... not found
checking for struct dirent.d_type ... found# make会进行编译之后会生成makefile 和 objs文件
# make install命令是将makefile 和 objs文件拷贝到本地
[root@nginx nginx-1.24.0]# make && make install
cc -c -pipe  -O -W -Wall -Wpointer-arith -Wno-unused-parameter -Werror -g  -I src/core -I src/event -I src/event/modules -I src/os/unix -I objs \-o objs/src/core/ngx_file.o \src/core/ngx_file.cobjs/src/http/modules/ngx_http_grpc_module.o \
objs/src/http/modules/ngx_http_memcached_module.o \make -f objs/Makefile install
make[1]: 进入目录“/root/nginx-1.24.0”
cp objs/nginx '/usr/local/nginx/sbin/nginx'# 添加nginx的可执行文件至环境变量中
[root@nginx sbin]# vim ~/.bash_profileexport PATH=$PATH:/usr/local/nginx/sbin/[root@nginx sbin]# source ~/.bash_profile[root@nginx sbin]# nginx -v
nginx version: nginx/1.24.0[root@nginx sbin]# nginx
[root@nginx sbin]# netstat -antuple | grep nginx
tcp        0      0 0.0.0.0:80              0.0.0.0:*               LISTEN      0          58724      33170/nginx: master#访问测试成功
[root@nginx sbin]# curl 172.25.254.120
<!DOCTYPE html>
<html>
<head>
<title>Welcome to nginx!</title>
<style>
html { color-scheme: light dark; }
body { width: 35em; margin: 0 auto;
font-family: Tahoma, Verdana, Arial, sans-serif; }
</style>
</head>
<body>
<h1>Welcome to nginx!</h1># 关闭nginx
[root@nginx sbin]# nginx -s stop
[root@nginx sbin]# netstat -antuple | grep nginx# 重新加载nginx的配置文件
[root@nginx ~]# nginx -s reload
关闭nginx的debug功能,减少nginx所占存储
# 对之前的make命令生成的文件进行清除(清除makefile、objs文件)
[root@nginx nginx-1.24.0]# make clean
rm -rf Makefile objs[root@nginx ~]# cd nginx-1.24.0/
[root@nginx nginx-1.24.0]# ls
auto  CHANGES  CHANGES.ru  conf  configure  contrib  html  LICENSE  Makefile  man  objs  README  src
[root@nginx nginx-1.24.0]# vim auto/cc/gcc # debug# 将这一行注释掉,关闭debug功能
#CFLAGS="$CFLAGS -g"# 重新进行编译安装过程
[root@nginx nginx-1.24.0]# ./configure --prefix=/usr/local/nginx --prefix=/usr/local/nginx --prefix=/usr/local/nginx --with-http_ssl_module --with-http_v2_module --with-http_realip_module --with-http_stub_status_module --with-http_gzip_static_module --with-pcre --with-stream --with-stream_ssl_module --with-stream_realip_module[root@nginx nginx-1.24.0]# make
[root@nginx nginx-1.24.0]# make install [root@nginx nginx-1.24.0]# cd /usr/local/nginx/
[root@nginx nginx]# du -sh .
6.7M    .
nginx的平滑升级和回滚
[root@nginx ~]# ls
anaconda-ks.cfg  echo-nginx-module-0.63.tar.gz  nginx-1.24.0  nginx-1.24.0.tar.gz  nginx-1.26.1.tar.gz# 解压新版本nginx
[root@nginx ~]# tar -zxf nginx-1.26.1.tar.gz
[root@nginx ~]# ls
anaconda-ks.cfg                nginx-1.24.0         nginx-1.26.1
echo-nginx-module-0.63.tar.gz  nginx-1.24.0.tar.gz  nginx-1.26.1.tar.gz# 解压nginx的模块包,这个实验目前使用不到这个,但是要用这个讲解如何在检测环境时,添加模块包
[root@nginx ~]# tar -zxf echo-nginx-module-0.63.tar.gz
[root@nginx ~]# ls
anaconda-ks.cfg         echo-nginx-module-0.63.tar.gz  nginx-1.24.0.tar.gz  nginx-1.26.1.tar.gz
echo-nginx-module-0.63  nginx-1.24.0                   nginx-1.26.1[root@nginx ~]# cd nginx-1.26.1/
[root@nginx nginx-1.26.1]# ls
auto  CHANGES  CHANGES.ru  conf  configure  contrib  html  LICENSE  man  README  src
[root@nginx nginx-1.26.1]# ./configure --prefix=/usr/local/nginx --user=nginx --group=nginx --with-http_ssl_module --with-http_v2_module --with-http_realip_module --with-http_stub_status_module --with-http_gzip_static_module --with-pcre --with-stream --with-stream_ssl_module --with-stream_realip_module --add-module=/root/echo-nginx-module-0.63(这里的最后一个参数就是添加指定位置路径的模块包)# 这里只make,只在当前路径生成对应的makefile和objs目录,不下载到本地的指定路径,为了之后的平滑升级
[root@nginx nginx-1.26.1]# make[root@nginx nginx-1.26.1]# ls
auto  CHANGES  CHANGES.ru  conf  configure  contrib  html  LICENSE  Makefile  man  objs  README  src# 目前启动的nginx版本,为1.24老版本
[root@nginx core]# curl -I localhost
HTTP/1.1 200 OK
Server: nginx/1.24.0
Date: Fri, 16 Aug 2024 04:07:42 GMT
Content-Type: text/html
Content-Length: 615
Last-Modified: Fri, 16 Aug 2024 03:53:29 GMT
Connection: keep-alive
ETag: "66becd39-267"
Accept-Ranges: bytes# 现在开始平滑升级# 查看两个版本
[root@nginx nginx-1.26.1]# ll objs/nginx /usr/local/nginx/sbin/nginx
-rwxr-xr-x 1 root root 6177456  8月 16 12:05 objs/nginx
-rwxr-xr-x 1 root root 5679504  8月 16 11:53 /usr/local/nginx/sbin/nginx# 把之前的旧版nginx命令进行备份
[root@nginx nginx-1.26.1]# cd /usr/local/nginx/sbin/
[root@nginx sbin]# ls
nginx
[root@nginx sbin]# cp nginx nginx.24
[root@nginx sbin]# ls
nginx  nginx.24# 把新版本的nginx命令覆盖旧版本的nginx命令
[root@nginx sbin]# \cp -f /root/nginx-1.26.1/objs/nginx /usr/local/nginx/sbin/
# 检测是否有错误
[root@nginx sbin]# nginx -t
nginx: the configuration file /usr/local/nginx/conf/nginx.conf syntax is ok
nginx: configuration file /usr/local/nginx/conf/nginx.conf test is successful# 查看nginx的进程
[root@nginx sbin]# ps aux | grep nginx
root        7208  0.0  0.0   9836   932 ?        Ss   11:54   0:00 nginx: master process /usr/local/nginx/sbin/nginx
nginx       7209  0.0  0.2  13724  5200 ?        S    11:54   0:00 nginx: worker process
root       10766  0.0  0.1   6636  2192 pts/0    S+   12:14   0:00 grep --color=auto nginx#USR2 平滑升级可执行程序,将存储有旧版本主进程PID的文件重命名为nginx.pid.oldbin,并启动新的 nginx #此时两个master的进程都在运行,只是旧的master不在监听,由新的master监听80 #此时Nginx开启一个新的master进程,这个master进程会生成新的worker进程,这就是升级后的Nginx进 程,此时老的进程不会自动退出,但是当接收到新的请求不作处理而是交给新的进程处理。
[root@nginx sbin]# kill -USR2 7208 # nginx master ID
[root@nginx sbin]# ps aux | grep nginx
root        7208  0.0  0.1   9836  2608 ?        Ss   11:54   0:00 nginx: master process /usr/local/nginx/sbin/nginx
nginx       7209  0.0  0.2  13724  5200 ?        S    11:54   0:00 nginx: worker process
root       10767  0.0  0.3   9872  6144 ?        S    12:15   0:00 nginx: master process /usr/local/nginx/sbin/nginx
nginx      10768  0.0  0.2  13760  4760 ?        S    12:15   0:00 nginx: worker process
root       10770  0.0  0.1   6636  2176 pts/0    S+   12:15   0:00 grep --color=auto nginx# 依旧是老版本生效
[root@nginx sbin]# curl -I localhost
HTTP/1.1 200 OK
Server: nginx/1.24.0
Date: Fri, 16 Aug 2024 04:15:37 GMT
Content-Type: text/html
Content-Length: 615
Last-Modified: Fri, 16 Aug 2024 03:53:29 GMT
Connection: keep-alive
ETag: "66becd39-267"
Accept-Ranges: bytes# 回收老版本
[root@nginx sbin]# kill -WINCH 7208
[root@nginx sbin]# ps aux | grep nginx
root        7208  0.0  0.1   9836  2608 ?        Ss   11:54   0:00 nginx: master process /usr/local/nginx/sbin/nginx
root       10767  0.0  0.3   9872  6144 ?        S    12:15   0:00 nginx: master process /usr/local/nginx/sbin/nginx
nginx      10768  0.0  0.2  13760  4760 ?        S    12:15   0:00 nginx: worker process
root       10776  0.0  0.1   6636  2128 pts/0    S+   12:16   0:00 grep --color=auto nginx# 访问的是新版本了
[root@nginx sbin]# curl -I localhost
HTTP/1.1 200 OK
Server: nginx/1.26.1
Date: Fri, 16 Aug 2024 04:16:18 GMT
Content-Type: text/html
Content-Length: 615
Last-Modified: Fri, 16 Aug 2024 03:53:29 GMT
Connection: keep-alive
ETag: "66becd39-267"
Accept-Ranges: bytes
平滑回滚
# 备份新版本的命令
[root@nginx sbin]# cp nginx nginx.26
[root@nginx sbin]# ls
nginx  nginx.24  nginx.26[root@nginx sbin]# mv nginx.24 nginx
mv:是否覆盖'nginx'? yes
[root@nginx sbin]# ls
nginx  nginx.26# 覆盖新版本的nginx命令
[root@nginx sbin]# mv nginx.24 nginx
mv:是否覆盖'nginx'? yes
[root@nginx sbin]# ls
nginx  nginx.26[root@nginx sbin]# ps aux | grep nginx
root        7208  0.0  0.1   9836  2608 ?        Ss   11:54   0:00 nginx: master process /usr/local/nginx/sbin/nginx
root       10767  0.0  0.3   9872  6144 ?        S    12:15   0:00 nginx: master process /usr/local/nginx/sbin/nginx
nginx      10768  0.0  0.2  13760  5356 ?        S    12:15   0:00 nginx: worker process
root       10817  0.0  0.1   6636  2196 pts/0    S+   12:24   0:00 grep --color=auto nginx[root@nginx sbin]# kill -HUP 7208 # 老版本的master进程
[root@nginx sbin]# kill -WINCH 10767 # 新版本的master进程# 版本回滚成功
[root@nginx sbin]# curl -I localhost
HTTP/1.1 200 OK
Server: nginx/1.24.0
Date: Fri, 16 Aug 2024 04:25:42 GMT
Content-Type: text/html
Content-Length: 615
Last-Modified: Fri, 16 Aug 2024 03:53:29 GMT
Connection: keep-alive
ETag: "66becd39-267"
Accept-Ranges: bytes
nginx的常用参数
-s参数:-s signal : send signal to a master process: stop, quit, reopen, reload # 发送信号,reload信号 会生成新的worker,但master不会重新生成
-g参数: 设置全局指令,注意和 配置文件不要同时配置,否则冲突
-s参数解释
[root@nginx ~]# ps -aux | grep nginx
root        1129  0.0  0.0   9836   932 ?        Ss   20:31   0:00 nginx: master process nginx
nginx       1130  0.0  0.2  13724  4696 ?        S    20:31   0:00 nginx: worker process
root        1132  0.0  0.1   6636  2232 pts/0    S+   20:31   0:00 grep --color=auto nginx[root@nginx ~]# nginx -s reload[root@nginx ~]# ps aux | grep nginx
root        1129  0.0  0.1   9836  3488 ?        Ss   20:31   0:00 nginx: master process nginx
nginx       1136  0.0  0.2  13736  4832 ?        S    20:40   0:00 nginx: worker process # 这里的master进程号没有变化,work进程号出现了变化,说明mster进程没有重新生成,work进程重新生成了,旧的进程被系统回收
root        1138  0.0  0.1   6636  2176 pts/0    S+   20:40   0:00 grep --color=auto nginx
-g参数解释
[root@nginx ~]# vim /usr/local/nginx/conf/nginx.conf#user  nobody;
#worker_processes  1; # 将这一行注释掉[root@nginx ~]# nginx -g "worker_processes  4;"# 成功让nginx开启了4个work进程
[root@nginx ~]# ps aux | grep nginx
root        1215  0.0  0.0   9836   932 ?        Ss   20:45   0:00 nginx: master process nginx -g worker_processes  4;
nginx       1216  0.0  0.2  13724  4572 ?        S    20:45   0:00 nginx: worker process
nginx       1217  0.0  0.2  13724  4572 ?        S    20:45   0:00 nginx: worker process
nginx       1218  0.0  0.2  13724  4572 ?        S    20:45   0:00 nginx: worker process
nginx       1219  0.0  0.2  13724  4572 ?        S    20:45   0:00 nginx: worker process
root        1221  0.0  0.1   6636  2180 pts/0    S+   20:45   0:00 grep --color=auto nginx
nginx服务启动脚本文件编写
# 编写服务启动脚本
[root@nginx ~]# vim /lib/systemd/system/nginx.service[Unit]
Description=The NGINX HTTP and reverse proxy server
After=syslog.target network-online.target remote-fs.target nss-lookup.target
Wants=network-online.target[Service]
Type=forking
PIDFile=/usr/local/nginx/logs/nginx.pid
ExecStartPre=/usr/local/nginx/sbin/nginx -t
ExecStart=/usr/local/nginx/sbin/nginx
ExecReload=/usr/local/nginx/sbin/nginx -s reload
ExecStop=/bin/kill -s QUIT $MAINPID
PrivateTmp=true [Install]
WantedBy=multi-user.target# 必须要重启服务
[root@nginx ~]# systemctl daemon-reload [root@nginx ~]# systemctl enable --now nginx.service # 开机自启动成功
[root@nginx ~]# systemctl status nginx.service
● nginx.service - The NGINX HTTP and reverse proxy serverLoaded: loaded (/usr/lib/systemd/system/nginx.service; enabled; vendor preset: disabled)Active: active (running) since Sat 2024-08-17 20:58:08 CST; 4s ago
nginx的全局配置参数优化调整
[root@nginx ~]# vim /usr/local/nginx/conf/nginx.confuser  nginx; # 更改nginx使用的账户
worker_processes  auto; # 启动Nginx工作进程的数量,一般设为和CPU核心数相同
worker_cpu_affinity 0001 0010; # 对CPU进行绑定,防止CPU的抖动#error_log  logs/error.log;
#error_log  logs/error.log  notice;
#error_log  logs/error.log  info;#pid        logs/nginx.pid;events {worker_connections  100000; # 设置单个工作进程的最大并发连接数 ,这里需要根据系统的最大文件打开数进行设置
}[root@nginx ~]# nginx -t
nginx: the configuration file /usr/local/nginx/conf/nginx.conf syntax is ok
nginx: configuration file /usr/local/nginx/conf/nginx.conf test is successful[root@nginx ~]# nginx -s reload# 修改系统最大打开文件数量
[root@nginx ~]# vim /etc/security/limits.conf# End of file
*                -       nofile          100000[root@nginx ~]# sudo -u nginx ulimit -n
100000[root@nginx ~]# sudo -u nginx ulimit -a
real-time non-blocking time  (microseconds, -R) unlimited
core file size              (blocks, -c) 0
data seg size               (kbytes, -d) unlimited
scheduling priority                 (-e) 0
file size                   (blocks, -f) unlimited
pending signals                     (-i) 7582
max locked memory           (kbytes, -l) 64
max memory size             (kbytes, -m) unlimited
open files                          (-n) 100000 # 在这里
pipe size                (512 bytes, -p) 8
POSIX message queues         (bytes, -q) 819200
real-time priority                  (-r) 0
stack size                  (kbytes, -s) 8192
cpu time                   (seconds, -t) unlimited
max user processes                  (-u) 7582
virtual memory              (kbytes, -v) unlimited
file locks                          (-x) unlimited
nginx配置中的root和alias的使用以及区别
nginx配置中的root和alias的使用
[root@nginx ~]# vim /usr/local/nginx/conf/nginx.confevents {worker_connections  100000;use epoll; # 启动epoll模式,默认使用的poll模式
}# 使用子配置目录文件进行配置include "/usr/local/nginx/conf.d/*.conf";server {listen       80;server_name  localhost;# 创建子配置目录
[root@nginx ~]# mkdir -p /usr/local/nginx/conf.d# 编写子配置文件
[root@nginx ~]# vim /usr/local/nginx/conf.d/vhost.confserver {listen 80;server_name www.shanxin.org;root /data/web/html;index index.html;location /test1/ {root /data/web/;}location /test2/ {alias /data/web/test1/;}
}# 创建网页存储路径以及书写网页打开文件
[root@nginx ~]# mkdir -p /data/web/html
[root@nginx ~]# echo www.shanxin.org > /data/web/html/index.html# 提前做好本地解析服务
[root@nginx ~]# vim /etc/hosts
[root@nginx ~]# cat /etc/hosts
127.0.0.1   localhost localhost.localdomain localhost4 localhost4.localdomain4
::1         localhost localhost.localdomain localhost6 localhost6.localdomain6
172.25.254.120  nginx.shanxin.org
172.25.254.120  www.shanxin.org[root@nginx ~]# nginx -t
nginx: the configuration file /usr/local/nginx/conf/nginx.conf syntax is ok
nginx: configuration file /usr/local/nginx/conf/nginx.conf test is successful# 重新加载配置
[root@nginx ~]# nginx -s reload# 访问测试,访问成功
[root@nginx ~]# curl www.shanxin.org
www.shanxin.org[root@nginx ~]# mkdir /data/web/test1
[root@nginx ~]# echo /data/web/test1 > /data/web/test1/index.html
[root@nginx ~]# nginx -t
nginx: the configuration file /usr/local/nginx/conf/nginx.conf syntax is ok
nginx: configuration file /usr/local/nginx/conf/nginx.conf test is successful
[root@nginx ~]# nginx -s reload# location访问测试
[root@nginx sbin]# curl www.shanxin.org/test1/
/data/web/test1# alias访问测试
[root@nginx sbin]# vim /usr/local/nginx/conf.d/vhost.conf
[root@nginx sbin]# nginx -s reload# 访问成功
[root@nginx sbin]# curl www.shanxin.org/test1/
/data/web/test1
nginx配置中的root和alias的区别
-
root
location /test1/ {root /data/web/; }- 表示真实的访问路径为/data/web/test1/index.html,/data/web/这部分就是root,root的内容会替换掉/test1/的 第一个/
-
alias
location /test2/ {alias /data/web/test1/; }- 表示真实的访问路径替换为了/data/web/test1/,在访问/test2/时,会跳转到/test1/去访问
nginx-location用法详解
[root@nginx ~]# vim /usr/local/nginx/conf.d/vhost.confserver_name www.shanxin.org;root /data/web/html;index index.html;location = /test {root /data/web2;}location /test {root /data/web1;}location ^~ /t {root /data/web1;}location ~ \.(html) {root /data/web1;}}[root@nginx ~]# mkdir -p /data/web{1..5}
[root@nginx ~]# mkdir -p /data/web{1..5}/test
[root@nginx ~]# echo web1 > /data/web1/test/index.html
[root@nginx ~]# echo web2 > /data/web2/test/index.html
[root@nginx ~]# echo web3 > /data/web3/test/index.html
[root@nginx ~]# echo web4 > /data/web4/test/index.html
[root@nginx ~]# echo web5 > /data/web5/test/index.html[root@nginx ~]# nginx -s reload
nginx的用户认证
# 下载httpd的工具箱
[root@nginx ~]# dnf install httpd-tools# 第一次需要加-c参数,以创建认证存储路径
[root@nginx ~]# htpasswd -cm /usr/local/nginx/.htpasswd admin
New password:
Re-type new password:
Adding password for user admin# 第二次一定不能加-c参数,否则会再次创建存储路径,会覆盖上一个认证文件
[root@nginx ~]# htpasswd -m /usr/local/nginx/.htpasswd shanxin
New password:
Re-type new password:
Adding password for user shanxin[root@nginx ~]# cat /usr/local/nginx/.htpasswd
admin:$apr1$Ux3ecygA$Z4X8K5obv9OyRWLsUl0Ls1
shanxin:$apr1$bwPAq12.$CBwpE3YDXhNdBglgjBVLM0[root@nginx ~]# vim /usr/local/nginx/conf.d/vhost.conf server {listen 80;server_name www.shanxin.org;root /data/web/html;index index.html;# 用户认证配置段location /lee {root /data/web;auth_basic "login password!!";auth_basic_user_file "/usr/local/nginx/.htpasswd";}
}[root@nginx ~]# mkdir -p /data/web/lee
[root@nginx ~]# echo lee > /data/web/lee/index.html
[root@nginx ~]# nginx -t
nginx: the configuration file /usr/local/nginx/conf/nginx.conf syntax is ok
nginx: configuration file /usr/local/nginx/conf/nginx.conf test is successful
[root@nginx ~]# nginx -s reload
注意:在进行浏览器访问测试时,需要提前做好本地域名解析服务
浏览器访问测试


nginx自定义错误页面
[root@nginx errorpage]# vim /usr/local/nginx/conf.d/vhost.conf server {listen 80;server_name www.shanxin.org;error_page 404 /40x.html;location = /40x.html {root /data/web/errorpage;}}[root@nginx ~]# mkdir -p /data/web/errorpage
[root@nginx ~]# echo error page > /data/web/errorpage/40x.html[root@nginx ~]# nginx -s reload
浏览器访问测试

nginx自定义日志
[root@nginx ~]# vim /usr/local/nginx/conf.d/vhost.conf server {listen 80;server_name www.shanxin.org;error_page 404 /40x.html;error_log   /var/log/shanxin.org/error.log;access_log  /var/log/shanxin.org/access.log;location = /40x.html {root /data/web/errorpage;}}# 自定义日志文件提前手动建立好,不然再重载nginx配置后会出现报错
[root@nginx ~]# mkdir /var/log/shanxin.org/ -p
[root@nginx ~]# nginx -s reload# 访问使其产生日志文件
[root@nginx ~]# curl 172.25.254.120
[root@nginx ~]# curl www.shanxin.org/haha# 查看自定义日志文件
[root@nginx ~]# ll /var/log/shanxin.org/
总用量 8
-rw-r--r-- 1 root root 185  8月 18 17:56 access.log
-rw-r--r-- 1 root root 218  8月 18 17:56 error.log
[root@nginx ~]# cat /var/log/shanxin.org/access.log
172.25.254.120 - - [18/Aug/2024:17:56:43 +0800] "GET / HTTP/1.1" 200 615 "-
172.25.254.120 - - [18/Aug/2024:17:56:57 +0800] "GET /haha HTTP/1.1" 404 11
[root@nginx ~]# cat /var/log/shanxin.org/error.log
2024/08/18 17:56:57 [error] 1169#0: *2 open() "/usr/local/nginx/html/haha" rectory), client: 172.25.254.120, server: www.shanxin.org, request: "GET /hnxin.org"
nginx中的文件检测
[root@nginx ~]# vim /usr/local/nginx/conf.d/vhost.confserver {listen 80;server_name www.shanxin.org;root /data/web/html;error_page 404 /40x.html;error_log   /var/log/shanxin.org/error.log;access_log  /var/log/shanxin.org/access.log;# 这里为文件检测配置段 ,如果没有被前面的匹配上,就会访问/error/default.html这个文件的内容,如果没有这个文件,则会报50x的错误try_files   $uri $uri.html $uri/index.html /error/default.html; # 注意:必须是defalut.html文件location = /40x.html {root /data/web/errorpage;}
}# 建立defalut.html存储路径
[root@nginx ~]# mkdir /data/web/html/error
[root@nginx ~]# echo error default > /data/web/html/error/default.html# 删除原来的默认网页文件
[root@nginx html]# rm -f /data/web/html/index.html # 访问测试,没有检测到网页文件,则会显示defalut.html文件的内容
[root@nginx html]# curl www.shanxin.org
error default
nginx中的长链接管理
[root@nginx html]# vim /usr/local/nginx/conf/nginx.conf#keepalive_timeout  0;keepalive_timeout  65 60; # 这里是链接保持时间,保持65秒,对外宣告保持60秒keepalive_requests 500; # 这里是访问请求的次数,最多500次[root@nginx html]# nginx -s reload# 下载测试工具
[root@nginx html]# dnf install telnet -y[root@nginx html]# curl -v www.shanxin.org
*   Trying 172.25.254.120:80...
* Connected to www.shanxin.org (172.25.254.120) port 80 (#0)
> GET / HTTP/1.1
> Host: www.shanxin.org
> User-Agent: curl/7.76.1
> Accept: */*
>
* Mark bundle as not supporting multiuse
< HTTP/1.1 200 OK
< Server: nginx/1.26.1
< Date: Sun, 18 Aug 2024 10:19:27 GMT
< Content-Type: text/html
< Content-Length: 16
< Last-Modified: Sun, 18 Aug 2024 10:16:53 GMT
< Connection: keep-alive
< Keep-Alive: timeout=60
< ETag: "66c1ca15-10"
< Accept-Ranges: bytes
<
www.shanxin.org
* Connection #0 to host www.shanxin.org left intact# 这里的telnet需要自己写访问报头文件
[root@nginx html]# telnet www.shanxin.org 80
Trying 172.25.254.120...
Connected to www.shanxin.org.
Escape character is '^]'.# 这部分需要自己去写
GET / HTTP/1.1
Host: www.shanxin.orgHTTP/1.1 200 OK
Server: nginx/1.26.1
Date: Sun, 18 Aug 2024 10:20:13 GMT
Content-Type: text/html
Content-Length: 16
Last-Modified: Sun, 18 Aug 2024 10:16:53 GMT
Connection: keep-alive
Keep-Alive: timeout=60 # 这里是连接的保持时间为60s,实际是65s
ETag: "66c1ca15-10"
Accept-Ranges: byteswww.shanxin.org^CConnection closed by foreign host.
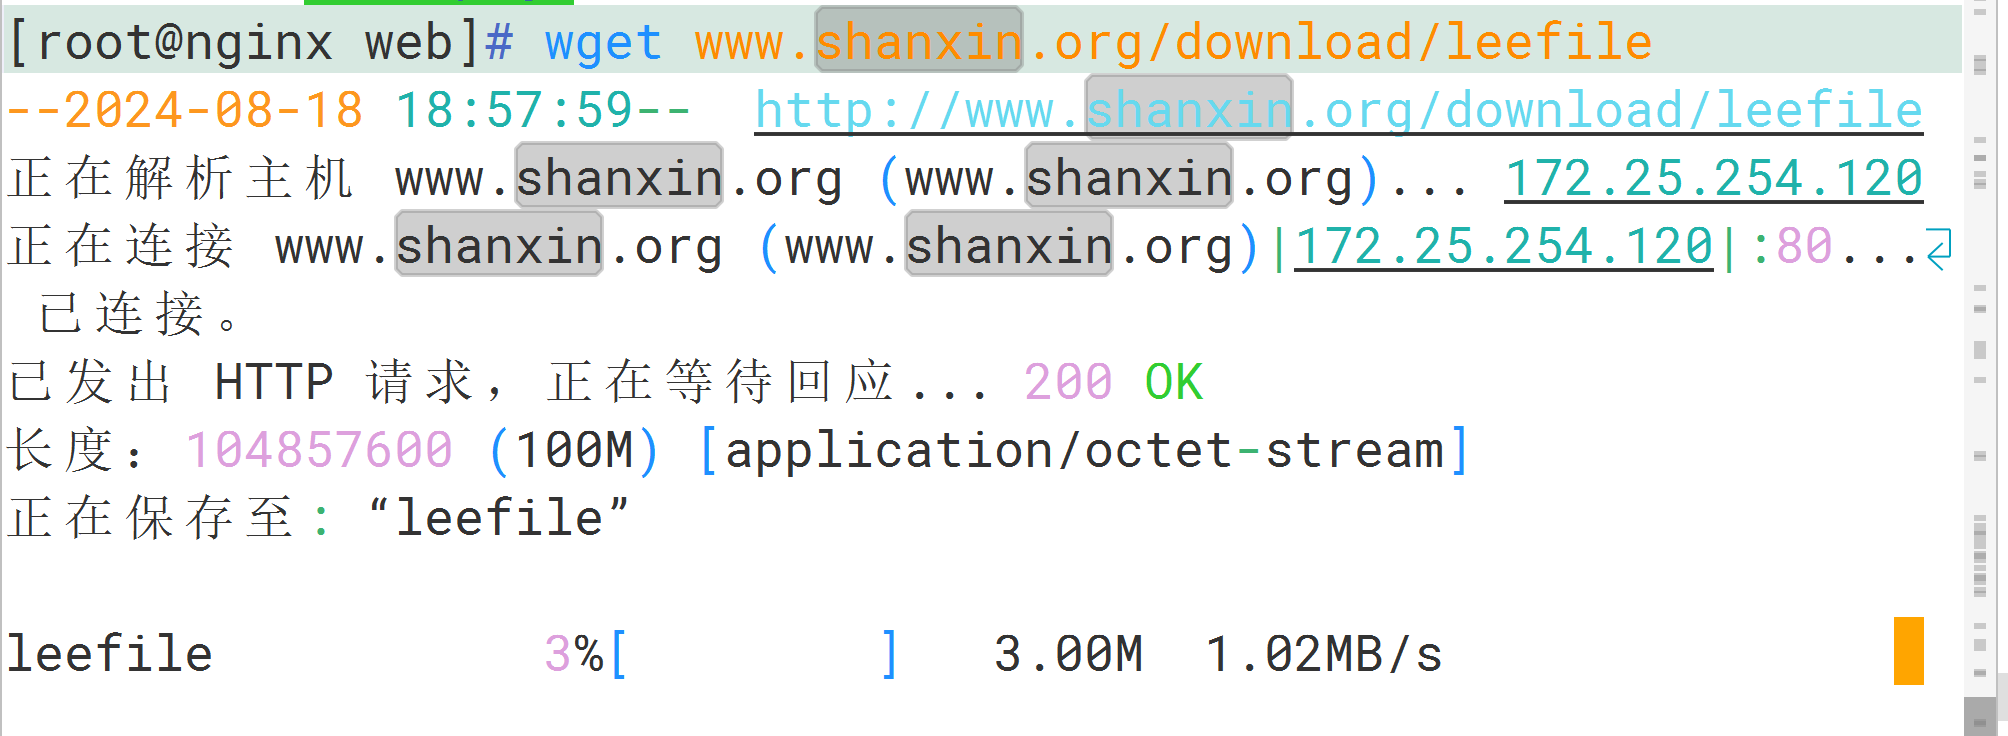
nginx下载服务器的设定以及优化
[root@nginx html]# vim /usr/local/nginx/conf.d/vhost.conf server {listen 80;server_name www.shanxin.org;root /data/web/html;error_page 404 /40x.html;error_log   /var/log/shanxin.org/error.log;access_log  /var/log/shanxin.org/access.log;try_files   $uri $uri.html $uri/index.html /error/default.html;location = /40x.html {root /data/web/errorpage;}# 这里是下载服务器的配置段location /download {root /data/web;autoindex on;	# 启动自动文件索引功能,是下载服务器的关键autoindex_localtime on; # 将格林尼治时间显示关闭,显示本地时间autoindex_exact_size off; # 将详细显示文件大小功能关闭,显示模糊大小以M为单位limit_rate 1024K; # 限制下载的速度,为1M/s}
}[root@nginx html]# nginx -s reload
浏览器访问测试

下载速度测试
nginx的状态页面
# 新建一个子配置文件
[root@nginx web]# vim /usr/local/nginx/conf.d/status.confserver {listen 80;server_name status.shanxin.org;root /data/web/html;index index.html;location /status {# 状态页面关键配置段stub_status;# 用户认证配置段auth_basic "auth login";auth_basic_user_file /usr/local/nginx/.htpasswd;# 黑白名单访问控制allow 172.25.254.1;deny all;}
}[root@nginx web]# nginx -s reload
浏览器访问测试


nginx的数据压缩功能
# 编辑主配置文件
[root@nginx ~]# vim /usr/local/nginx/conf/nginx.conf# 主要添加如下配置段gzip  on; # 开启压缩功能gzip_comp_level 5; # 压缩等级为5级gzip_min_length 1k; # 小于1k的文件不压缩gzip_http_version 1.1; # http的版本为1.1gzip_vary on; # 在报头添加已压缩的信息,建议打开gzip_types text/plain application/javascript application/x-javascript text/css application/xml text/javascript application/x-httpd-php image/gif image/png; # 需要压缩的文件类型[root@nginx ~]# nginx -s reload# 访问测试,检测是否会压缩小于1k的文件,或者会压缩大于1k的文件# 制作测试文件
[root@nginx ~]# echo hello shanxin > /data/web/html/small.html[root@nginx ~]# du -sh /usr/local/nginx/logs/access.log
20K     /usr/local/nginx/logs/access.log
[root@nginx ~]# cat /usr/local/nginx/logs/access.log > /data/web/html/big.html[root@nginx ~]# nginx -s reload[root@nginx ~]# curl --head --compressed www.shanxin.org/small.html
HTTP/1.1 200 OK
Server: nginx/1.26.1
Date: Mon, 19 Aug 2024 01:14:28 GMT
Content-Type: text/html
Content-Length: 14
Last-Modified: Mon, 19 Aug 2024 01:13:08 GMT
Connection: keep-alive
Keep-Alive: timeout=60
ETag: "66c29c24-e"
Accept-Ranges: bytes # 这里小于1k的文件,没有压缩[root@nginx ~]# curl --head --compressed www.shanxin.org/big.html
HTTP/1.1 200 OK
Server: nginx/1.26.1
Date: Mon, 19 Aug 2024 01:14:37 GMT
Content-Type: text/html
Last-Modified: Mon, 19 Aug 2024 01:13:47 GMT
Connection: keep-alive
Keep-Alive: timeout=60
Vary: Accept-Encoding
ETag: W/"66c29c4b-4b97"
Content-Encoding: gzip # 这里大于1k的文件,有压缩
nginx中的变量详解
nginx的内置参数
[root@nginx html]# vim /usr/local/nginx/conf.d/vhost.conf server {listen 80;server_name var.shanxin.org;root /data/web/html;location /var {default_type text/html;echo $remote_addr; # 访问的远程IP(客户端IP)echo $args; # url传递的所有参数echo $is_args; # 如果有参数则为?否则为空echo $document_root; # 当前请求的资源目录echo $document_uri; # 请求的uriecho $host; # 请求的host名称echo $remote_port; # 远程访问使用的端口号echo $remote_user; # 经过用户认证的用户名echo $request_method; # 请求资源的方式echo $request_filename; # 请求的资源文件的磁盘路径echo $request_uri; # 包含请求参数的原始uriecho $scheme; # 请求的协议echo $server_protocol; # 请求资源使用的协议的版本echo $server_addr; # 虚拟主机的IPecho $server_name; # 虚拟主机的主机名echo $server_port; # 虚拟主机的端口号echo $http_user_agent; # 显示使用的浏览器echo $http_cookie; # 显示所有的cookiei信息echo $cookie_key2; # 显示key2的cookie信息}
}[root@nginx html]# nginx -t
nginx: the configuration file /usr/local/nginx/conf/nginx.conf syntax is ok
nginx: configuration file /usr/local/nginx/conf/nginx.conf test is successful
[root@nginx html]# nginx -s reload# 访问测速
[root@nginx html]#  curl -b "key1=lee,key2=lee1" -u lee:lee var.shanxin.org/var?name=lee&&id=6666
172.25.254.120
name=lee
?
/data/web/html
/var
var.shanxin.org
55764
lee
GET
/data/web/html/var
/var?name=lee
http
HTTP/1.1
172.25.254.120
var.shanxin.org
80
curl/7.76.1
key1=lee,key2=lee1
lee1
nginx的自定义参数
[root@nginx html]# vim /usr/local/nginx/conf.d/vhost.confserver {listen 80;server_name var.shanxin.org;root /data/web/html;location /var {default_type text/html;set $timinglee lee;echo $timinglee;}
}[root@nginx html]# nginx -t
nginx: the configuration file /usr/local/nginx/conf/nginx.conf syntax i
nginx: configuration file /usr/local/nginx/conf/nginx.conf test is succ
[root@nginx html]# nginx -s reload
[root@nginx html]# curl var.shanxin.org/var/
lee
nginx-rewrite模块功能
if模块
[root@nginx html]# vim /usr/local/nginx/conf.d/vhost.confserver {listen 80;server_name var.shanxin.org;root /data/web/html;# if判断location /test2 {if ( !-e $request_filename ){ # 判断请求的资源文件的磁盘路径文件是否存在,如果不存在的话,会打印指定的输出内容echo "$request_filename is not exist";}}
[root@nginx html]# nginx -t
nginx: the configuration file /usr/local/nginx/conf/nginx.conf syntax i
nginx: configuration file /usr/local/nginx/conf/nginx.conf test is succ
[root@nginx html]# nginx -s reload[root@nginx html]#curl var.timinglee.org/test2/index.html
break模块
[root@nginx html]# vim /usr/local/nginx/conf.d/vhost.confserver {listen 80;server_name var.shanxin.org;root /data/web/html;# breaklocation /break {default_type text/html;set $name lee;echo $name;if ( $http_user_agent = "curl/7.76.1" ){ # 如何使用的浏览器是curl/7.76.1,则执行下面的break跳过set $id 666;这个动作break;}set $id 666;echo $id; # 这个还是会打印的,但是打印为空}[root@nginx html]# nginx -t
nginx: the configuration file /usr/local/nginx/conf/nginx.conf syntax i
nginx: configuration file /usr/local/nginx/conf/nginx.conf test is succ
[root@nginx html]# nginx -s reload[root@nginx html]#curl  var.timinglee.org/break
[root@nginx html]#curl -A "firefox"  var.timinglee.org/break
return模块
[root@nginx html]# vim /usr/local/nginx/conf.d/vhost.confserver {listen 80;server_name var.shanxin.org;root /data/web/html;#returnlocation /return {default_type text/html;if ( !-e $request_filename){ # 判断请求的资源文件的磁盘路径文件是否存在,如果不存在,报301网站重定向的错误,并且重定向到baidu网站return 301 http://www.baidu.com; }echo "$request_filename is exist";}[root@nginx html]# nginx -t
nginx: the configuration file /usr/local/nginx/conf/nginx.conf syntax i
nginx: configuration file /usr/local/nginx/conf/nginx.conf test is succ
[root@nginx html]# nginx -s reload# 访问测试
# 注意:curl无法实现重定向网站的操作,但是可以显示状态
[root@nginx-node1 conf.d]# curl -I var.timinglee.org/return
HTTP/1.1 301 Moved Permanently
Server: nginx/1.26.2
Date: Sun, 18 Aug 2024 03:01:30 GMT
Content-Type: text/html
Content-Length: 169
Connection: keep-alive
Keep-Alive: timeout=60
Location: http://www.baidu.com #网站重定向[root@nginx-node1 conf.d]# mkdir  -p /data/web/html/return
[root@nginx-node1 conf.d]# curl -I var.timinglee.org/return
HTTP/1.1 200 OK
Server: nginx/1.26.2
Date: Sun, 18 Aug 2024 03:01:58 GMT
Content-Type: text/html
Connection: keep-alive
Keep-Alive: timeout=60
Vary: Accept-Encoding # 网站正常访问
临时重定向(redirect)与永久重定向(permanent)
[root@nginx html]# vim /usr/local/nginx/conf.d/vhost.confserver {listen 80;server_name var.shanxin.org;root /data/web/html;location / {root /data/web/var;index index.html;rewrite / http://www.timinglee.com permanent; # 这个是301永久重定向#rewrite / http://www.timinglee.com redirect; # 这个是302临时重定向}# 访问测试
[root@nginx-node1 conf.d]# curl -I var.timinglee.org
HTTP/1.1 301 Moved Permanently
Server: nginx/1.26.2
Date: Sun, 18 Aug 2024 03:18:33 GMT
Content-Type: text/html
Content-Length: 169
Connection: keep-alive
Keep-Alive: timeout=60
Location: http://www.timinglee.com
break和last
[root@centos8 ~]#cat /apps/nginx/conf.d/pc.conf
server { listen 80; server_name lee.timinglee.org; root /webdata/nginx/timinglee.org/lee; location /break { root /webdata/nginx/timinglee.org/lee; rewrite ^/break/(.*) /test1/$1 break; # 这里遇到break后会结束掉rewrite,只会访问这一行的内容,最终只会访问/test1的资源文件rewrite ^/test1/(.*) /test2/$1;}location /last { root /webdata/nginx/timinglee.org/lee; rewrite ^/last/(.*) /test1/$1 last; # 这里遇到last后,还会向下跳转,执行下面的rewrite,最终访问的是/test2的资源文件rewrite ^/test1/(.*) /test2/$1;}location /test1 { default_type text/html; return 666 "new test1"; }location /test2 { root /webdata/nginx/timinglee.org/lee; } }# 测试文件的准备
[root@nginx-node1 conf.d]# mkdir  /data/web/html/{test1,test2,break,last} -p
[root@nginx-node1 conf.d]# echo test1 > /data/web/html/test1/index.html
[root@nginx-node1 conf.d]# echo test2 > /data/web/html/test2/index.html
[root@nginx-node1 conf.d]# echo last > /data/web/html/last/index.html
[root@nginx-node1 conf.d]# echo break > /data/web/html/break/index.html
nginx-rewrite的企业示例以及防盗链
企业示例(全站加密)
# 建立证书和密钥的存储路径及制作证书以及密钥
[root@nginx ~]# mkdir /usr/local/nginx/certs
[root@nginx ~]# openssl req -newkey rsa:2048 -nodes -sha256 -keyout /usr/local/nginx/certs/timinglee.org.key -x509 -days 365 -out /usr/local/nginx/certs/timinglee.org.crt# 查看证书以及密钥
[root@nginx ~]# cd /usr/local/nginx/certs/
[root@nginx certs]# ls
timinglee.org.crt  timinglee.org.key[root@nginx certs]# vim /usr/local/nginx/conf.d/vhost.conf server {listen 80;listen 443 ssl;server_name www.shanxin.org;root /data/web/html;index index.html;ssl_certificate      /usr/local/nginx/certs/timinglee.org.crt;ssl_certificate_key  /usr/local/nginx/certs/timinglee.org.key;ssl_session_cache    shared:SSL:1m;ssl_session_timeout  5m;location / {if ( $scheme = http) {rewrite / https://$host redirect;}}
}[root@nginx certs]# nginx -t
nginx: the configuration file /usr/local/nginx/conf/nginx.conf
nginx: configuration file /usr/local/nginx/conf/nginx.conf tes
[root@nginx certs]# nginx -s reload
浏览器访问测试

访问的是http,自动转到https访问
防盗链
location /images  {valid_referers none blocked server_names *.timinglee.org ~/.baidu/.;if ( $invalid_referer ){rewrite ^/   http://www.timinglee.org/daolian.png;}
}
这篇关于Nginx 超级指南:从零到英雄的旅程的文章就介绍到这儿,希望我们推荐的文章对编程师们有所帮助!


