本文主要是介绍Struts2(一)---struts2的环境搭建及实例,希望对大家解决编程问题提供一定的参考价值,需要的开发者们随着小编来一起学习吧!
刚刚接触struts2,有点懵懵懂懂,还是习惯于先写代码,然后慢慢来理解其中的思想。
这篇文章主要内容是strusts的环境搭建及通过一个简单的例子来理解到底是怎么使用struts来简化编程的。
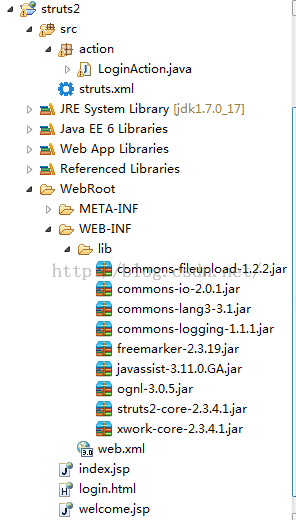
1.项目结构如下如,包括必须的包
2.web.xml
<?xml version="1.0" encoding="UTF-8"?>
<web-app version="3.0" xmlns="http://java.sun.com/xml/ns/javaee" xmlns:xsi="http://www.w3.org/2001/XMLSchema-instance" xsi:schemaLocation="http://java.sun.com/xml/ns/javaee http://java.sun.com/xml/ns/javaee/web-app_3_0.xsd"><display-name></display-name> <!-- 配置过滤器类 --><filter><filter-name>struts2</filter-name><!--  从struts-2.1.3以后,org.apache.struts2.dispatcher.FileDispatcher值被标注为过时,现在是如下写法 --><filter-class>org.apache.struts2.dispatcher.ng.filter.StrutsPrepareAndExecuteFilter</filter-class></filter><!-- 过滤器用来初始化struts2并处理所有web请求 --><filter-mapping><filter-name>struts2</filter-name><url-pattern>/*</url-pattern></filter-mapping><welcome-file-list><welcome-file>index.jsp</welcome-file></welcome-file-list>
</web-app>
3.struts.xml
<?xml version="1.0" encoding="UTF-8" ?>
<!DOCTYPE struts PUBLIC"-//Apache Software Foundation//DTD Struts Configuration 2.0//EN""http://struts.apache.org/dtds/struts-2.0.dtd"><struts><!-- struts基本配置内容 --><!-- package-name:用于区别不同的package;必须是唯一的、可用的变量名;用于其它package来继承;package-namespace:用于减少重复代码(和struts1比较);是调用action时输入路径的组成部分;package-extends:用于继承其它package以使用里面的过滤器等东东;--><package name="struts" namespace="" extends="struts-default"><!-- action-name:用于在一个package里区别不同的action;必须是唯一的、可用的变量名;是调用action时输入路径的组成部分;action-class:action所在的路径(包名+类名);action-method:action所调用的方法名; 默认执行execute,所以execute可以不写--><action name="login" class="action.LoginAction" method="execute"><result name="success">/welcome.jsp</result><result name="login">/login.html</result></action><action name="index" class="action.LoginAction" method="index"><result name="index">/login.html</result></action></package></struts>
4.LoginAction.java
package action;import com.opensymphony.xwork2.ActionSupport;
//该类继承了ActionSupport类。这样就可以直接使用SUCCESS, LOGIN等变量和重写execute等方法
public class LoginAction extends ActionSupport {private String name;private String password;public String getName() {return name;}public void setName(String name) {this.name = name;}public String getPassword() {return password;}public void setPassword(String password) {this.password = password;}/*** 在这里返回值使用自定义的* @return*/public String index(){return "index";}/*** 这里的返回值直接使用SUCCESS等变量*/public String execute(){//会自动取出页面表单中的值if("sa".equals(name)&&"aaaaaa".equals(password))return SUCCESS;return LOGIN;}}
6.login.html
<!DOCTYPE html>
<html><head><title>登录</title><meta http-equiv="keywords" content="keyword1,keyword2,keyword3"><meta http-equiv="description" content="this is my page"><meta http-equiv="content-type" content="text/html; charset=UTF-8"></head><body><!-- action为login,提交时会根据路径在struts.xml找到与其匹配的action类 --><form action="login" method="post">登录名:<input type="text" name="name"/><br/>密  码:<input type="password" name="password"/><input type="submit" value="登录"/></form></body>
</html>
7.welcome.html
<%@ page language="java" import="java.util.*" pageEncoding="ISO-8859-1"%>
<%
String path = request.getContextPath();
String basePath = request.getScheme()+"://"+request.getServerName()+":"+request.getServerPort()+path+"/";
%><!DOCTYPE HTML PUBLIC "-//W3C//DTD HTML 4.01 Transitional//EN">
<html><head><base href="<%=basePath%>"><title>welcome</title></head><body>welcome!!! <br></body>
</html>
启动tomcat后,在地址栏输入http://localhost:8080/struts2/index 即可打开login.html
输入sa和aaaaaa可打开welcome.jsp
这篇关于Struts2(一)---struts2的环境搭建及实例的文章就介绍到这儿,希望我们推荐的文章对编程师们有所帮助!