本文主要是介绍Spring中的事件讲解(Application Event),希望对大家解决编程问题提供一定的参考价值,需要的开发者们随着小编来一起学习吧!
文章目录
- 1 Spring事件
- 1.1 简介
- 1.2 Spring框架中事件
- 2 Demo示例
- 2.1 pom.xml文件
- 2.2 自定义事件
- 2.3 事件监听器
- 2.3.1 实现ApplicationListener接口
- 2.3.2 使用@EventListener注解
- 2.3.3 使用@TransactionalEventListener注解
- 2.3.3.1 定义
- 2.3.3.2 源码说明
- 2.3.3.3 使用示例
- 2.4 事件发布类
- 2.5 配置类
- 2.6 启动测试
- 2.7 含有泛型 T 的监听
- 2.7.1 问题引入
- 2.7.2 解决方法
- 2.7.3 深入分析
- 3 同步异步使用
- 3.1 同步使用
- 3.1.1 自定义事件
- 3.1.2 定义监听器
- 3.1.3 定义发布者
- 3.1.4 单测执行
- 3.2 异步使用
- 3.2.1 自定义事件
- 3.2.2 定义监听器
- 3.2.3 定义发布者
- 3.2.4 单测执行(同步)
- 3.2.5 开启异步
- 3.2.6 单测执行(异步)
1 Spring事件
1.1 简介
Spring Event(Application Event)其实就是一个观察者设计模式,一个 Bean 处理完成任务后希望通知其它 Bean 或者说一个 Bean 想观察监听另一个Bean 的行为。
当Spring的事件(Application Event)为Bean和Bean之间的消息同步提供了支持。当一个Bean处理完成一个任务之后,希望另外一个Bean知道并能做相应的处理,这时我们就需要让另外一个Bean监听当前Bean所发生的事件
Spring的事件需要遵循如下流程:
- 自定义事件,继承
ApplicationEvent - 定义事件监听器,实现
ApplicationListener - 使用容器发布事件
1.2 Spring框架中事件
Spring提供了以下5种标准的事件:
- 上下文更新事件(
ContextRefreshedEvent):
ApplicationContext被初始化或刷新时,该事件被发布。这也可以在ConfigurableApplicationContext接口中使用refresh()方法来发生。此处的初始化是指:所有的Bean被成功装载,后处理Bean被检测并激活,所有Singleton Bean被预实例化,ApplicationContext容器已就绪可用。 - 上下文开始事件(
ContextStartedEvent):
当使用ConfigurableApplicationContext(ApplicationContext子接口)接口中的start()方法启动ApplicationContext时,该事件被发布。此时可以调查的数据库,或者可以在接受到这个事件后重启任何停止的应用程序。 - 上下文停止事件(
ContextStoppedEvent):
当使用ConfigurableApplicationContext接口中的stop()停止ApplicationContext时,发布这个事件。可以在接受到这个事件后做必要的清理的工作 - 上下文关闭事件(
ContextClosedEvent):
当使用ConfigurableApplicationContext接口中的close()方法关闭ApplicationContext时,该事件被发布。一个已关闭的上下文到达生命周期末端;它不能被刷新或重启
容器被关闭时,其管理的所有单例Bean都被销毁。 - 请求处理事件(
RequestHandledEvent):
在Web应用中,当一个http请求(request)结束触发该事件。
这是一个web-specific事件,告诉所有bean HTTP请求已经被服务。只能应用于使用DispatcherServlet的Web应用。在使用Spring作为前端的MVC控制器时,当Spring处理用户请求结束后,系统会自动触发该事件
如果一个bean实现了ApplicationListener接口,当一个ApplicationEvent被发布以后,bean会自动被通知
2 Demo示例
2.1 pom.xml文件
<?xml version="1.0" encoding="UTF-8"?>
<project xmlns="http://maven.apache.org/POM/4.0.0"xmlns:xsi="http://www.w3.org/2001/XMLSchema-instance"xsi:schemaLocation="http://maven.apache.org/POM/4.0.0 http://maven.apache.org/xsd/maven-4.0.0.xsd"><modelVersion>4.0.0</modelVersion><groupId>cn.jzh</groupId><artifactId>TestDemo</artifactId><version>1.0-SNAPSHOT</version><dependencies><dependency><groupId>org.springframework</groupId><artifactId>spring-context</artifactId><version>5.2.9.RELEASE</version><scope>compile</scope></dependency></dependencies>
</project>
2.2 自定义事件
package cn.jzh.event;import org.springframework.context.ApplicationEvent;/*** 自定义的spring事件*/public class DemoEvent extends ApplicationEvent {private String msg;public DemoEvent(Object source,String msg) {super(source);this.msg = msg;}public String getMsg() {return msg;}public void setMsg(String msg) {this.msg = msg;}
}
2.3 事件监听器
监听器有三种实现方式:实现ApplicationListener接口,使用@EventListener注解,使用@TransactionalEventListener注解
2.3.1 实现ApplicationListener接口
新建一个类实现 ApplicationListener 接口,并且重写 onApplicationEvent 方法注入到Spring容器中,交给Spring管理如下代码新建了一个发送短信监听器,收到事件后执行业务操作
package cn.jzh.event;import org.springframework.context.ApplicationListener;
import org.springframework.stereotype.Component;/*** 监听事件的实现类*/
@Component
public class DemoListener implements ApplicationListener<DemoEvent> {//实现ApplicationListener接口,并指定监听的事件类型@Overridepublic void onApplicationEvent(DemoEvent event) {//使用onApplicationEvent方法对消息进行接受处理String msg = event.getMsg();System.out.println("DemoListener获取到了监听消息:"+msg);}
}
2.3.2 使用@EventListener注解
使用 @EventListener 标注处理事件的方法,此时 Spring将创建一个ApplicationListener bean对象,使用给定的方法处理事件,参数可以指定的事件 这里巧妙的用到了@AliasFor的能力,放到了@EventListener身上
注意:一般建议都需要指定此值,否则默认可以处理所有类型的事件,范围太广了
源码如下:
@Target({ElementType.METHOD, ElementType.ANNOTATION_TYPE})
@Retention(RetentionPolicy.RUNTIME)
@Documented
public @interface EventListener {@AliasFor("classes")Class<?>[] value() default {};@AliasFor("value")Class<?>[] classes() default {};String condition() default "";String id() default "";
}
使用示例:
@Component
public class DemoListener {@EventListener({ DemoEvent.class })public void sendMsg(DemoEvent event) {String msg = event.getMsg();System.out.println("DemoListener获取到了监听消息:"+msg);}
}
2.3.3 使用@TransactionalEventListener注解
2.3.3.1 定义
使用@TransactionalEventListener注解来定义一个监听器
@EventListener 和 @TransactionalEventListener 都是 Spring Framework 提供的注解,用于处理应用程序事件。它们的主要区别在于它们处理事件的时间和事务的关联性。
@EventListener:这个注解可以应用于任何方法,使得该方法成为一个事件监听器。当一个事件被发布时,所有标记为@EventListener的方法都会被调用,无论当前是否存在一个活动的事务。这意味着@EventListener注解的方法可能在事务提交之前或之后被调用。@TransactionalEventListener:这个注解是@EventListener的一个特化版本,它允许更精细地控制事件监听器在事务处理过程中的执行时机。@TransactionalEventListener默认在当前事务提交后才处理事件(TransactionPhase.AFTER_COMMIT),这可以确保事件处理器只在事务成功提交后才被调用。也可以通过phase属性来改变事件处理的时机,例如在事务开始前、事务提交前、事务提交后或者事务回滚
注意:此注解需要spring-tx的依赖;
2.3.3.2 源码说明
注解源码如下:主要是看一下注释内容。
在这个注解上面有一个注解:@EventListener,所以表明其实这个注解也是个事件监听器。
@Target({ElementType.METHOD, ElementType.ANNOTATION_TYPE})
@Retention(RetentionPolicy.RUNTIME)
@Documented
@EventListener
public @interface TransactionalEventListener {这个注解取值有:BEFORE_COMMIT(指定目标方法在事务commit之前执行)AFTER_COMMIT(指定目标方法在事务commit之后执行)、AFTER_ROLLBACK(指定目标方法在事务rollback之后执行)AFTER_COMPLETION(指定目标方法在事务完成时执行,这里的完成是指无论事务是成功提交还是事务回滚了)各个值都代表什么意思表达什么功能,非常清晰需要注意的是:AFTER_COMMIT + AFTER_COMPLETION是可以同时生效的AFTER_ROLLBACK + AFTER_COMPLETION是可以同时生效的TransactionPhase phase() default TransactionPhase.AFTER_COMMIT;表明若没有事务的时候,对应的event是否需要执行,默认值为false表示,没事务就不执行了。boolean fallbackExecution() default false;这里巧妙的用到了@AliasFor的能力,放到了@EventListener身上注意:一般建议都需要指定此值,否则默认可以处理所有类型的事件,范围太广了。@AliasFor(annotation = EventListener.class, attribute = "classes")Class<?>[] value() default {};@AliasFor(annotation = EventListener.class, attribute = "classes")Class<?>[] classes() default {};@AliasFor(annotation = EventListener.class, attribute = "condition")String condition() default "";@AliasFor(annotation = EventListener.class, attribute = "id")String id() default "";
}
2.3.3.3 使用示例
使用方式如下。phase事务类型,value指定事件。
@Component
public class DemoListener {@TransactionalEventListener(phase = TransactionPhase.AFTER_COMMIT,value = { DemoEvent.class })public void messageListener(DemoEvent event) {String msg = event.getMsg();System.out.println("DemoListener获取到了监听消息:"+msg);}
}
2.4 事件发布类
package cn.jzh.event;import org.springframework.beans.factory.annotation.Autowired;
import org.springframework.context.ApplicationContext;
import org.springframework.stereotype.Component;/*** 发布事件*/
@Component
public class DemoPublisher  {@Autowiredprivate ApplicationContext applicationContext;//注入ApplicationContext用来发布事件public void publish(String msg){applicationContext.publishEvent(new DemoEvent(this,msg));//使用ApplicationContext对象的publishEvent发布事件}
}
2.5 配置类
配置类中没有具体的代码逻辑注意作用是为了能扫描到相应的使用注解的类
package cn.jzh.event;import org.springframework.context.annotation.ComponentScan;
import org.springframework.context.annotation.Configuration;
import org.springframework.stereotype.Component;@Configuration
@ComponentScan("cn.jzh.event")
public class EventConfig {}
2.6 启动测试
package cn.jzh.event;import org.springframework.context.annotation.AnnotationConfigApplicationContext;public class App {public static void main(String[] args) {//使用AnnotationConfigApplicationContext读取配置EventConfig类,EventConfig类读取了使用注解的地方AnnotationConfigApplicationContext context = new AnnotationConfigApplicationContext(EventConfig.class);DemoPublisher publish = context.getBean(DemoPublisher.class);publish.publish("你好");context.close();}
}
2.7 含有泛型 T 的监听
2.7.1 问题引入
假如监听类里面有泛型 <T>,类似下面
监听事件类中有泛型 <T>
@Data
class BaseEvent<T> {private T data;private String addOrUpdate;public BaseEvent(T data, String addOrUpdate) {this.data = data;this.addOrUpdate = addOrUpdate;}
}
对应的监听泛类
@slf4j
@Component
public class EventListenerService {@EventListenerpublic void handleEvent(BaseEvent<?> baseEvent) {Object data = baseEvent.getData();if (data instanceof Order){log.info("监听到order开始做数据加工={}",baseEvent);}else if (data instanceof Person){log.info("监听到person开始做数据加工={}",baseEvent);}}
}
启动服务,跑一把,发起调用之后你会发现控制台正常输出但是监听这一坨代码我感觉不爽,全部都写在一个方法里面了,需要用非常多的 if 分支去做判断。而且,假设某些对象在同步之前,还有一些个性化的加工需求,那么都会体现在这一坨代码中,不够优雅。
怎么办呢?
很简单,拆开监听:
@slf4j
@Component
public class EventListenerService {@EventListenerpublic void handlePersonEvent(BaseEvent<Person> baseEvent) {log.info("监听到person开始做数据加工={}",baseEvent);}@EventListenerpublic void handleOrderEvent(BaseEvent<Order> baseEvent) {log.info("监听到order开始做数据加工={}",baseEvent);}
}
但是这样不能监听到,其主要原因是泛型擦除导致的
点击了解 Java中泛型擦除
2.7.2 解决方法
监听事件类中有泛型 <T>的话,实现接口ResolvableTypeProvider即可解决问题
@Data
class BaseEvent<T> implements ResolvableTypeProvider {private T data;private String addOrUpdate;public BaseEvent(T data, String addOrUpdate) {this.data = data;this.addOrUpdate = addOrUpdate;}@Overridepublic ResolvableType getResolvableType() {return ResolvableType.forClassWithGenerics(getClass(), ResolvableType.forInstance(getData()));}
}
2.7.3 深入分析
因为我们已知是 ResolvableTypeProvider 这个接口在搞事情,所以我只需要看看这个接口在代码中被使用的地方有哪些:

除去一些注释和包导入的地方,整个项目中只有 ResolvableType 和 MultipartHttpMessageWriter 这个两个中用到了。直觉告诉我,应该是在 ResolvableType 用到的地方打断点
所以直接在这里打上断点,然后发起调用,程序果然就停在了断点处:
org.springframework.core.ResolvableType#forInstance

我们观察一下,发现这几行代码核心就干一个事儿:判断 instance 是不是 ResolvableTypeProvider 的子类。
如果是则返回一个 type,如果不是则返回 forClass(instance.getClass())。
通过 Debug 我们发现 instance 是 BaseEvent:

巧了,这就是 ResolvableTypeProvider 的子类,所以返回的 type 是这样式儿的:
com.example.elasticjobtest.BaseEvent<com.example.elasticjobtest.Person>

是带具体的类型的,而这个类型就是通过 getResolvableType 方法拿到的。
前面在实现 ResolvableTypeProvider 的时候,就重写了 getResolvableType 方法,调用了 ResolvableType.forClassWithGenerics,然后用 data 对应的真正的 T 对象实例的类型,作为返回值,这样泛型对应的真正的对象类型,就在运行期被动态的获取到了,从而解决了编译阶段泛型擦除的问题。
如果没有实现 ResolvableTypeProvider 接口,那么这个方法返回的就是 BaseEvent<?>:
com.example.elasticjobtest.BaseEvent<?>
都已经拿到具体的泛型对象了,后面再发起对应的事件监听,那不是顺理成章的事情吗?
好,现在你在第一个断点处就收获到了一个这么关键的信息,接下来怎么办呢?
接着断点处往下调试,然后把整个链路都梳理清楚呗。
再往下走,你会来到这个地方:
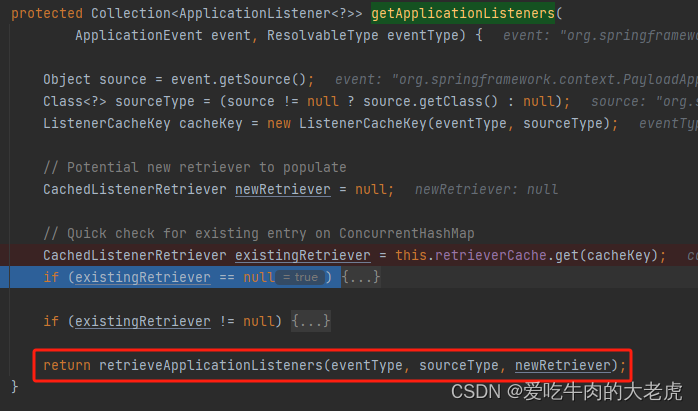
org.springframework.context.event.AbstractApplicationEventMulticaster#getApplicationListeners

从 cache 里面获取到了一个 null。
因为这个缓存里面放的就是在项目启动过程中已经触发过的框架自带的 listener 对象:

调用的时候,如果能从缓存中拿到对应的 listener,则直接返回。而我们 Demo 中的自定义 listener 是第一次触发,所以肯定是没有的。
因此关键逻辑就这个方法的最后一行:retrieveApplicationListeners 方法里面
org.springframework.context.event.AbstractApplicationEventMulticaster#retrieveApplicationListeners

3 同步异步使用
3.1 同步使用
3.1.1 自定义事件
定义事件,继承 ApplicationEvent 的类成为一个事件类
@ToString
public class OrderProductEvent extends ApplicationEvent {/** 该类型事件携带的信息 */private String orderId;public OrderProductEvent(Object source, String orderId) {super(source);this.orderId = orderId;}public String getOrderId () {return orderId;}public void setOrderId (String orderId) {this.orderId= orderId ;}
}
3.1.2 定义监听器
监听并处理事件,实现 ApplicationListener 接口或者使用 @EventListener 注解
@Slf4j
@Component
public class OrderProductListener implements ApplicationListener<OrderProductEvent> {/** 使用 onApplicationEvent 方法对消息进行接收处理 */@SneakyThrows@Overridepublic void onApplicationEvent(OrderProductEvent event) {String orderId = event.getOrderId();long start = System.currentTimeMillis();Thread.sleep(2000);long end = System.currentTimeMillis();log.info("{}:校验订单商品价格耗时:({})毫秒", orderId, (end - start));}
}
3.1.3 定义发布者
发布事件,通过 ApplicationEventPublisher 发布事件;
@Slf4j
@Service
@RequiredArgsConstructor
public class OrderService {/** 注入ApplicationContext用来发布事件 */private final ApplicationContext applicationContext;/*** 下单** @param orderId 订单ID*/public String buyOrder(String orderId) {long start = System.currentTimeMillis();// 1.查询订单详情// 2.检验订单价格 (同步处理)applicationContext.publishEvent(new OrderProductEvent(this, orderId));// 3.短信通知(异步处理)long end = System.currentTimeMillis();log.info("任务全部完成,总耗时:({})毫秒", end - start);return "购买成功";}
}
3.1.4 单测执行
@SpringBootTest
public class OrderServiceTest {@Autowired private OrderService orderService;@Testpublic void buyOrderTest() {orderService.buyOrder("732171109");}
}
执行结果如下:2022-04-24 10:13:17.535  INFO 44272 --- [           main] c.c.m.e.listener.OrderProductListener    : 732171109:校验订单商品价格耗时:(2008)毫秒
2022-04-24 10:13:17.536  INFO 44272 --- [           main] c.c.mingyue.event.service.OrderService   : 任务全部完成,总耗时:(2009)毫秒
3.2 异步使用
有些业务场景不需要在一次请求中同步完成,比如邮件发送、短信发送等。
3.2.1 自定义事件
自定义事件,此时可以继承 ApplicationEvent,也可以不继承
@Data
@AllArgsConstructor
public class MsgEvent {/** 该类型事件携带的信息 */public String orderId;
}
3.2.2 定义监听器
此处使用 @EventListener 注解
@Slf4j
@Component
public class MsgListener {@SneakyThrows@EventListener(MsgEvent.class)public void sendMsg(MsgEvent event) {String orderId = event.getOrderId();long start = System.currentTimeMillis();log.info("开发发送短信");log.info("开发发送邮件");Thread.sleep(4000);long end = System.currentTimeMillis();log.info("{}:发送短信、邮件耗时:({})毫秒", orderId, (end - start));}
}
3.2.3 定义发布者
public String buyOrder(String orderId) {long start = System.currentTimeMillis();// 1.查询订单详情// 2.检验订单价格 (同步处理)applicationContext.publishEvent(new OrderProductEvent(this, orderId));// 3.短信通知(异步处理)applicationContext.publishEvent(new MsgEvent(orderId));long end = System.currentTimeMillis();log.info("任务全部完成,总耗时:({})毫秒", end - start);return "购买成功";
}
3.2.4 单测执行(同步)
@Test
public void buyOrderTest() {orderService.buyOrder("732171109");
}
执行结果如下:2022-04-24 10:24:13.905  INFO 54848 --- [           main] c.c.m.e.listener.OrderProductListener    : 732171109:校验订单商品价格耗时:(2004)毫秒
2022-04-24 10:24:13.906  INFO 54848 --- [           main] c.c.mingyue.event.listener.MsgListener   : 开发发送短信
2022-04-24 10:24:13.907  INFO 54848 --- [           main] c.c.mingyue.event.listener.MsgListener   : 开发发送邮件
2022-04-24 10:24:17.908  INFO 54848 --- [           main] c.c.mingyue.event.listener.MsgListener   : 732171109:发送短信、邮件耗时:(4002)毫秒
2022-04-24 10:24:17.908  INFO 54848 --- [           main] c.c.mingyue.event.service.OrderService   : 任务全部完成,总耗时:(6008)毫秒
3.2.5 开启异步
点击了解 Spring之异步任务@Async详解分析
启动类增加 @EnableAsync 注解
@EnableAsync
@SpringBootApplication
public class MingYueSpringbootEventApplication {public static void main(String[] args) {SpringApplication.run(MingYueSpringbootEventApplication.class, args);}
}
Listener 类需要开启异步的方法增加 @Async 注解
@Async
@SneakyThrows
@EventListener(MsgEvent.class)
public void sendMsg(MsgEvent event) {String orderId = event.getOrderId();long start = System.currentTimeMillis();log.info("开发发送短信");log.info("开发发送邮件");Thread.sleep(4000);long end = System.currentTimeMillis();log.info("{}:发送短信、邮件耗时:({})毫秒", orderId, (end - start));
}
3.2.6 单测执行(异步)
测试异步时,最好启动服务,而不是用测试类
发送短信的线程显示 task-1,主线程结束后(总耗时:(2017)毫秒)控制台停止打印了
2022-04-24 10:30:59.002  INFO 59448 --- [           main] c.c.m.e.listener.OrderProductListener    : 732171109:校验订单商品价格耗时:(2009)毫秒
2022-04-24 10:30:59.009  INFO 59448 --- [           main] c.c.mingyue.event.service.OrderService   : 任务全部完成,总耗时:(2017)毫秒
2022-04-24 10:30:59.028  INFO 59448 --- [         task-1] c.c.mingyue.event.listener.MsgListener   : 开发发送短信
2022-04-24 10:30:59.028  INFO 59448 --- [         task-1] c.c.mingyue.event.listener.MsgListener   : 开发发送邮件
这篇关于Spring中的事件讲解(Application Event)的文章就介绍到这儿,希望我们推荐的文章对编程师们有所帮助!


