本文主要是介绍人工智能--搭建人工神经网络,希望对大家解决编程问题提供一定的参考价值,需要的开发者们随着小编来一起学习吧!

欢迎来到 Papicatch的博客

文章目录
🍉引言
🍉神经元与感知器
🍈神经元(Neuron)
🍈感知器
🍉损失函数与梯度下降算法
🍈损失函数
🍈梯度下降算法
🍉多层感知器与神经网络
🍈多层感知器(MLP)
🍈激活函数
🍈反向传播算法
🍉实例
🍈手工搭建神经网络
🍉总结

🍉引言
人工神经网络(Artificial Neural Networks, ANN)是一种受生物神经系统启发的计算模型,能够学习和执行复杂的非线性映射任务。本文将深入探讨神经元、感知器、损失函数、梯度下降算法、多层感知器(MLP)、激活函数、反向传播算法,并通过实例展示如何手工搭建一个神经网络。
🍉神经元与感知器
🍈神经元(Neuron)
神经元是神经网络的基本单元,模仿生物神经元的结构和功能。它接收来自其他神经元或外部输入的信号,通过加权求和和激活函数转换后输出结果。
一个简单的神经元模型如下:

其中,𝑥𝑖xi 是输入信号,𝑤𝑖wi 是对应的权重,𝑏b 是偏置项,𝜎σ 是激活函数,如 sigmoid、ReLU 等。
🍈感知器
感知器模型结构:

🍈感知器实现and函数
逻辑运算and的真值表
| x1 | x2 | y(and运行结果) |
|---|---|---|
| 0(假) | 0(假) | 0(假) |
| 0(假) | 1(真) | 0(假) |
| 1(真) | 0(假) | 0(假) |
| 1(真) | 1(真) | 1(真) |
🍈代码实现
# 定义AND运算的函数
def AND(a, b):return a & b# 真值表的输入组合
inputs = [(0, 0),(0, 1),(1, 0),(1, 1)
]# 打印真值表
print("A | B | A AND B")
print("---|---|-------")
for a, b in inputs:result = AND(a, b)print(f" {a} | {b} |   {result}")

感知器(Perceptron)是最简单的神经网络形式,包含一个单层神经元,直接将输入映射到输出,通常用于二分类问题。
🍉损失函数与梯度下降算法
🍈损失函数
损失函数(Loss Function)衡量神经网络预测值与实际标签之间的差异。
常见的损失函数包括:
- 均方误差(Mean Squared Error, MSE):适用于回归问题。
- 交叉熵损失函数(Cross-Entropy Loss):适用于分类问题。
🍈梯度下降算法
梯度下降算法通过最小化损失函数来优化神经网络的参数。核心思想是沿着损失函数梯度的反方向更新权重和偏置,从而逐步改进模型的预测能力。
具体步骤如下:
- 计算损失函数的梯度:使用反向传播算法计算每个参数对损失函数的影响。
- 更新权重和偏置:通过学习率(learning rate)控制更新步长,减小损失函数值。

🍉多层感知器与神经网络
异或(XOR)问题是经典的逻辑运算问题,感知器不能拟合出一条直线将结果分开。要将二者分开,必须采用封闭式的曲线才行。多层感知器可以实现。
异或(XOR)真值表
| A | 𝐵B | 𝐴 XOR 𝐵A XOR B |
|---|---|---|
| 0 | 0 | 0 |
| 0 | 1 | 1 |
| 1 | 0 | 1 |
| 1 | 1 | 0 |
import numpy as np
import matplotlib.pyplot as plt# 定义激活函数(sigmoid)及其导数
def sigmoid(x):return 1 / (1 + np.exp(-x))def sigmoid_derivative(x):return x * (1 - x)# 输入数据和目标输出
inputs = np.array([[0, 0],[0, 1],[1, 0],[1, 1]])expected_output = np.array([[0],[1],[1],[0]])# 初始化参数
input_layer_neurons = inputs.shape[1]
hidden_layer_neurons = 2
output_neurons = 1# 初始化权重和偏置
hidden_weights = np.random.uniform(size=(input_layer_neurons, hidden_layer_neurons))
hidden_bias = np.random.uniform(size=(1, hidden_layer_neurons))
output_weights = np.random.uniform(size=(hidden_layer_neurons, output_neurons))
output_bias = np.random.uniform(size=(1, output_neurons))# 设置学习率和迭代次数
learning_rate = 0.1
epochs = 10000
error_history = []# 训练神经网络
for epoch in range(epochs):# 前向传播hidden_layer_activation = np.dot(inputs, hidden_weights)hidden_layer_activation += hidden_biashidden_layer_output = sigmoid(hidden_layer_activation)output_layer_activation = np.dot(hidden_layer_output, output_weights)output_layer_activation += output_biaspredicted_output = sigmoid(output_layer_activation)# 计算误差error = expected_output - predicted_outputerror_history.append(np.mean(np.abs(error)))d_predicted_output = error * sigmoid_derivative(predicted_output)# 反向传播error_hidden_layer = d_predicted_output.dot(output_weights.T)d_hidden_layer = error_hidden_layer * sigmoid_derivative(hidden_layer_output)# 更新权重和偏置output_weights += hidden_layer_output.T.dot(d_predicted_output) * learning_rateoutput_bias += np.sum(d_predicted_output, axis=0, keepdims=True) * learning_ratehidden_weights += inputs.T.dot(d_hidden_layer) * learning_ratehidden_bias += np.sum(d_hidden_layer, axis=0, keepdims=True) * learning_rate# 打印结果
print("Final hidden weights: ", hidden_weights)
print("Final hidden bias: ", hidden_bias)
print("Final output weights: ", output_weights)
print("Final output bias: ", output_bias)
print("Predicted output: ", predicted_output)# 绘制误差下降图
plt.plot(error_history)
plt.title('Error History')
plt.xlabel('Epoch')
plt.ylabel('Error')
plt.show()# 绘制神经网络预测结果图
def plot_decision_boundary(X, y, model, title):x_min, x_max = X[:, 0].min() - 1, X[:, 0].max() + 1y_min, y_max = X[:, 1].min() - 1, X[:, 1].max() + 1xx, yy = np.meshgrid(np.arange(x_min, x_max, 0.1),np.arange(y_min, y_max, 0.1))Z = model(np.c_[xx.ravel(), yy.ravel()])Z = Z.reshape(xx.shape)plt.contourf(xx, yy, Z, alpha=0.8)plt.scatter(X[:, 0], X[:, 1], c=y.flatten(), s=40, edgecolor='k')plt.title(title)plt.show()# 定义预测函数
def predict(X):hidden_layer_activation = np.dot(X, hidden_weights) + hidden_biashidden_layer_output = sigmoid(hidden_layer_activation)output_layer_activation = np.dot(hidden_layer_output, output_weights) + output_biaspredicted_output = sigmoid(output_layer_activation)return np.round(predicted_output)# 绘制决策边界
plot_decision_boundary(inputs, expected_output, predict, 'XOR Decision Boundary')


🍈多层感知器(MLP)
多层感知器(MLP)是一种前向结构的神经网络,由多个全连接隐藏层和至少一个输出层组成。
每个神经元在每层中执行以下步骤:
- 线性变换:计算加权输入的和。
- 非线性变换(激活函数):通过激活函数如 sigmoid、ReLU 将结果映射到非线性空间。
🍈激活函数
激活函数是神经网络中每个神经元的非线性映射函数,常见的有:
Sigmoid 函数:将输入值压缩到0到1之间。

ReLU 函数:对于正数输入,返回输入值本身;对于负数输入,返回0。

🍈反向传播算法

反向传播算法是训练神经网络的核心技术,通过链式法则计算损失函数相对于每个参数的梯度,并将梯度传播回网络以更新权重和偏置。
🍉实例

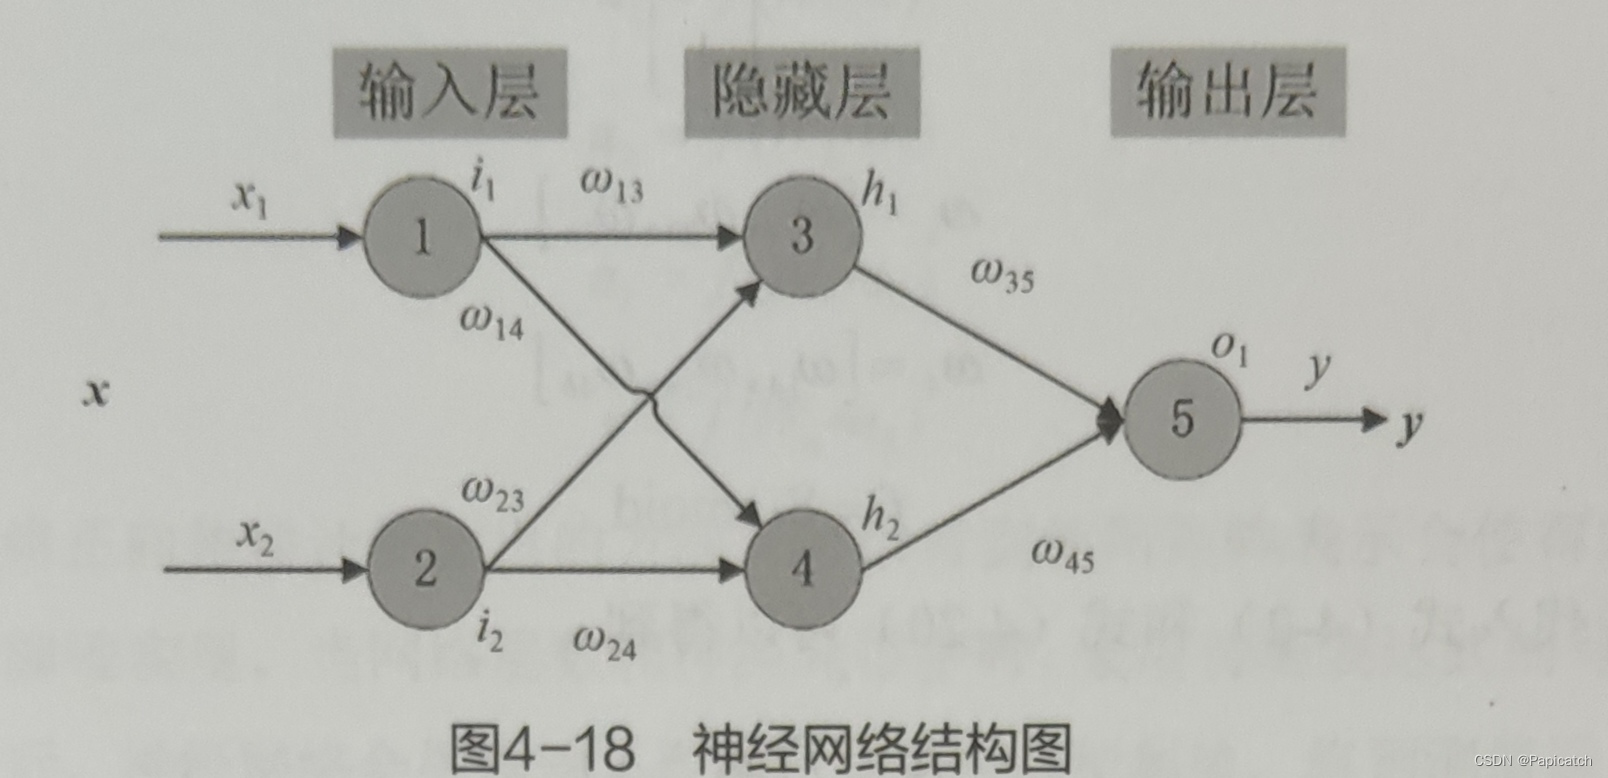
三层神经网络结构
🍈手工搭建神经网络
以下是一个简单的 Python 示例代码,演示如何手工实现一个包含单隐藏层的多层感知器,并训练它解决 XOR 问题。
import numpy as npclass NeuralNetwork:def __init__(self, input_size, hidden_size, output_size):self.weights1 = np.random.randn(input_size, hidden_size)self.bias1 = np.zeros((1, hidden_size))self.weights2 = np.random.randn(hidden_size, output_size)self.bias2 = np.zeros((1, output_size))def sigmoid(self, x):return 1 / (1 + np.exp(-x))def sigmoid_derivative(self, x):return x * (1 - x)def forward_pass(self, X):self.hidden_layer_input = np.dot(X, self.weights1) + self.bias1self.hidden_layer_output = self.sigmoid(self.hidden_layer_input)self.output_layer_input = np.dot(self.hidden_layer_output, self.weights2) + self.bias2self.output = self.sigmoid(self.output_layer_input)return self.outputdef backward_pass(self, X, y, output):self.output_error = y - outputself.output_delta = self.output_error * self.sigmoid_derivative(output)self.hidden_layer_error = np.dot(self.output_delta, self.weights2.T)self.hidden_layer_delta = self.hidden_layer_error * self.sigmoid_derivative(self.hidden_layer_output)self.weights2 += np.dot(self.hidden_layer_output.T, self.output_delta)self.bias2 += np.sum(self.output_delta, axis=0, keepdims=True)self.weights1 += np.dot(X.T, self.hidden_layer_delta)self.bias1 += np.sum(self.hidden_layer_delta, axis=0, keepdims=True)def train(self, X, y, epochs):for epoch in range(epochs):output = self.forward_pass(X)self.backward_pass(X, y, output)if epoch % 1000 == 0:print(f'Epoch {epoch}, Loss: {np.mean(np.square(y - output))}')if __name__ == "__main__":input_size = 2hidden_size = 3output_size = 1nn = NeuralNetwork(input_size, hidden_size, output_size)X = np.array([[0, 0], [0, 1], [1, 0], [1, 1]])y = np.array([[0], [1], [1], [0]])nn.train(X, y, epochs=10000)print('Final predictions:')print(nn.forward_pass(X))

🍉总结
本文详细讲解了人工神经网络的核心组成部分和关键技术。从神经元、感知器到多层感知器的演进,再到损失函数、梯度下降算法和反向传播算法的实际应用,读者可以全面理解神经网络的工作原理及其在实际问题中的应用。通过手工搭建神经网络的示例,读者不仅能够加深对神经网络内部运作的理解,还能够通过修改和扩展代码来探索更复杂的神经网络结构和任务。神经网络作为深度学习的基础,对于理解和实践现代机器学习技术具有重要意义。

希望能给大家提供一些帮助!!!

这篇关于人工智能--搭建人工神经网络的文章就介绍到这儿,希望我们推荐的文章对编程师们有所帮助!


