本文主要是介绍基于VLC实现RTSP推流视频,希望对大家解决编程问题提供一定的参考价值,需要的开发者们随着小编来一起学习吧!
基于VLC实现RTSP推流视频
- 一、添加VLC头文件和库文件
- 二、封装RTSPServer推流类
- 三、测试代码
不清楚推流大概原理的小伙伴,参考《设置VLC播放器进行RTSP推流视频》
这里以VLC 2.2.4版本为例,我们下载VLC播放器,其中带有VLC的SDK,下载地址:
http://download.videolan.org/vlc/2.2.4/win64/vlc-2.2.4-win64.7z
一、添加VLC头文件和库文件
我们创建一个测试工程RSTPVideo,在pro文件中添加如下内容:
win32 {
# VLC相关库
LIBS += -L$$PWD/../VLC/lib -llibvlc -llibvlccore# VLC头文件目录
INCLUDEPATH += $$PWD/../VLC/include
}
二、封装RTSPServer推流类
封装一个RSTPServer类,实现推流视频的主要逻辑代码。
RTSPServer.h
#ifndef RTSPSERVER_H
#define RTSPSERVER_H#include <QString>
#include <vlc/vlc.h>class RTSPServer
{
public:RTSPServer();~RTSPServer();// 使用VLC实现RTSP推流。将视频文件转码后,推流到指定ip的端口上,协议一般为udp。// 在VLC播放器中输入rtsp://xx.xx.xx.xx:端口/,即可播放推流的视频// 推流到本地时,如rtsp://127.0.0.1:8554/,即可播放推流的视频bool pushVideo(const QString& ip, int port, const QString& filePath);private:libvlc_instance_t *instance;
};#endif // RTSPSERVER_H
RTSPServer.cpp
#include "RTSPServer.h"
#include <QDir>#define VIDEO_MEDIA_NAME        "Video"RTSPServer::RTSPServer()
{// 创建VLC实例instance = libvlc_new (0, nullptr);
}RTSPServer::~RTSPServer()
{// 停止推流libvlc_vlm_stop_media(instance, VIDEO_MEDIA_NAME);// 释放VLC实例libvlc_vlm_release(instance);instance = nullptr;
}bool RTSPServer::pushVideo(const QString &ip, int port, const QString &filePath)
{// 转码参数:#transcode{vcodec=h264,acodec=mpga,ab=128,channels=2,samplerate=44100,scodec=none}QString convertPara = "#transcode{vcodec=h264,acodec=mpga,ab=128,channels=2,samplerate=44100,scodec=none}";// 网络参数:rtp{sdp=rtsp://xx.xx.xx.xx:yyyy/}// 表示本机ip时,可省略ip,只写端口,如rtp{sdp=rtsp://:8554/}QString netPara = "rtp{sdp=rtsp://" + ip + ":" + QString::number(port) + "/}";// 如sout = "#transcode{vcodec=h264,acodec=mpga,ab=128,channels=2,samplerate=44100,scodec=none}:rtp{sdp=rtsp://127.0.0.1:8554/}"QString sout = convertPara + ":" + netPara;// 将推流视频路径转换为本地系统风格,win下"a\\b\\c",linux下"a/b/c"QString path = QDir::toNativeSeparators(filePath);// 添加名为VIDEO_MEDIA_NAME的广播int ret = libvlc_vlm_add_broadcast(instance, VIDEO_MEDIA_NAME,path.toStdString().c_str(),sout.toStdString().c_str(),0, nullptr, true, false);if (ret != 0){return false;}// 播放该广播ret = libvlc_vlm_play_media(instance, VIDEO_MEDIA_NAME);return (ret == 0);
}
三、测试代码
mainwindow.h
#ifndef MAINWINDOW_H
#define MAINWINDOW_H#include <QMainWindow>
#include "RTSPServer.h"namespace Ui {
class MainWindow;
}class MainWindow : public QMainWindow
{Q_OBJECTpublic:explicit MainWindow(QWidget *parent = nullptr);~MainWindow();private slots:void on_pushButton_clicked();private:Ui::MainWindow *ui;RTSPServer rtspServer;
};#endif // MAINWINDOW_H
mainwindow.cpp
void MainWindow::on_pushButton_clicked()
{bool ret = rtspServer.pushVideo("127.0.0.1", 8554, qApp->applicationDirPath() + "/video.mp4");if (ret){QMessageBox::information(nullptr, "Info", "Push streaming video successfully");}else{QMessageBox::information(nullptr, "Info", "Failed to push streaming video");}ui->pushButton->setEnabled(false);
}
代码非常简单,将程序所在目录下的video.mp4视频文件,推流到127.0.0.1,8554端口上。
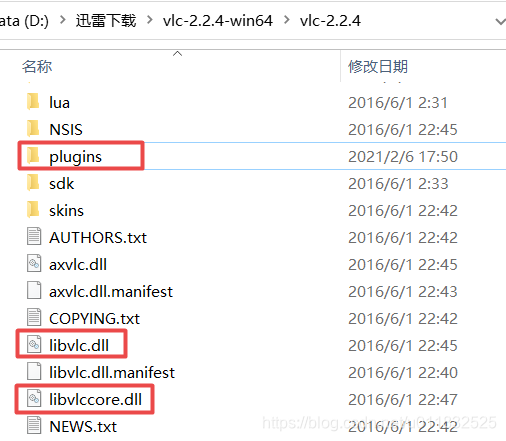
注意:运行时,依赖的动态库有,libvlc.dll、libvlccore.dll、plugins插件,如下:

程序启动后,点击“Push Video”按钮启动推流;然后在VLC播放器中,打开如下串流地址
rtsp://127.0.0.1:8554/
运行效果如下:

左边播放器正常播放推流视频。
本文涉及工程代码:
https://gitee.com/bailiyang/cdemo/tree/master/Qt/63VLCTest/RTSPVideo
若对你有帮助,欢迎点赞、收藏、评论,你的支持就是我的最大动力!!!
同时,阿超为大家准备了丰富的学习资料,欢迎关注公众号“超哥学编程”,即可领取。

这篇关于基于VLC实现RTSP推流视频的文章就介绍到这儿,希望我们推荐的文章对编程师们有所帮助!


