本文主要是介绍【Netty】ByteBuffer原理与使用,希望对大家解决编程问题提供一定的参考价值,需要的开发者们随着小编来一起学习吧!
Buffer则用来缓冲读写数据,常见的buffer有:
-
ByteBuffer
-
MappedByBuffer
-
DirectByteBuffer
-
HeapByteBuffer
-
-
hortBuffer
-
IntBuffer
-
LongBuffer
-
FloatBuffer
-
DoubleBuffer
-
CharBuffer
有一个普通文本文件data.txt,内容为:
1234567890abcd使用fileChannel读取文件内容
package com.aqiuo.buffer;
import lombok.extern.slf4j.Slf4j;
import java.io.FileNotFoundException;
import java.io.IOException;
import java.io.RandomAccessFile;
import java.nio.Buffer;
import java.nio.ByteBuffer;
import java.nio.channels.FileChannel;
@Slf4j
public class ChannelDemo {public static void main(String[] args) throws IOException {try (RandomAccessFile file=new RandomAccessFile("data.txt","rw")) {FileChannel channel = file.getChannel();ByteBuffer buffer = ByteBuffer.allocate(10);do {int len = channel.read(buffer);if (len == -1) {break;}log.info("得到的字节数{}", len);buffer.flip();while (buffer.hasRemaining()) {
log.info("{}",(char) buffer.get());}buffer.clear();}while (true);}}
}
输出
10:39:03 [DEBUG] [main] c.i.n.ChannelDemo1 - 读到字节数:10
10:39:03 [DEBUG] [main] c.i.n.ChannelDemo1 - 1
10:39:03 [DEBUG] [main] c.i.n.ChannelDemo1 - 2
10:39:03 [DEBUG] [main] c.i.n.ChannelDemo1 - 3
10:39:03 [DEBUG] [main] c.i.n.ChannelDemo1 - 4
10:39:03 [DEBUG] [main] c.i.n.ChannelDemo1 - 5
10:39:03 [DEBUG] [main] c.i.n.ChannelDemo1 - 6
10:39:03 [DEBUG] [main] c.i.n.ChannelDemo1 - 7
10:39:03 [DEBUG] [main] c.i.n.ChannelDemo1 - 8
10:39:03 [DEBUG] [main] c.i.n.ChannelDemo1 - 9
10:39:03 [DEBUG] [main] c.i.n.ChannelDemo1 - 0
10:39:03 [DEBUG] [main] c.i.n.ChannelDemo1 - 读到字节数:4
10:39:03 [DEBUG] [main] c.i.n.ChannelDemo1 - a
10:39:03 [DEBUG] [main] c.i.n.ChannelDemo1 - b
10:39:03 [DEBUG] [main] c.i.n.ChannelDemo1 - c
10:39:03 [DEBUG] [main] c.i.n.ChannelDemo1 - d
10:39:03 [DEBUG] [main] c.i.n.ChannelDemo1 - 读到字节数:-1
2.1 ByteBuffer 正确使用姿势
-
向buffer写入数据,例如调用:channel.read(buffer);
-
调用flip切换到读模式
-
从buffer读取数据,例如调用buffer.get()
-
调用clear()或compact()切换到写模式
-
重入1-4步骤
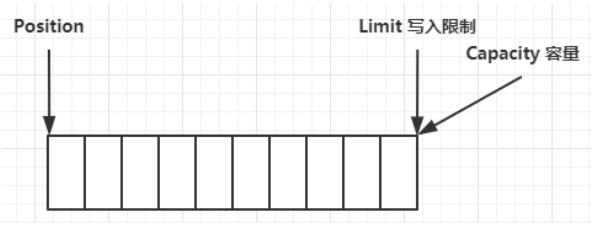
2.2 ByteBuffer的结构
ByteBuffer有以下重要属性:
-
capacity
-
position
-
limit
一开始
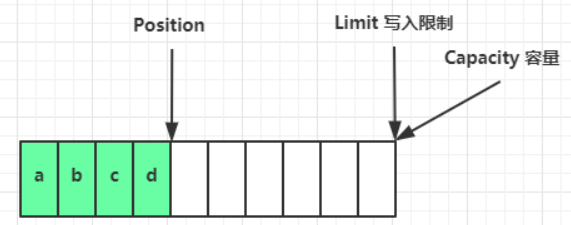
写模式下,position是写入位置,limit相当于容量,下图表示写入4字节后的状态。
flip动作发生后,position切换为读取位置,limit切换为读取限制
读取 4 个字节后,状态:

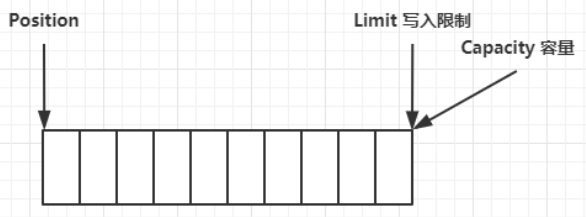
clear动作后,状态:
compact 方法,是把未读完的部分向前压缩,然后切换至写模式

💡 调试工具类
public class ByteBufferUtil {private static final char[] BYTE2CHAR = new char[256];private static final char[] HEXDUMP_TABLE = new char[256 * 4];private static final String[] HEXPADDING = new String[16];private static final String[] HEXDUMP_ROWPREFIXES = new String[65536 >>> 4];private static final String[] BYTE2HEX = new String[256];private static final String[] BYTEPADDING = new String[16];
static {final char[] DIGITS = "0123456789abcdef".toCharArray();for (int i = 0; i < 256; i++) {HEXDUMP_TABLE[i << 1] = DIGITS[i >>> 4 & 0x0F];HEXDUMP_TABLE[(i << 1) + 1] = DIGITS[i & 0x0F];}
int i;
// Generate the lookup table for hex dump paddingsfor (i = 0; i < HEXPADDING.length; i++) {int padding = HEXPADDING.length - i;StringBuilder buf = new StringBuilder(padding * 3);for (int j = 0; j < padding; j++) {buf.append(" ");}HEXPADDING[i] = buf.toString();}
// Generate the lookup table for the start-offset header in each row (up to 64KiB).for (i = 0; i < HEXDUMP_ROWPREFIXES.length; i++) {StringBuilder buf = new StringBuilder(12);buf.append(NEWLINE);buf.append(Long.toHexString(i << 4 & 0xFFFFFFFFL | 0x100000000L));buf.setCharAt(buf.length() - 9, '|');buf.append('|');HEXDUMP_ROWPREFIXES[i] = buf.toString();}
// Generate the lookup table for byte-to-hex-dump conversionfor (i = 0; i < BYTE2HEX.length; i++) {BYTE2HEX[i] = ' ' + StringUtil.byteToHexStringPadded(i);}
// Generate the lookup table for byte dump paddingsfor (i = 0; i < BYTEPADDING.length; i++) {int padding = BYTEPADDING.length - i;StringBuilder buf = new StringBuilder(padding);for (int j = 0; j < padding; j++) {buf.append(' ');}BYTEPADDING[i] = buf.toString();}
// Generate the lookup table for byte-to-char conversionfor (i = 0; i < BYTE2CHAR.length; i++) {if (i <= 0x1f || i >= 0x7f) {BYTE2CHAR[i] = '.';} else {BYTE2CHAR[i] = (char) i;}}}
/*** 打印所有内容* @param buffer*/public static void debugAll(ByteBuffer buffer) {int oldlimit = buffer.limit();buffer.limit(buffer.capacity());StringBuilder origin = new StringBuilder(256);appendPrettyHexDump(origin, buffer, 0, buffer.capacity());System.out.println("+--------+-------------------- all ------------------------+----------------+");System.out.printf("position: [%d], limit: [%d]\n", buffer.position(), oldlimit);System.out.println(origin);buffer.limit(oldlimit);}
/*** 打印可读取内容* @param buffer*/public static void debugRead(ByteBuffer buffer) {StringBuilder builder = new StringBuilder(256);appendPrettyHexDump(builder, buffer, buffer.position(), buffer.limit() - buffer.position());System.out.println("+--------+-------------------- read -----------------------+----------------+");System.out.printf("position: [%d], limit: [%d]\n", buffer.position(), buffer.limit());System.out.println(builder);}
private static void appendPrettyHexDump(StringBuilder dump, ByteBuffer buf, int offset, int length) {if (isOutOfBounds(offset, length, buf.capacity())) {throw new IndexOutOfBoundsException("expected: " + "0 <= offset(" + offset + ") <= offset + length(" + length+ ") <= " + "buf.capacity(" + buf.capacity() + ')');}if (length == 0) {return;}dump.append(" +-------------------------------------------------+" +NEWLINE + " | 0 1 2 3 4 5 6 7 8 9 a b c d e f |" +NEWLINE + "+--------+-------------------------------------------------+----------------+");
final int startIndex = offset;final int fullRows = length >>> 4;final int remainder = length & 0xF;
// Dump the rows which have 16 bytes.for (int row = 0; row < fullRows; row++) {int rowStartIndex = (row << 4) + startIndex;
// Per-row prefix.appendHexDumpRowPrefix(dump, row, rowStartIndex);
// Hex dumpint rowEndIndex = rowStartIndex + 16;for (int j = rowStartIndex; j < rowEndIndex; j++) {dump.append(BYTE2HEX[getUnsignedByte(buf, j)]);}dump.append(" |");
// ASCII dumpfor (int j = rowStartIndex; j < rowEndIndex; j++) {dump.append(BYTE2CHAR[getUnsignedByte(buf, j)]);}dump.append('|');}
// Dump the last row which has less than 16 bytes.if (remainder != 0) {int rowStartIndex = (fullRows << 4) + startIndex;appendHexDumpRowPrefix(dump, fullRows, rowStartIndex);
// Hex dumpint rowEndIndex = rowStartIndex + remainder;for (int j = rowStartIndex; j < rowEndIndex; j++) {dump.append(BYTE2HEX[getUnsignedByte(buf, j)]);}dump.append(HEXPADDING[remainder]);dump.append(" |");
// Ascii dumpfor (int j = rowStartIndex; j < rowEndIndex; j++) {dump.append(BYTE2CHAR[getUnsignedByte(buf, j)]);}dump.append(BYTEPADDING[remainder]);dump.append('|');}
dump.append(NEWLINE +"+--------+-------------------------------------------------+----------------+");}
private static void appendHexDumpRowPrefix(StringBuilder dump, int row, int rowStartIndex) {if (row < HEXDUMP_ROWPREFIXES.length) {dump.append(HEXDUMP_ROWPREFIXES[row]);} else {dump.append(NEWLINE);dump.append(Long.toHexString(rowStartIndex & 0xFFFFFFFFL | 0x100000000L));dump.setCharAt(dump.length() - 9, '|');dump.append('|');}}
public static short getUnsignedByte(ByteBuffer buffer, int index) {return (short) (buffer.get(index) & 0xFF);}
}2.3 ByteBuffer 常见方法
分配空间
可以使用allocate 方法为ByteBuffer分配空间,其他buffer类也有该方法
Bytebuffer buf = ByteBuffer.allocate(16);向buffer写入数据
有两种方法:
调用channel的read方法
调用buffer自己的put方法
int readBytes=channel.read(buf);
buf.put((byte)127);
从buffer读取数据
同样有两种办法
-
调用 channel 的 write 方法
-
调用 buffer 自己的 get 方法
int writeBytes = channel.write(buf);
byte b = buf.get();
get 方法会让 position 读指针向后走,如果想重复读取数据
-
可以调用 rewind 方法将 position 重新置为 0
-
或者调用 get(int i) 方法获取索引 i 的内容,它不会移动读指针
mark 和 reset
mark 是在读取时,做一个标记,即使 position 改变,只要调用 reset 就能回到 mark 的位置
import lombok.extern.slf4j.Slf4j;
import java.io.File;
import java.io.FileInputStream;
import java.io.FileNotFoundException;
import java.io.IOException;
import java.nio.ByteBuffer;
import java.nio.channels.FileChannel;
@Slf4j
public class TestByteBuffer {public static void main(String[] args) throws IOException {
File file=new File("data.txt");FileInputStream fileInputStream=new FileInputStream(file);FileChannel fileChannel=fileInputStream.getChannel();ByteBuffer buffer=ByteBuffer.allocate(10);int len;
len=fileChannel.read(buffer);log.info("读取的字节数:"+len);
buffer.flip();System.out.println((char) buffer.get());System.out.println((char)buffer.get());System.out.println((char)buffer.get());buffer.mark();System.out.println((char)buffer.get());System.out.println((char)buffer.get());System.out.println((char)buffer.get());buffer.reset();System.out.println((char)buffer.get());System.out.println((char)buffer.get());System.out.println((char)buffer.get());}
}19:08:05.220 [main] INFO com.aqiuo.buffer.TestByteBuffer - 读取的字节数:10 1 2 3 4 5 6 4 5 6
注意
rewind 和 flip 都会清除 mark 位置
字符串和ByteBuffer的换转
package com.aqiuo.buffer;
import java.nio.Buffer;
import java.nio.ByteBuffer;
import java.nio.CharBuffer;
import java.nio.charset.Charset;
import java.nio.charset.StandardCharsets;
public class TestByteBufferEncode {public static void main(String[] args) {ByteBuffer buffer1= StandardCharsets.UTF_8.encode("nihao");ByteBuffer buffer2= Charset.forName("UTF-8").encode("nihao");ByteBufferUtil.debugAll(buffer1);ByteBufferUtil.debugAll(buffer2);CharBuffer buffer3=StandardCharsets.UTF_8.decode(buffer1);System.out.println(buffer3.getClass());System.out.println(buffer3.toString());
}
}输出
+--------+-------------------- all ------------------------+----------------+
position: [0], limit: [5]+-------------------------------------------------+|  0  1  2  3  4  5  6  7  8  9  a  b  c  d  e  f |
+--------+-------------------------------------------------+----------------+
|00000000| 6e 69 68 61 6f                                  |nihao           |
+--------+-------------------------------------------------+----------------+
class java.nio.HeapCharBuffer
nihao
⚠️ Buffer 的线程安全
Buffer 是非线程安全的
这篇关于【Netty】ByteBuffer原理与使用的文章就介绍到这儿,希望我们推荐的文章对编程师们有所帮助!


