本文主要是介绍Spring(五)依赖注入原理及多种数据类型的装配,希望对大家解决编程问题提供一定的参考价值,需要的开发者们随着小编来一起学习吧!
基本类型对象注入
package test.spring.dao;public interface PersonDao {public abstract void add();}package test.spring.dao.impl;import test.spring.dao.PersonDao;public class PersonDaoBean implements PersonDao {@Overridepublic void add(){System.out.println("执行PersonDaoBean里的test1()方法");}
}
package test.spring.service;import java.util.List;
import java.util.Map;
import java.util.Properties;
import java.util.Set;public interface PersonService {public abstract void save();public Set<String> getSet();public List<String> getList();public Properties getProperties();public Map<String, String> getMap();
}
package test.spring.service.impl;import java.util.ArrayList;
import java.util.HashMap;
import java.util.HashSet;
import java.util.List;
import java.util.Map;
import java.util.Properties;
import java.util.Set;import test.spring.dao.PersonDao;
import test.spring.entity.Property;
import test.spring.service.PersonService;public class PersonServiceBean2 implements PersonService {private PersonDao personDao;private String name;private Integer num;private Set<String> set = new HashSet<String>();private List<String> list = new ArrayList<String>();private Properties properties = new Properties();private Map<String, String> map = new HashMap<String, String>();public Map<String, String> getMap() {return map;}public void setMap(Map<String, String> map) {this.map = map;}public Properties getProperties() {return properties;}public void setProperties(Properties properties) {this.properties = properties;}public List<String> getList() {return list;}public void setList(List<String> list) {this.list = list;}public Set<String> getSet() {return set;}public void setSet(Set<String> set) {this.set = set;}public Integer getNum() {return num;}public void setNum(Integer num) {this.num = num;}public String getName() {return name;}public void setName(String name) {this.name = name;}public PersonDao getPersonDao() {return personDao;}public void setPersonDao(PersonDao personDao) {this.personDao = personDao;}@Overridepublic void save() {personDao.add();System.out.println(name);System.out.println(num);}
}
<?xml version="1.0" encoding="UTF-8"?>
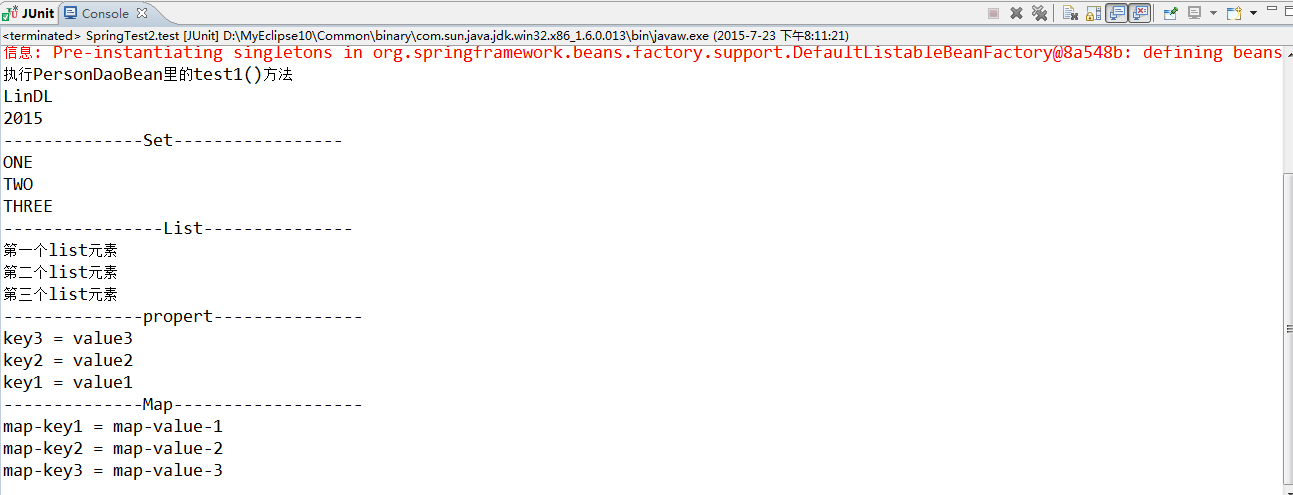
<beans xmlns="http://www.springframework.org/schema/beans"xmlns:xsi="http://www.w3.org/2001/XMLSchema-instance"xsi:schemaLocation="http://www.springframework.org/schema/beanshttp://www.springframework.org/schema/beans/spring-beans-2.5.xsd"><!-- 这时候这个bean就可以由spring帮我们创建和维护,用到时只需从spring容器中获取 --><!-- <bean id="personService" class="test.spring.service.impl.PersonServiceBean" lazy-init="false" init-method="init" destroy-method="destroy"></bean> --><!-- <bean id="personService2" class="test.spring.service.impl.PersonServiceBeanFactory" factory-method="createPersonServiceBean"></bean> <bean id="personServiceFactory" class="test.spring.service.impl.PersonServiceBeanFactory"></bean> <bean id="personService3" factory-bean="personServiceFactory" factory-method="createPersonServiceBean2"></bean> --><!-- 基本类型对象注入 --><!-- <bean id="personDao" class="test.spring.dao.impl.PersonDaoBean"></bean> <bean id="personService" class="test.spring.service.impl.PersonServiceBean2"> --><!-- name是service中对于的属性名,ref是对于的bean --><!-- <property name="personDao" ref="personDao"></property> </bean> --><!-- 使用内部bean,但该bean不能被其他bean使用 --><bean id="personDao" class="test.spring.dao.impl.PersonDaoBean" /><bean id="personService" class="test.spring.service.impl.PersonServiceBean2"><!-- name是service中对于的属性名,ref是对于的bean --><property name="personDao" ref="personDao" /><!-- 为基本数据类型注入值 --><property name="name" value="LinDL" /><property name="num" value="2015" /><property name="set"><set><value>ONE</value><value>TWO</value><value>THREE</value></set></property><property name="list"><list><value>第一个list元素</value><value>第二个list元素</value><value>第三个list元素</value></list></property><property name="properties"><props><prop key="key1">value1</prop><prop key="key2">value2</prop><prop key="key3">value3</prop></props></property><property name="map"><map><entry key="map-key1" value="map-value-1" /><entry key="map-key2" value="map-value-2" /><entry key="map-key3" value="map-value-3" /></map></property></bean>
</beans>
package test.spring.jnit;import org.junit.Test;
import org.springframework.context.ApplicationContext;
import org.springframework.context.support.ClassPathXmlApplicationContext;import test.spring.service.PersonService;public class SpringTest2 {@Testpublic void test() {ApplicationContext applicationContext = new ClassPathXmlApplicationContext("beans.xml");PersonService personService=(PersonService) applicationContext.getBean("personService");personService.save();System.out.println("--------------Set-----------------");for(String str:personService.getSet()){System.out.println(str);}System.out.println("----------------List---------------");for(String str:personService.getList()){System.out.println(str);}System.out.println("--------------propert---------------");for(Object key:personService.getProperties().keySet()){System.out.println(key+" = "+personService.getProperties().getProperty((String) key));}System.out.println("--------------Map-------------------");for(String key:personService.getMap().keySet()){System.out.println(key+" = "+personService.getMap().get(key));}// InjectTest injectTest=new InjectTest("beans.xml");
// PersonService personService=(PersonService) injectTest.getBean("personService");
// personService.save();}}
编码剖析依赖注入原理
package test.spring.entity;import java.util.ArrayList;
import java.util.List;public class Bean2 {private String id;private String classPath;private List<Property> properties=new ArrayList<Property>();public Bean2(String id, String classPath) {this.id = id;this.classPath = classPath;}public String getId() {return id;}public void setId(String id) {this.id = id;}public String getClassPath() {return classPath;}public void setClassPath(String classPath) {this.classPath = classPath;}public List<Property> getProperties() {return properties;}public void setProperties(List<Property> properties) {this.properties = properties;}}
package test.spring.entity;public class Property {private String name;private String ref;private String value;public Property(String name, String ref, String value) {super();this.name = name;this.ref = ref;this.value = value;}public String getName() {return name;}public void setName(String name) {this.name = name;}public String getRef() {return ref;}public void setRef(String ref) {this.ref = ref;}public String getValue() {return value;}public void setValue(String value) {this.value = value;}}
<pre name="code" class="java">package test.spring.jnit;import java.beans.Introspector;
import java.beans.PropertyDescriptor;
import java.net.URL;
import java.util.ArrayList;
import java.util.HashMap;
import java.util.List;
import java.util.Map;import org.apache.commons.beanutils.ConvertUtils;
import org.dom4j.Document;
import org.dom4j.Element;
import org.dom4j.XPath;
import org.dom4j.io.SAXReader;
import org.springframework.asm.commons.Method;import test.spring.entity.Bean;
import test.spring.entity.Bean2;
import test.spring.entity.Property;public class InjectTest {private List<Bean2> beanDefines = new ArrayList<Bean2>();private Map<String, Object> singletons = new HashMap<String, Object>();public InjectTest(String filename){this.readXML(filename);this.instanceBeans();this.injectObject();}/*** 为bean对象的属性注入值*/private void injectObject() {for(Bean2 beanDefinition : beanDefines){Object bean = singletons.get(beanDefinition.getId());if(bean!=null){try {PropertyDescriptor[] ps = Introspector.getBeanInfo(bean.getClass()).getPropertyDescriptors();for(Property propertyDefinition : beanDefinition.getProperties()){for(PropertyDescriptor properdesc : ps){if(propertyDefinition.getName().equals(properdesc.getName())){java.lang.reflect.Method setter = properdesc.getWriteMethod();//获取属性的setter方法 ,privateif(setter!=null){Object value = null;if(propertyDefinition.getRef()!=null && !"".equals(propertyDefinition.getRef().trim())){value = singletons.get(propertyDefinition.getRef());}else{value = ConvertUtils.convert(propertyDefinition.getValue(), properdesc.getPropertyType());}setter.setAccessible(true);setter.invoke(bean, value);//把引用对象注入到属性}break;}}}} catch (Exception e) {}}}}/*** 完成bean的实例化*/private void instanceBeans() {for(Bean2 beanDefinition : beanDefines){try {if(beanDefinition.getClassPath()!=null && !"".equals(beanDefinition.getClassPath().trim()))singletons.put(beanDefinition.getId(), Class.forName(beanDefinition.getClassPath()).newInstance());} catch (Exception e) {e.printStackTrace();}}}/*** 读取xml配置文件* @param filename*/private void readXML(String filename) {SAXReader saxReader = new SAXReader();   Document document=null;   try{URL xmlpath = this.getClass().getClassLoader().getResource(filename);document = saxReader.read(xmlpath);Map<String,String> nsMap = new HashMap<String,String>();nsMap.put("ns","http://www.springframework.org/schema/beans");//加入命名空间XPath xsub = document.createXPath("//ns:beans/ns:bean");//创建beans/bean查询路径xsub.setNamespaceURIs(nsMap);//设置命名空间List<Element> beans = xsub.selectNodes(document);//获取文档下所有bean节点 for(Element element: beans){String id = element.attributeValue("id");//获取id属性值String clazz = element.attributeValue("class"); //获取class属性值        Bean2 beanDefine = new Bean2(id, clazz);XPath propertysub =  element.createXPath("ns:property");propertysub.setNamespaceURIs(nsMap);//设置命名空间List<Element> propertys = propertysub.selectNodes(element);for(Element property : propertys){	            	String propertyName = property.attributeValue("name");String propertyref = property.attributeValue("ref");String propertyValue = property.attributeValue("value");Property propertyDefinition = new Property(propertyName, propertyref, propertyValue);beanDefine.getProperties().add(propertyDefinition);}beanDefines.add(beanDefine);} }catch(Exception e){   e.printStackTrace();}}/*** 获取bean实例* @param beanName* @return*/public Object getBean(String beanName){return this.singletons.get(beanName);}}
这篇关于Spring(五)依赖注入原理及多种数据类型的装配的文章就介绍到这儿,希望我们推荐的文章对编程师们有所帮助!


