本文主要是介绍Android Studio 多渠道打包和一键完成(全部产品)打包并签名,希望对大家解决编程问题提供一定的参考价值,需要的开发者们随着小编来一起学习吧!
多渠道打包
方法1
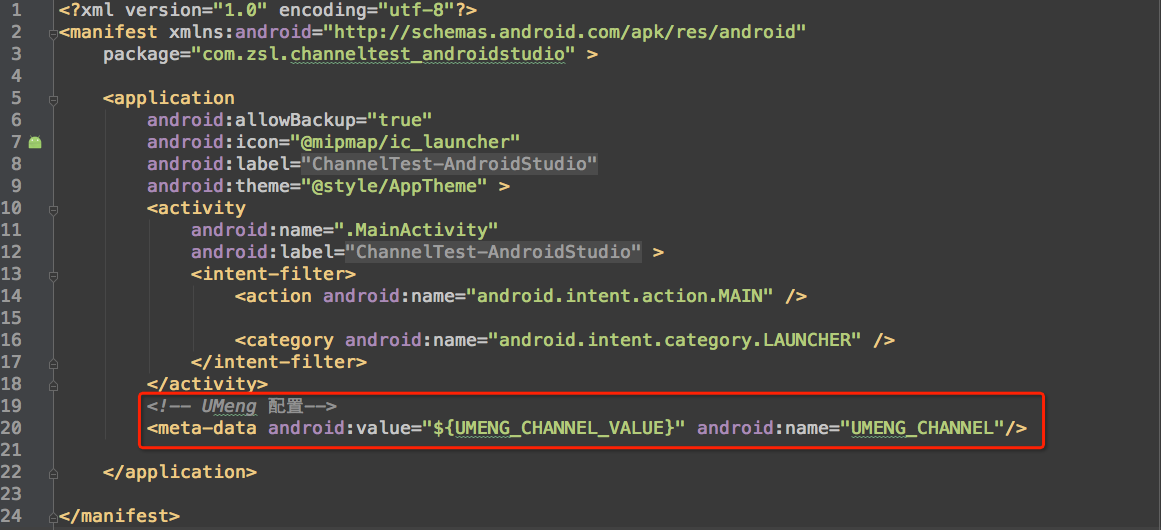
第一步:添加渠道表示标签
<meta-data android:value="${UMENG_CHANNEL_VALUE}" android:name="UMENG_CHANNEL"/>
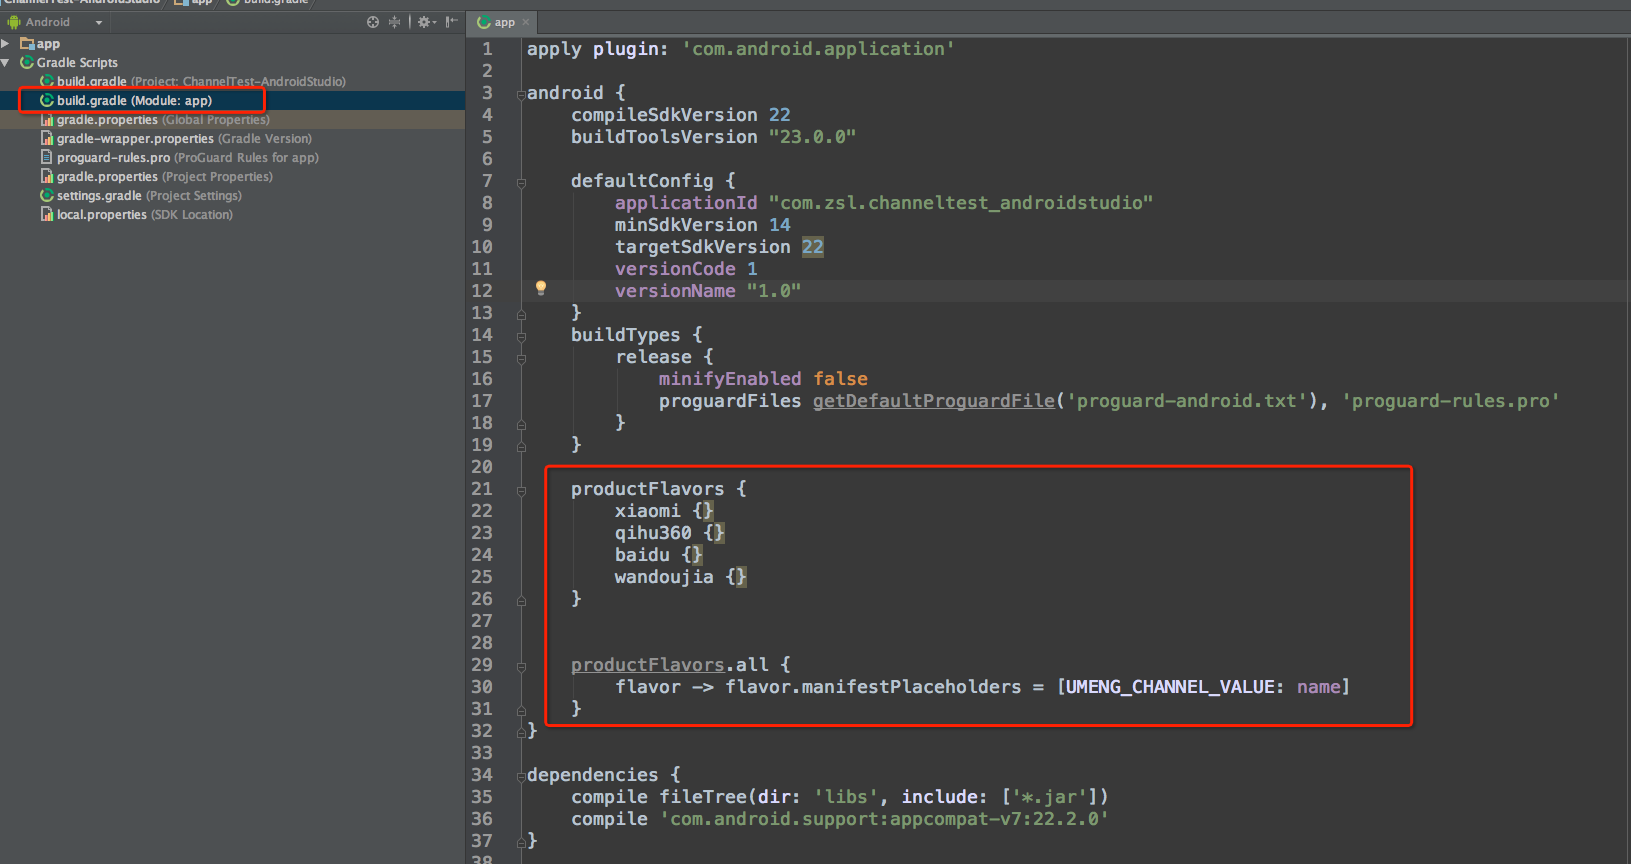
第二步:添加渠道
productFlavors {xiaomi {}qihu360 {}baidu {}wandoujia {}}productFlavors.all {flavor -> flavor.manifestPlaceholders = [UMENG_CHANNEL_VALUE: name]}
添加完之后我们在点击一下Gradle 的构建按钮重新构建一下

第三步:测试
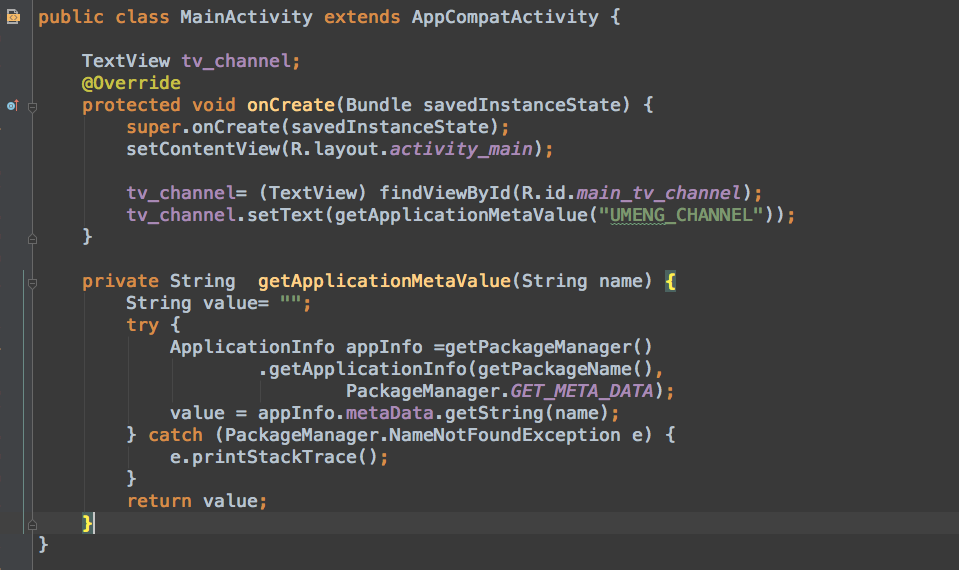
我们通过java代码获取到meta标签中的value来测试是否成功实现了多渠道打包:
<code class="language-java hljs  has-numbering" style="display: block; padding: 0px; color: inherit; box-sizing: border-box; font-family: 'Source Code Pro', monospace;font-size:undefined; white-space: pre; border-radius: 0px; word-wrap: normal; background: transparent;"><span class="hljs-keyword" style="color: rgb(0, 0, 136); box-sizing: border-box;">public</span> <span class="hljs-class" style="box-sizing: border-box;"><span class="hljs-keyword" style="color: rgb(0, 0, 136); box-sizing: border-box;">class</span> <span class="hljs-title" style="box-sizing: border-box; color: rgb(102, 0, 102);">MainActivity</span> <span class="hljs-keyword" style="color: rgb(0, 0, 136); box-sizing: border-box;">extends</span> <span class="hljs-title" style="box-sizing: border-box; color: rgb(102, 0, 102);">AppCompatActivity</span> {</span>TextView tv_channel;<span class="hljs-annotation" style="color: rgb(155, 133, 157); box-sizing: border-box;">@Override</span><span class="hljs-keyword" style="color: rgb(0, 0, 136); box-sizing: border-box;">protected</span> <span class="hljs-keyword" style="color: rgb(0, 0, 136); box-sizing: border-box;">void</span> <span class="hljs-title" style="box-sizing: border-box;">onCreate</span>(Bundle savedInstanceState) {<span class="hljs-keyword" style="color: rgb(0, 0, 136); box-sizing: border-box;">super</span>.onCreate(savedInstanceState);setContentView(R.layout.activity_main);tv_channel= (TextView) findViewById(R.id.main_tv_channel);tv_channel.setText(getApplicationMetaValue(<span class="hljs-string" style="color: rgb(0, 136, 0); box-sizing: border-box;">"UMENG_CHANNEL"</span>));}<span class="hljs-keyword" style="color: rgb(0, 0, 136); box-sizing: border-box;">private</span> String  <span class="hljs-title" style="box-sizing: border-box;">getApplicationMetaValue</span>(String name) {String value= <span class="hljs-string" style="color: rgb(0, 136, 0); box-sizing: border-box;">""</span>;<span class="hljs-keyword" style="color: rgb(0, 0, 136); box-sizing: border-box;">try</span> {ApplicationInfo appInfo =getPackageManager().getApplicationInfo(getPackageName(),PackageManager.GET_META_DATA);value = appInfo.metaData.getString(name);} <span class="hljs-keyword" style="color: rgb(0, 0, 136); box-sizing: border-box;">catch</span> (PackageManager.NameNotFoundException e) {e.printStackTrace();}<span class="hljs-keyword" style="color: rgb(0, 0, 136); box-sizing: border-box;">return</span> value;}
}</code><ul class="pre-numbering" style="box-sizing: border-box; position: absolute; width: 50px; top: 0px; left: 0px; margin: 0px; padding: 6px 0px 40px; border-right-width: 1px; border-right-style: solid; border-right-color: rgb(221, 221, 221); list-style: none; text-align: right; background-color: rgb(238, 238, 238);"><li style="box-sizing: border-box; padding: 0px 5px;">1</li><li style="box-sizing: border-box; padding: 0px 5px;">2</li><li style="box-sizing: border-box; padding: 0px 5px;">3</li><li style="box-sizing: border-box; padding: 0px 5px;">4</li><li style="box-sizing: border-box; padding: 0px 5px;">5</li><li style="box-sizing: border-box; padding: 0px 5px;">6</li><li style="box-sizing: border-box; padding: 0px 5px;">7</li><li style="box-sizing: border-box; padding: 0px 5px;">8</li><li style="box-sizing: border-box; padding: 0px 5px;">9</li><li style="box-sizing: border-box; padding: 0px 5px;">10</li><li style="box-sizing: border-box; padding: 0px 5px;">11</li><li style="box-sizing: border-box; padding: 0px 5px;">12</li><li style="box-sizing: border-box; padding: 0px 5px;">13</li><li style="box-sizing: border-box; padding: 0px 5px;">14</li><li style="box-sizing: border-box; padding: 0px 5px;">15</li><li style="box-sizing: border-box; padding: 0px 5px;">16</li><li style="box-sizing: border-box; padding: 0px 5px;">17</li><li style="box-sizing: border-box; padding: 0px 5px;">18</li><li style="box-sizing: border-box; padding: 0px 5px;">19</li><li style="box-sizing: border-box; padding: 0px 5px;">20</li><li style="box-sizing: border-box; padding: 0px 5px;">21</li><li style="box-sizing: border-box; padding: 0px 5px;">22</li><li style="box-sizing: border-box; padding: 0px 5px;">23</li><li style="box-sizing: border-box; padding: 0px 5px;">24</li><li style="box-sizing: border-box; padding: 0px 5px;">25</li></ul>
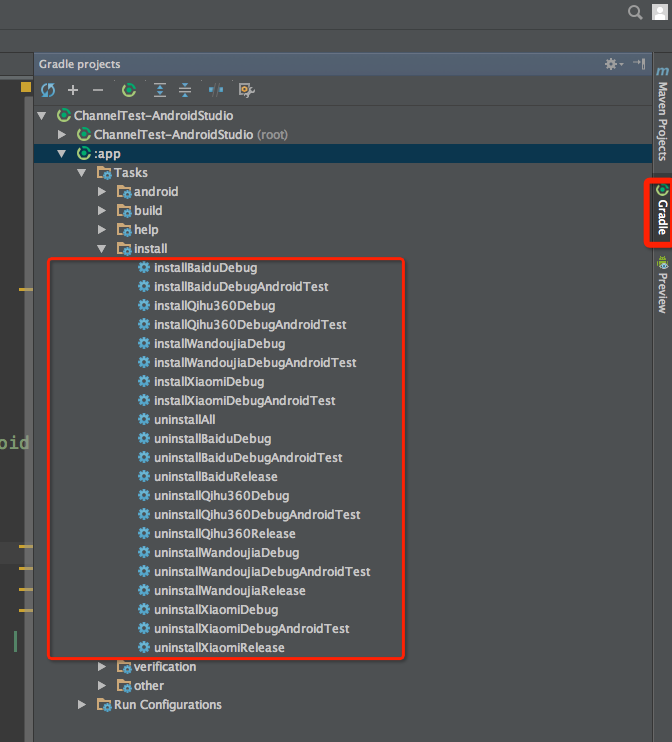
测试代码添加完毕之后,我们现在点击AS右侧的Gradle,我们此时就可以看到我们刚才添加的xiaomi、qihu360、baidu、wandoujia都出现了,如下图
此时我们双击[installBaiduDebug],然后就可以看到如下结果:
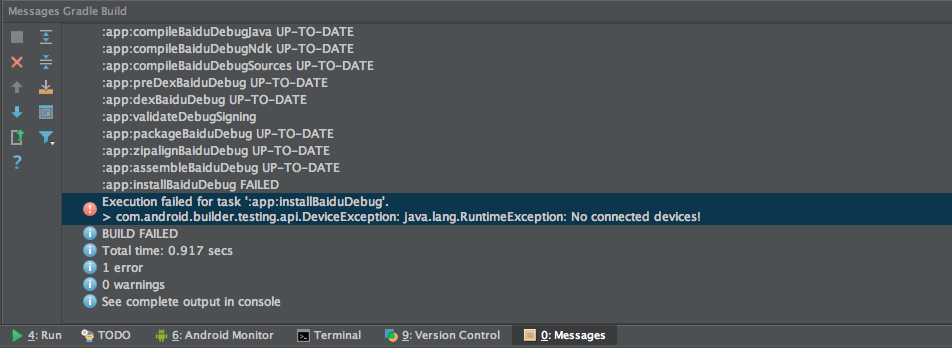
这说明你没有链接手机,链接上手机继续重新双击一下,结果如下
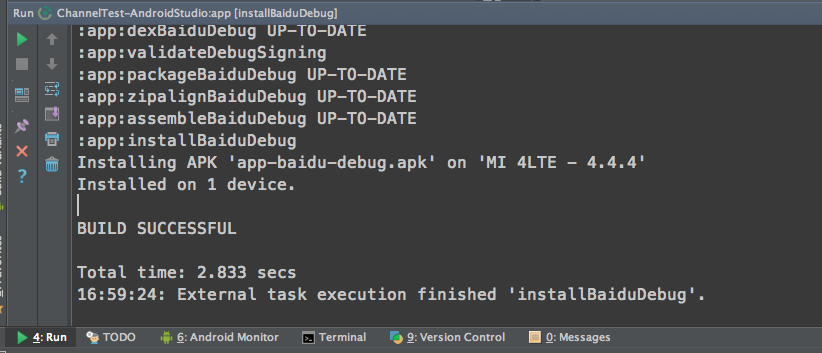
这就说明你成功的安装到你的手机上了,此时不会自动给你打开app,需要手动打开,效果如下:

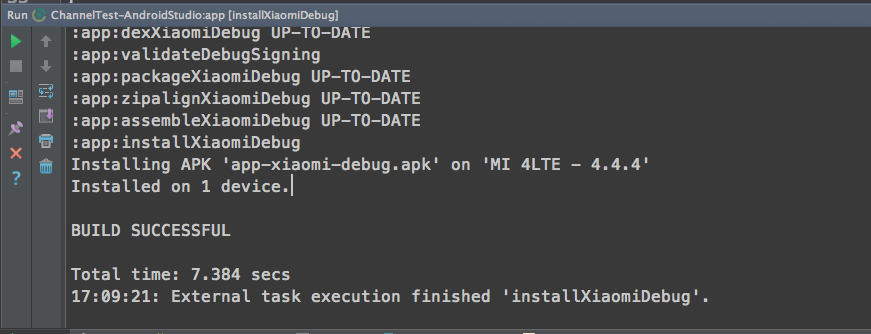
然后我们在双击[installXiaomiDebug],然后看看
效果

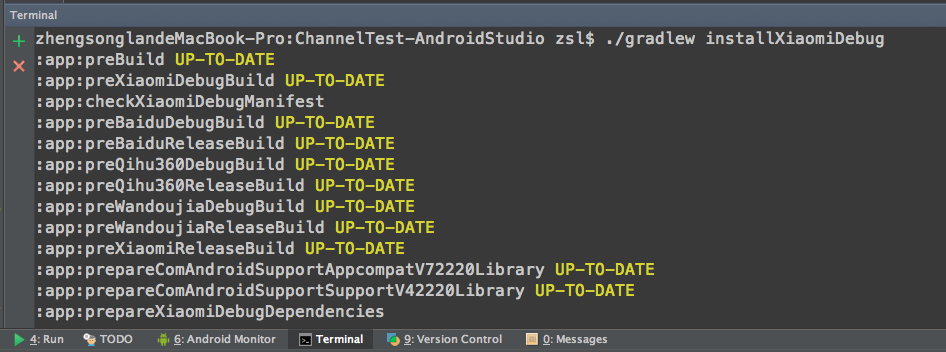
到这里我们来做一个小结,这里我们在ManiFest中添加了meta标签、在gradle(app)中添加了渠道产品对应的渠道名称 ,最后我们测试多渠道打包,这里还最重要的一点就是我这里没有让大家去运行什么命令,全部是让大家点击来实现的,其实点击就是在运行命令:./gradew installXiaomiDebug 效果如下:
一键完成打包(全部产品)并签名
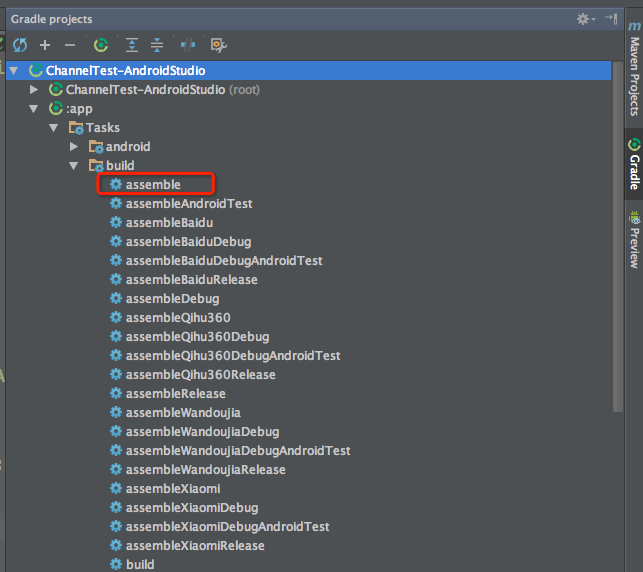
正如标题所示,我们如果要打包所有的产品,肯定不能像刚才一样一个一个来打,那么现在来使用另外一个按钮(命令)assemble
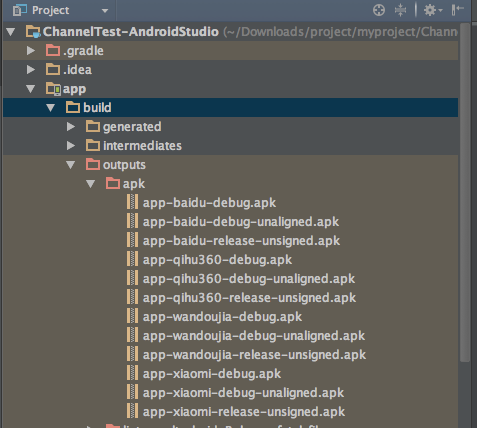
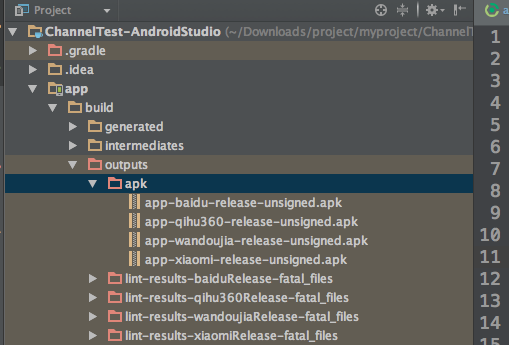
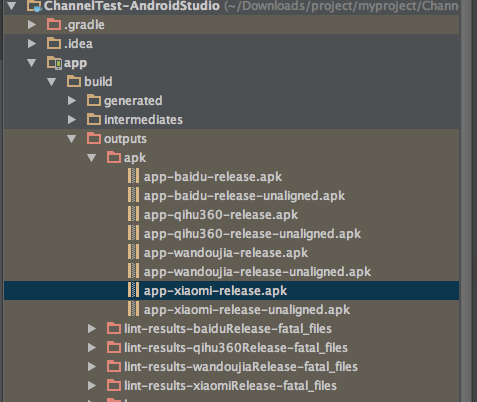
然后切换项目到Project视图,找到app>build>outputs>apk,结果如下我们看到所有版本的apk都有了,有debug版的,debug没有签名的,release没有签名的。
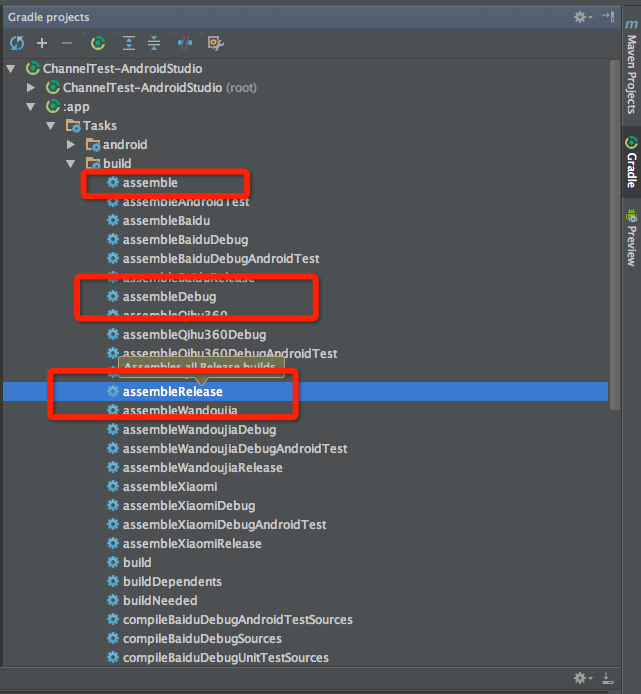
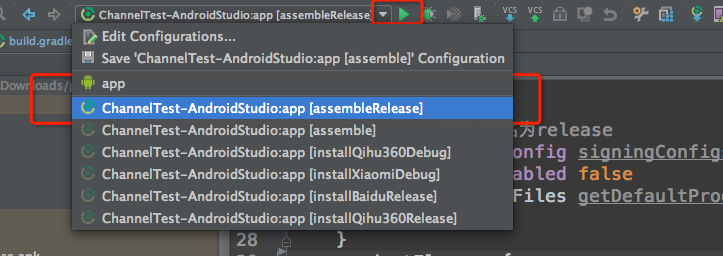
如果我们现在只想打包所有的release版本怎么办呢?看下面的图,如果想打release版就双击[assembleRelease] ,如果想打所有的debug版本就双击[assembleDebug]
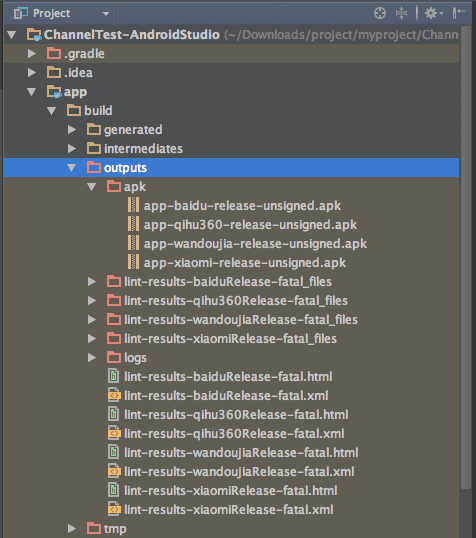
- 小测试(我现在把apk目录下的所有apk都删除掉,然后只打所有release版本),效果如下:
- 问题(所有的apk生成了,但是没有签名是发布不了的,肿莫办?)
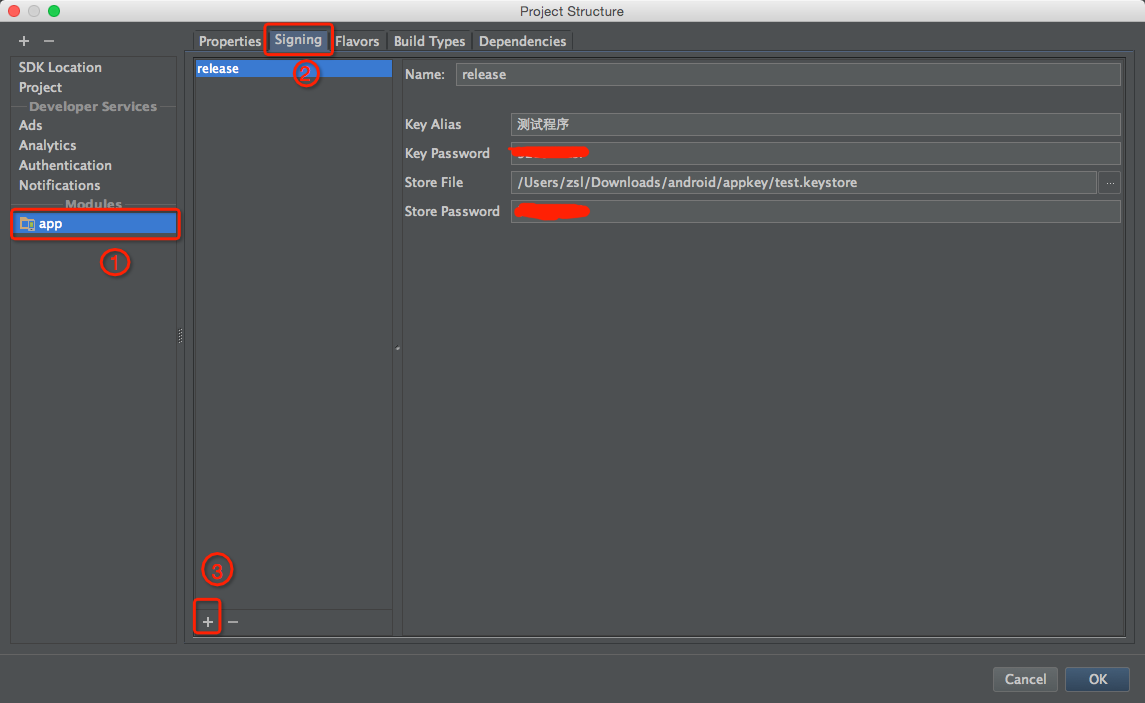
点击项目架构按钮,如下:

然后点击app>Signing>+,然后填写上签名信息,最后点击OK
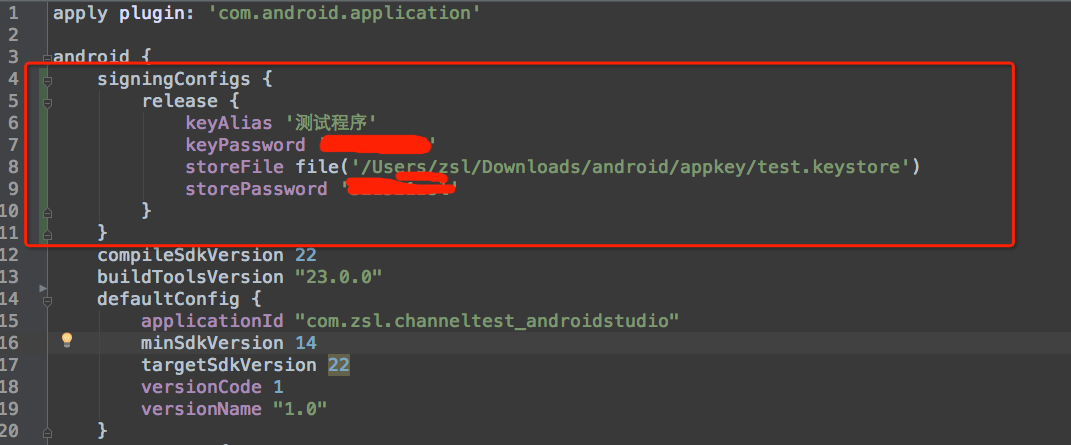
我们做的上述操作其实就是在gradle文件中添加如下信息,不信你打开你的gradle看看:
<code class="language-java hljs has-numbering" style="display: block; padding: 0px; color: inherit; box-sizing: border-box; font-family: 'Source Code Pro', monospace;font-size:undefined; white-space: pre; border-radius: 0px; word-wrap: normal; background: transparent;">signingConfigs {release {keyAlias <span class="hljs-string" style="color: rgb(0, 136, 0); box-sizing: border-box;">'测试程序'</span>keyPassword <span class="hljs-string" style="color: rgb(0, 136, 0); box-sizing: border-box;">'证书密码'</span>storeFile file(<span class="hljs-string" style="color: rgb(0, 136, 0); box-sizing: border-box;">'/Users/zsl/Downloads/android/appkey/test.keystore'</span>)storePassword <span class="hljs-string" style="color: rgb(0, 136, 0); box-sizing: border-box;">'签名密码'</span>}}</code><ul class="pre-numbering" style="box-sizing: border-box; position: absolute; width: 50px; top: 0px; left: 0px; margin: 0px; padding: 6px 0px 40px; border-right-width: 1px; border-right-style: solid; border-right-color: rgb(221, 221, 221); list-style: none; text-align: right; background-color: rgb(238, 238, 238);"><li style="box-sizing: border-box; padding: 0px 5px;">1</li><li style="box-sizing: border-box; padding: 0px 5px;">2</li><li style="box-sizing: border-box; padding: 0px 5px;">3</li><li style="box-sizing: border-box; padding: 0px 5px;">4</li><li style="box-sizing: border-box; padding: 0px 5px;">5</li><li style="box-sizing: border-box; padding: 0px 5px;">6</li><li style="box-sizing: border-box; padding: 0px 5px;">7</li><li style="box-sizing: border-box; padding: 0px 5px;">8</li></ul>
此时我们把apk下面的apk文件删掉,然后双击[assembleRelease],结果发现还是没有签名啊
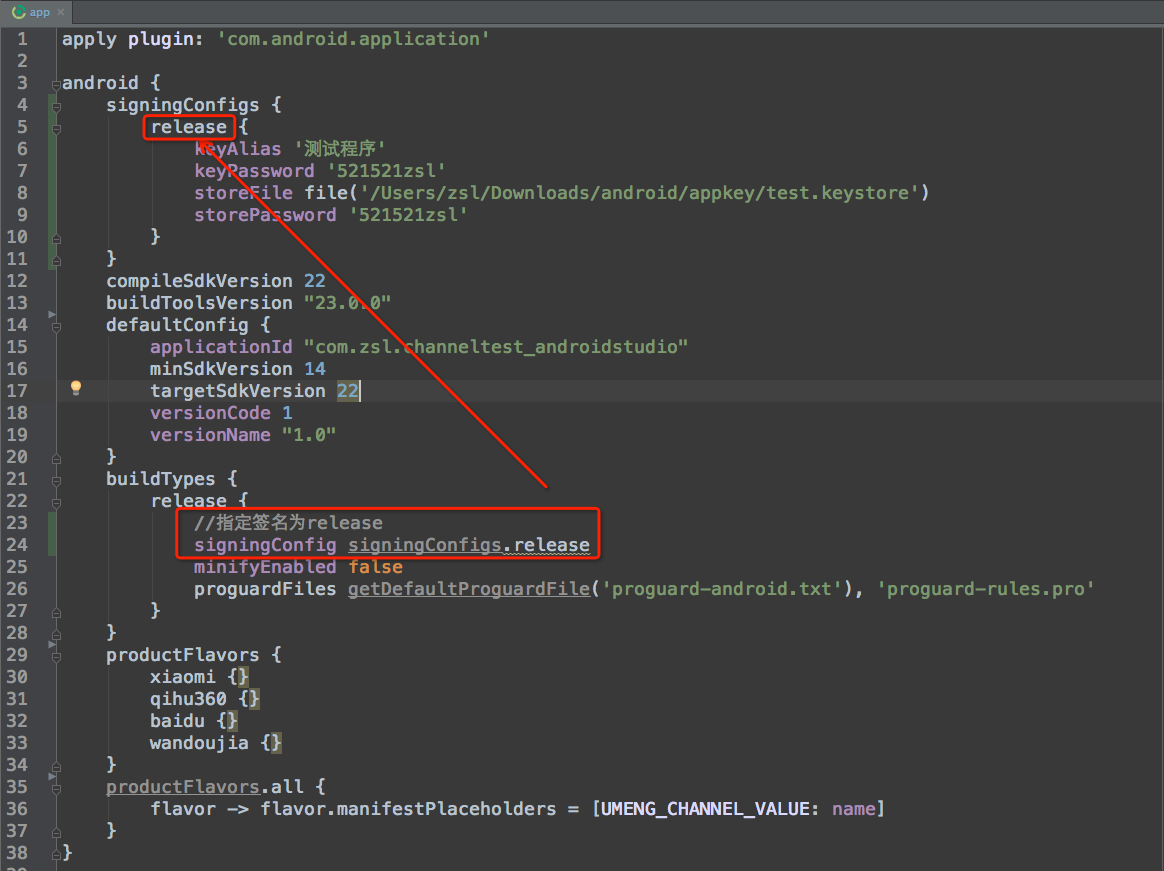
这是因为我们只是配置了签名信息,但是我们没有给产品(apk)指定,我们只需要在Gradle文件中添加如下的代码就 ok了,我们来试试看看
<code class="language-java hljs  has-numbering" style="display: block; padding: 0px; color: inherit; box-sizing: border-box; font-family: 'Source Code Pro', monospace;font-size:undefined; white-space: pre; border-radius: 0px; word-wrap: normal; background: transparent;"><span class="hljs-comment" style="color: rgb(136, 0, 0); box-sizing: border-box;">//指定签名为release</span>
signingConfig signingConfigs.release</code><ul class="pre-numbering" style="box-sizing: border-box; position: absolute; width: 50px; top: 0px; left: 0px; margin: 0px; padding: 6px 0px 40px; border-right-width: 1px; border-right-style: solid; border-right-color: rgb(221, 221, 221); list-style: none; text-align: right; background-color: rgb(238, 238, 238);"><li style="box-sizing: border-box; padding: 0px 5px;">1</li><li style="box-sizing: border-box; padding: 0px 5px;">2</li></ul>
我们现在删掉apk文件夹下所有的apk,然后选择[assembleRelease]然后点击run按钮,如下图,这里的run会记录我们最近使用的run脚本名称,
现在我们来看看apk目录下的安装包是否签名:
总结
开始我们在manifast文件中添加了meta渠道标签,然后修改了gradle的文件添加了不同的渠道产品,最后我们在代码中读取了meta标签的value并且显示在一个textview上,我们做了测试。
接下来我们又添加了签名配置,最后我们指定了给release版本的签名,签名的名称是release,最后我们终于搞定了一键多渠道打包签名,下一篇给大家分享AS生成jks签名证书,并且apk签名。
这篇关于Android Studio 多渠道打包和一键完成(全部产品)打包并签名的文章就介绍到这儿,希望我们推荐的文章对编程师们有所帮助!


