本文主要是介绍Postman下发流表至Opendaylight,希望对大家解决编程问题提供一定的参考价值,需要的开发者们随着小编来一起学习吧!
目录
任务目的
任务内容
实验原理
实验环境
实验过程
1、打开ODL控制器
2、网页端打开ODL控制页面
3、创建拓扑
4、Postman中查看交换机的信息
5、L2层流表下发
6、L3层流表下发
7、L4层流表下发
任务目的
1、掌握OpenFlow流表相关知识,理解SDN网络中L2,L3,L4层流表的概念。
2、学习并熟练掌握Postman工具下发L2,L3,L4层流表。
任务内容
1、学习OpenFlow流表的组成,包头域的解析流程及流表的匹配流程。
2、熟悉OpenDaylight对接Mininet的使用。
3、使用Postman工具,下发相应的L2,L3,L4层流表,并验证。
实验原理
SDN的设计目标之一就是将网络设备的控制功能与转发功能进行分离,进而将控制功能全部集中到远程的控制器上完成,而SDN交换机只负责在本地做简单高速的数据转发。在SDN交换机运行的过程中,其数据转发的依据就是流表。
实验环境

实验过程
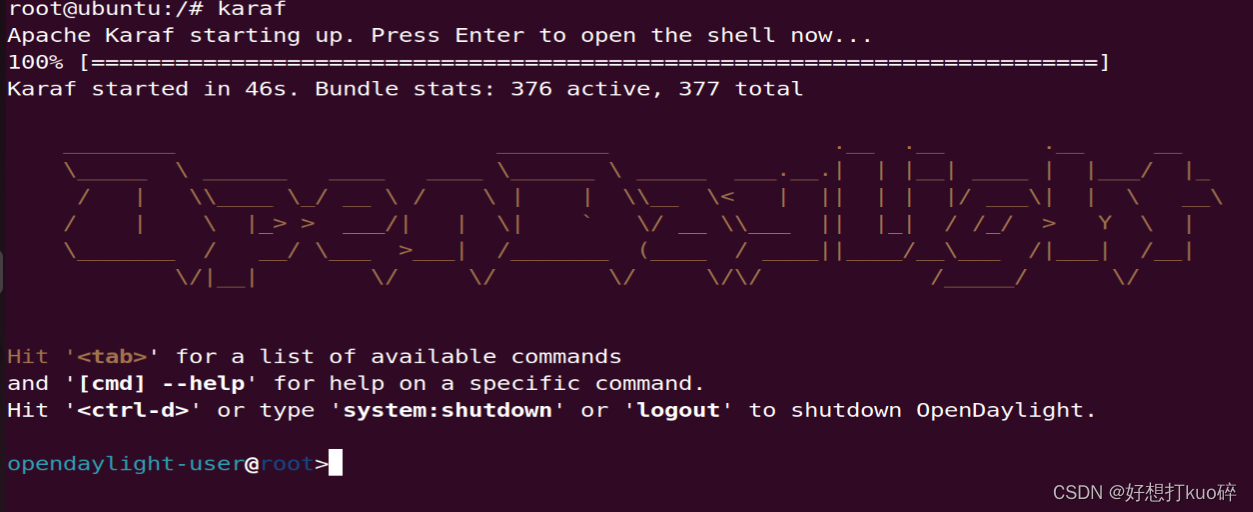
1、打开ODL控制器
这里已经把ODL控制器的添加到了环境变量中,所以直接使用karaf命令就可以启动ODL控制器,如果没有添加到环境变量中就需要进入到ODL安装目录使用命令:./bin/karaf启动ODL
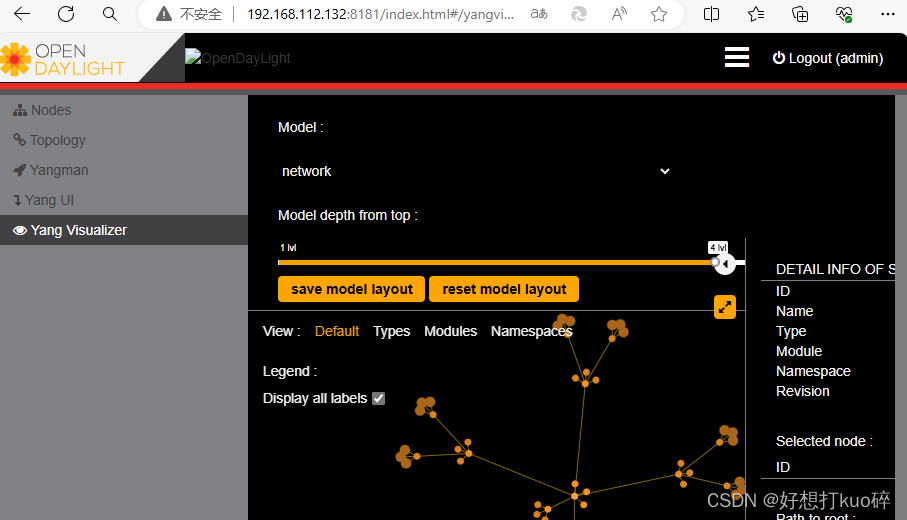
2、网页端打开ODL控制页面
我这里电脑的IP地址为192.168.112.132,因此在浏览器中输入:http://192.168.112.132:8181/index.html即可进入ODL控制器的页面
3、创建拓扑
在另一台安装了mininet的虚拟机上创建拓扑并将控制器的地址改为192.168.112.132
mn --topo=single,2 --controller=remote,ip=192.168.112.132,port=6633 --switch ovsk,protocols=OpenFlow13
pingall
此时ODL页面就已经可以看到topo了

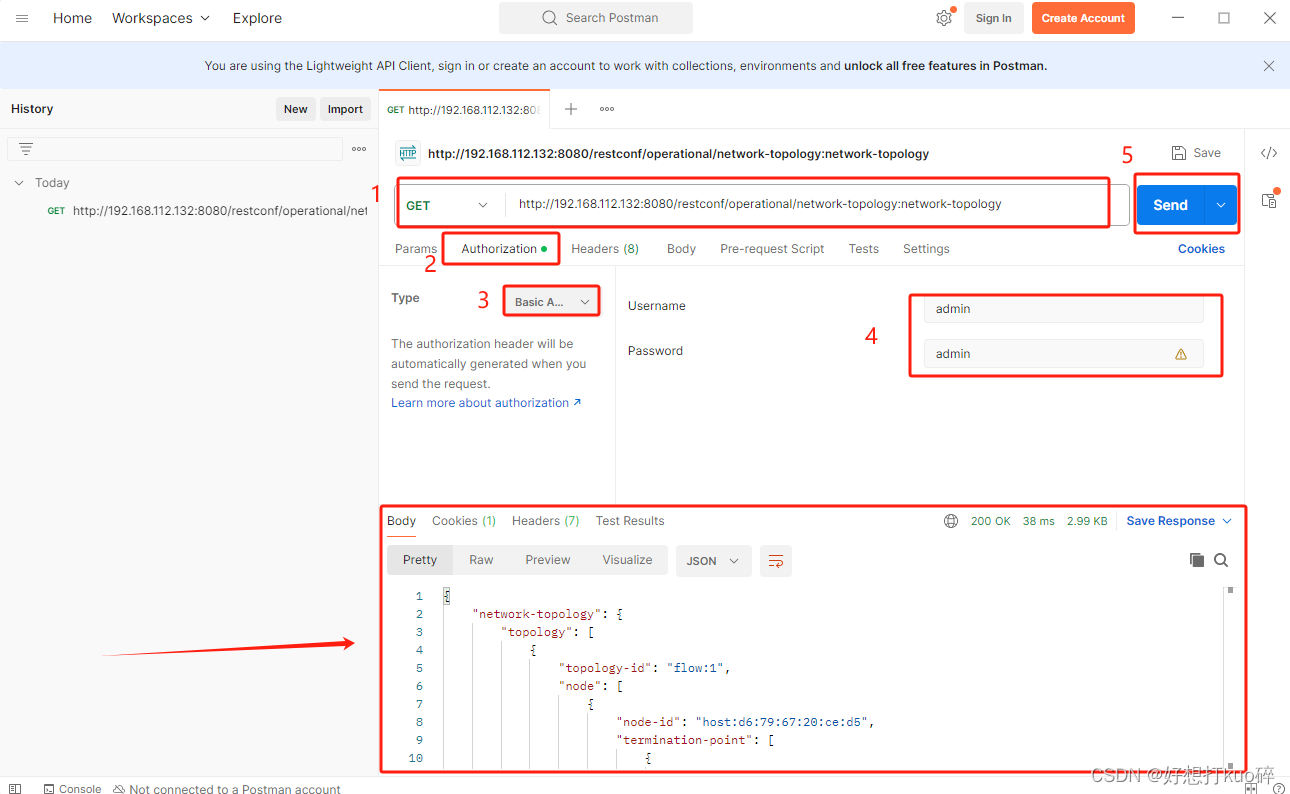
4、Postman中查看交换机的信息
Basic Auth页签,Username字段填写admin,Password字段填写admin完成认证。
提交方式为GET,URL地址栏中输入http://192.168.112.132:8080/restconf/operational/network-topology:network-topology ,设置完成,单击Send按钮,获取交换机id信息输入
5、L2层流表下发
下发第一条L2流表
选择提交方式“PUT”
URL地址栏输入如下形式的地址:http://{controllerip}:8080/restconf/config/opendaylight-inventory:nodes/node/{node-id}/table/{table-id}/flow/{flow-id}
其中,{controller-ip}为控制器的ip地址,node-id为上面获取到的交换机id信息,table-id这里为0,flow-id根据下发不同流表变化,可自定义。
如:http://192.168.112.132:8080/restconf/config/opendaylight-inventory:nodes/node/openflow:1/table/0/flow/107
“body”中选择“raw”,格式为XML(application/xml),并填写如下消息体,注意修改源目MAC地址(源地址为1端口连接的主机,目的地址为2端口连接的地址)
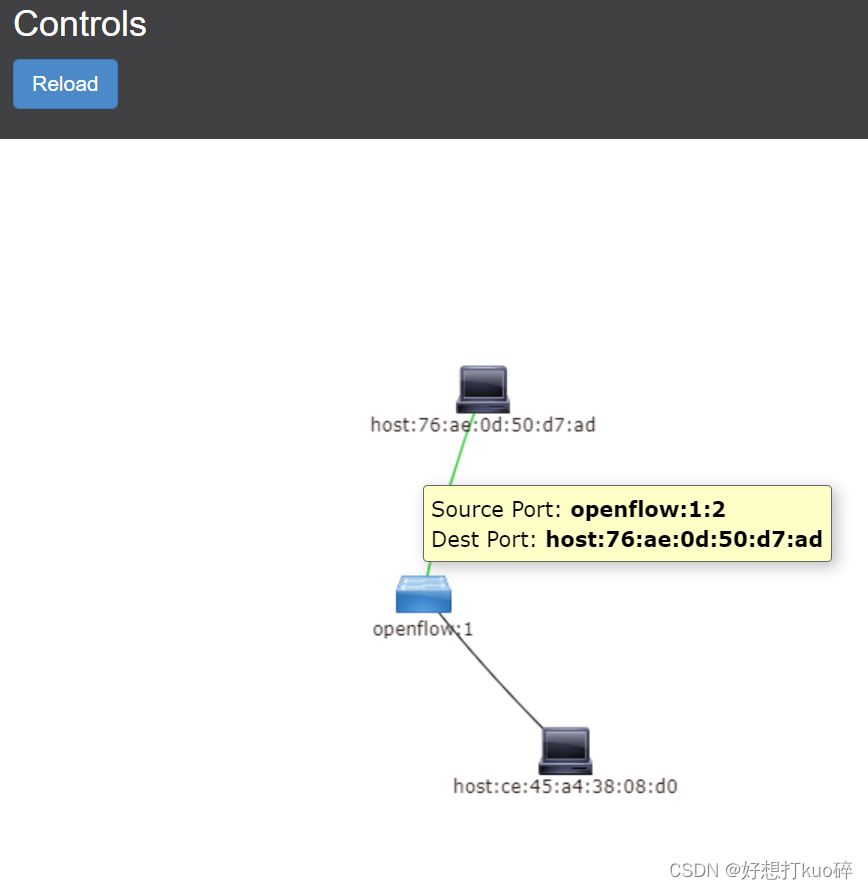
下发流表:匹配源MAC为ce:45:a4:38:08:d0的流量,目的MAC为76:ae:0d:50:d7:ad,出端口为2,优先级为300
这里可以看到交换机的2端口连接的是76:ae:0d:50:d7:ad,因此以下配置中目的地址为:76:ae:0d:50:d7:ad,源地址为:ce:45:a4:38:08:d0
<?xml version="1.0" encoding="UTF-8" standalone="no"?>
<flow xmlns="urn:opendaylight:flow:inventory">
<priority>200</priority>
<flow-name>Foo1</flow-name>
<idle-timeout>0</idle-timeout>
<hard-timeout>0</hard-timeout>
<match>
<ethernet-match>
<ethernet-source>
<address>ce:45:a4:38:08:d0</address>
</ethernet-source>
<ethernet-destination>
<address>76:ae:0d:50:d7:ad</address>
</ethernet-destination>
</ethernet-match>
</match>
<id>107</id>
<table_id>0</table_id>
<instructions>
<instruction>
<order>0</order>
<apply-actions>
<action>
<order>0</order>
<output-action>
<output-node-connector>2</output-node-connector>
</output-action>
</action>
</apply-actions>
</instruction>
</instructions>
</flow>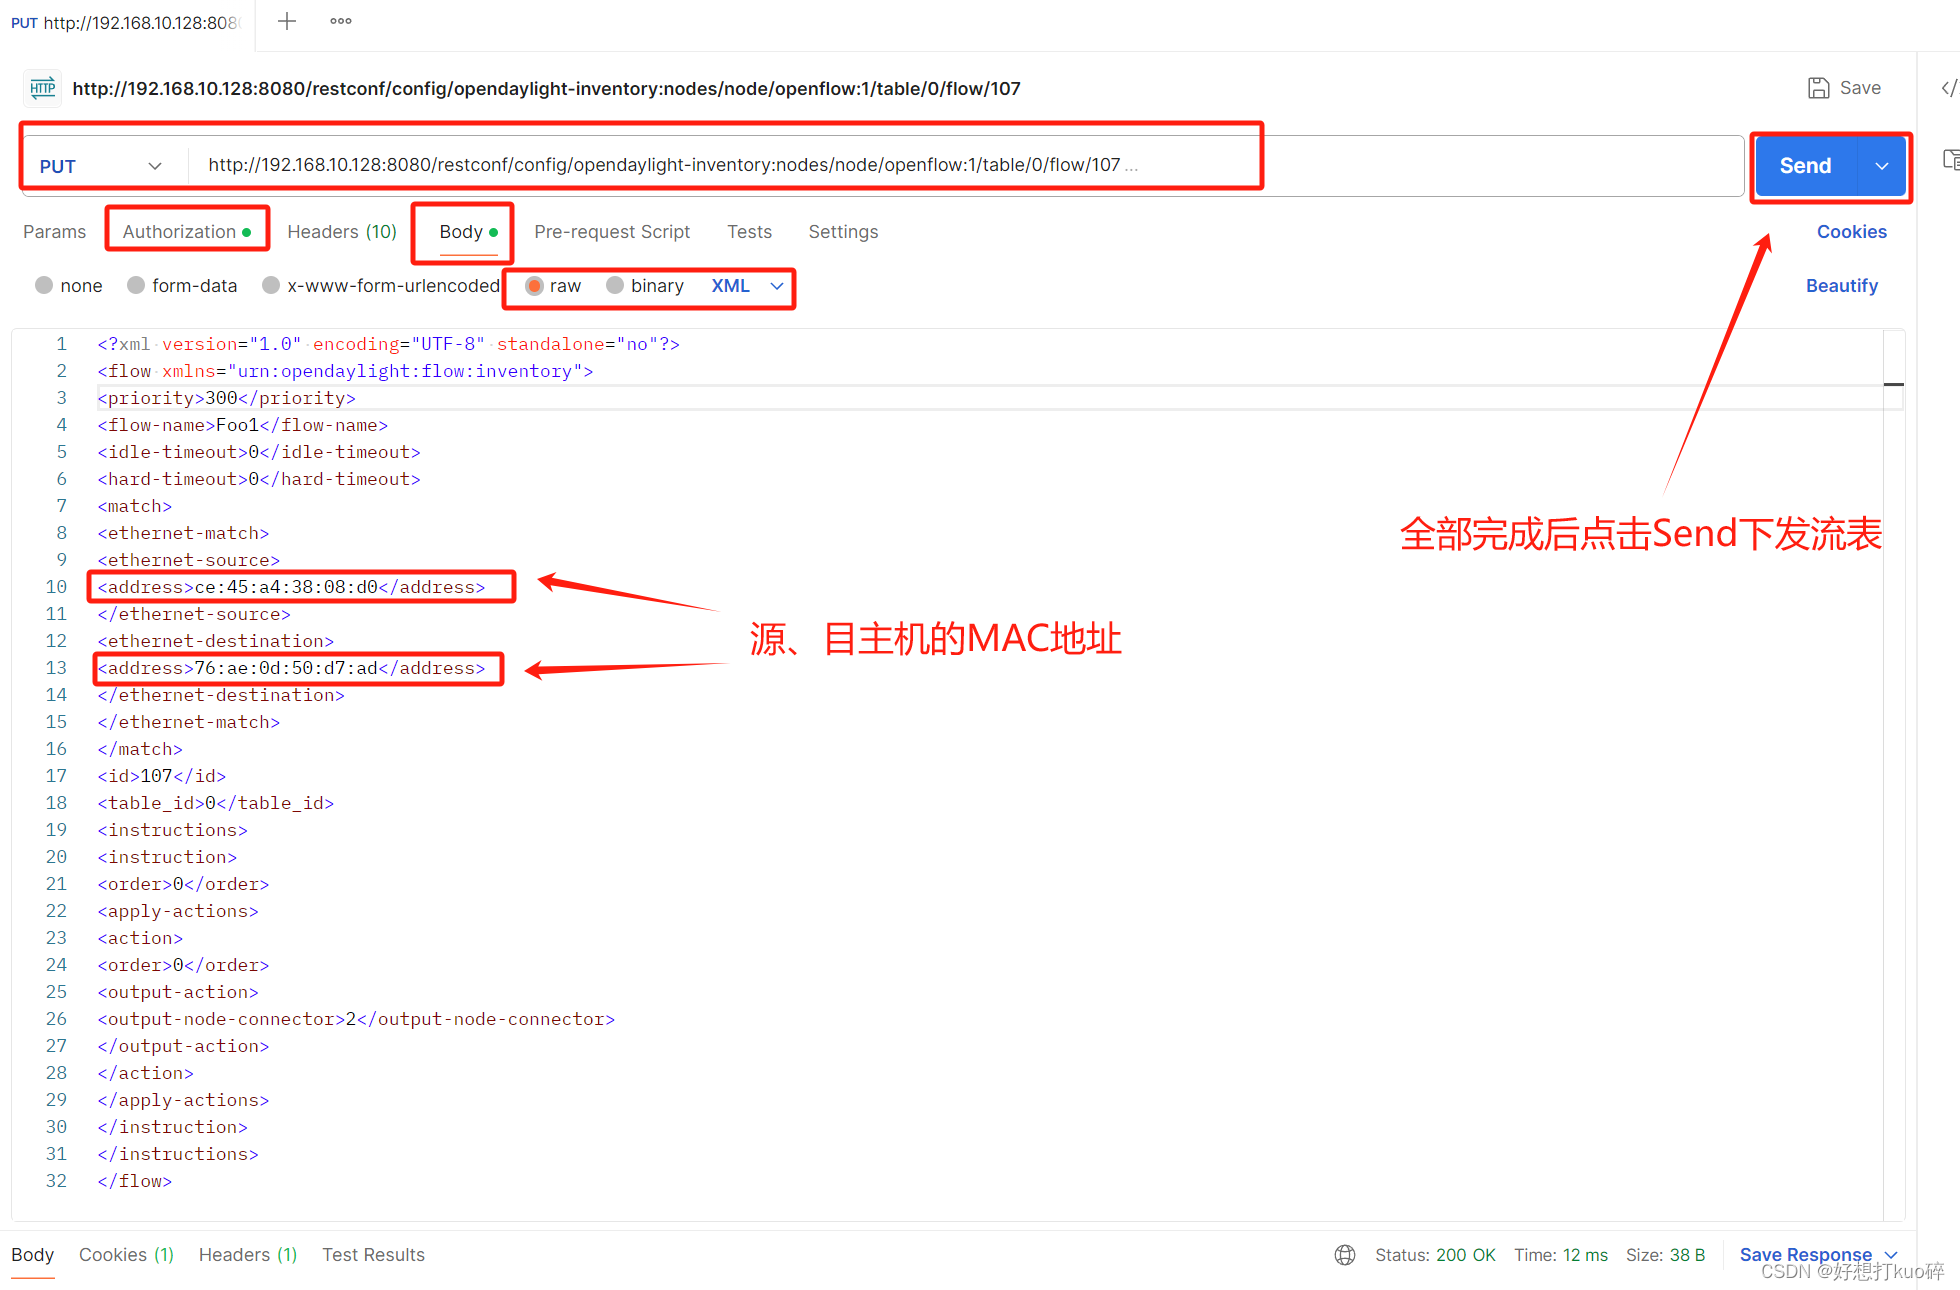
mininet上查看流表是否增加了一条优先级为300的流表
sh ovs-ofctl dump-flows s1 -O openflow13
下发第二条L2流表
下发流表:匹配源MAC为76:ae:0d:50:d7:ad的流量,目的MAC为ce:45:a4:38:08:d0,出端口为1,优先级为300
这里的源目MAC地址与第一条流表中的应该相反,且流ID不能再是107,应该换一个,比如108
<?xml version="1.0" encoding="UTF-8" standalone="no"?>
<flow xmlns="urn:opendaylight:flow:inventory">
<priority>200</priority>
<flow-name>Foo1</flow-name>
<idle-timeout>0</idle-timeout>
<hard-timeout>0</hard-timeout>
<match>
<ethernet-match>
<ethernet-source>
<address>76:ae:0d:50:d7:ad</address>
</ethernet-source>
<ethernet-destination>
<address>ce:45:a4:38:08:d0</address>
</ethernet-destination>
</ethernet-match>
</match>
<id>108</id>
<table_id>0</table_id>
<instructions>
<instruction>
<order>0</order>
<apply-actions>
<action>
<order>0</order>
<output-action>
<output-node-connector>1</output-node-connector>
</output-action>
</action>
</apply-actions>
</instruction>
</instructions>
</flow>
在mininet上查询流表是否已经下发
sh ovs-ofctl dump-flows s1 -O openflow13
测试下发的流表是否有效
pingall
此处可以看到,匹配流表的数据增加了
6、L3层流表下发
L3层对应OSI模型的三层,三层流表主要匹配的是IP包的协议类型和IP地址
URL地址栏输入:http://192.168.112.132:8080/restconf/config/opendaylight-inventory:nodes/node/openflow:1/table/0/flow/111
流表:匹配源IP地址为10.0.0.1/32的报文,并将其转发到2端口
<?xml version="1.0" encoding="UTF-8" standalone="no"?>
<flow xmlns="urn:opendaylight:flow:inventory">
<priority>300</priority>
<flow-name>Foo1</flow-name>
<idle-timeout>0</idle-timeout>
<hard-timeout>0</hard-timeout>
<match>
<ethernet-match>
<ethernet-type>
<type>2048</type>
</ethernet-type>
</ethernet-match>
<ipv4-source>10.0.0.1/32</ipv4-source>
</match>
<id>111</id>
<table_id>0</table_id>
<instructions>
<instruction>
<order>0</order>
<apply-actions>
<action>
<order>0</order>
<output-action>
<output-node-connector>2</output-node-connector>
</output-action>
</action>
</apply-actions>
</instruction>
</instructions>
</flow>
URL地址栏输入:http://192.168.112.132:8080/restconf/config/opendaylight-inventory:nodes/node/openflow:1/table/0/flow/112
匹配源IP地址为10.0.0.2/32的报文,并将其转发到1端口。
<?xml version="1.0" encoding="UTF-8" standalone="no"?>
<flow xmlns="urn:opendaylight:flow:inventory">
<priority>300</priority>
<flow-name>Foo2</flow-name>
<idle-timeout>0</idle-timeout>
<hard-timeout>0</hard-timeout>
<match>
<ethernet-match>
<ethernet-type>
<type>2048</type>
</ethernet-type>
</ethernet-match>
<ipv4-source>10.0.0.2/32</ipv4-source>
</match>
<id>112</id>
<table_id>0</table_id>
<instructions>
<instruction>
<order>0</order>
<apply-actions>
<action>
<order>0</order>
<output-action>
<output-node-connector>1</output-node-connector>
</output-action>
</action>
</apply-actions>
</instruction>
</instructions>
</flow>
URL地址栏输入:http://192.168.112.132:8080/restconf/config/opendaylight-inventory:nodes/node/openflow:1/table/0/flow/113
流表:下发arp匹配流表
<?xml version="1.0" encoding="UTF-8" standalone="no"?>
<flow xmlns="urn:opendaylight:flow:inventory">
<priority>300</priority>
<flow-name>Foo1</flow-name>
<idle-timeout>0</idle-timeout>
<hard-timeout>0</hard-timeout>
<match>
<ethernet-match>
<ethernet-type>
<type>2054</type>
</ethernet-type>
</ethernet-match>
</match>
<id>113</id>
<table_id>0</table_id>
<instructions>
<instruction>
<order>0</order>
<apply-actions>
<action>
<order>0</order>
<output-action>
<output-node-connector>NORMAL</output-node-connector>
<max-length>0</max-length>
</output-action>
</action>
</apply-actions>
</instruction>
</instructions>
</flow>
7、L4层流表下发
L4对应的OSI模型中的四层,即流表对应的TCP/UDP源端口(TCP/UDP src port)、TCP/UDP目的端口号(TCP/UDP dst port)字段。本实验匹配TCP目的端口
URL地址栏输入http://192.168.112.132:8080/restconf/config/opendaylight-inventory:nodes/node/openflow:1/table/0/flow/117
匹配到目的IP地址为10.0.0.1/32且目的端口为5001的TCP报文,将其转发到2端口
<?xml version="1.0" encoding="UTF-8" standalone="no"?>
<flow xmlns="urn:opendaylight:flow:inventory">
<priority>300</priority>
<flow-name>Foo1</flow-name>
<idle-timeout>0</idle-timeout>
<hard-timeout>0</hard-timeout>
<match>
<tcp-destination-port>5001</tcp-destination-port>
<ethernet-match>
<ethernet-type>
<type>2048</type>
</ethernet-type>
</ethernet-match>
<ipv4-destination>10.0.0.1/32</ipv4-destination>
<ip-match>
<ip-protocol>6</ip-protocol>
</ip-match>
</match>
<id>117</id>
<table_id>0</table_id>
<instructions>
<instruction>
<order>0</order>
<apply-actions>
<action>
<order>0</order>
<output-action>
<output-node-connector>2</output-node-connector>
</output-action>
</action>
</apply-actions>
</instruction>
</instructions>
</flow>
URL地址栏输入http://192.168.112.132:8080/restconf/config/opendaylight-inventory:nodes/node/openflow:1/table/0/flow/118
匹配到目的IP地址为10.0.0.2/32且目的端口为5001的TCP报文,将其转发到1端口
<?xml version="1.0" encoding="UTF-8" standalone="no"?>
<flow xmlns="urn:opendaylight:flow:inventory">
<priority>300</priority>
<flow-name>Foo1</flow-name>
<idle-timeout>0</idle-timeout>
<hard-timeout>0</hard-timeout>
<match>
<tcp-destination-port>5001</tcp-destination-port>
<ethernet-match>
<ethernet-type>
<type>2048</type>
</ethernet-type>
</ethernet-match>
<ipv4-destination>10.0.0.2/32</ipv4-destination>
<ip-match>
<ip-protocol>6</ip-protocol>
</ip-match>
</match>
<id>118</id>
<table_id>0</table_id>
<instructions>
<instruction>
<order>0</order>
<apply-actions>
<action>
<order>0</order>
<output-action>
<output-node-connector>1</output-node-connector>
</output-action>
</action>
</apply-actions>
</instruction>
</instructions>
</flow>
URL地址栏输入http://192.168.112.132:8080/restconf/config/opendaylight-inventory:nodes/node/openflow:1/table/0/flow/119
流表:下发arp匹配流表
<?xml version="1.0" encoding="UTF-8" standalone="no"?>
<flow xmlns="urn:opendaylight:flow:inventory">
<priority>300</priority>
<flow-name>Foo1</flow-name>
<idle-timeout>0</idle-timeout>
<hard-timeout>0</hard-timeout>
<match>
<ethernet-match>
<ethernet-type>
<type>2054</type>
</ethernet-type>
</ethernet-match>
</match>
<id>119</id>
<table_id>0</table_id>
<instructions>
<instruction>
<order>0</order>
<apply-actions>
<action>
<order>0</order>
<output-action>
<output-node-connector>FLOOD</output-node-connector>
<max-length>0</max-length>
</output-action>
</action>
</apply-actions>
</instruction>
</instructions>
</flow>
这篇关于Postman下发流表至Opendaylight的文章就介绍到这儿,希望我们推荐的文章对编程师们有所帮助!


