本文主要是介绍【YOLOX】——目标监测(代码与原理详解),希望对大家解决编程问题提供一定的参考价值,需要的开发者们随着小编来一起学习吧!
code:https://github.com/Megvii-BaseDetection/YOLOX
来自:旷视
关键词:目标检测,精度

原理部分摘自:https://bbs.cvmart.net/articles/5138
1. 基线
我们选择YOLOv3+DarkNet53作为基线,接下来,我们将逐步介绍YOLOX的整个系统设计。
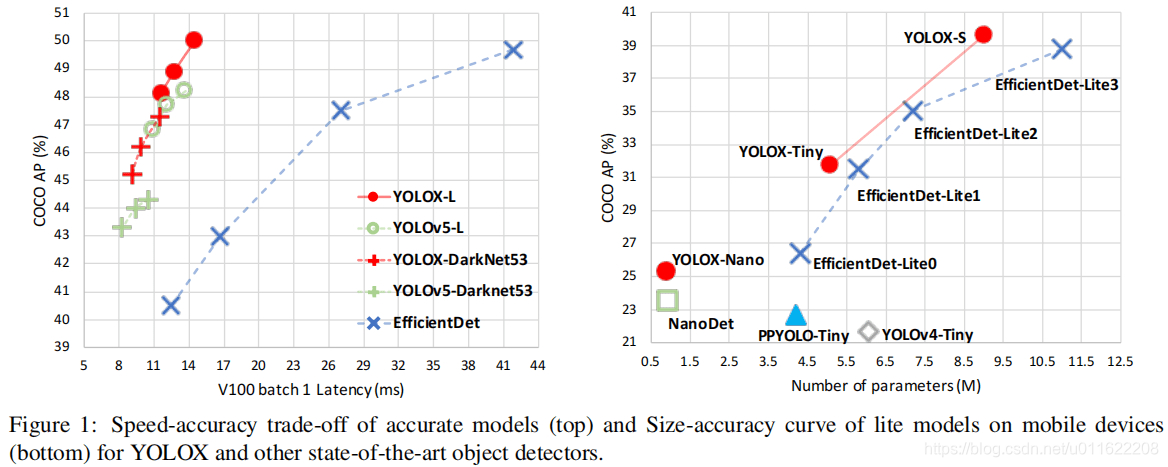
Implementation Details 我们的训练配置从基线模型到最终模型基本一致。在COCO train2017上训练300epoch并进行5epoch的warm-up。优化器为SGD,BatchSize=64,初始学习率为0.01,cosine学习机制。weight decay设置为0.0005,momentum设置为0.9, batch为128(8GPU)。输入尺寸从448以步长32均匀过渡到832. FPS与耗时采用FP-16精度、bs=1在Tesla V100测试所得。

YOLOv3 baseline 基线模型采用了DarkNet53骨干+SPP层(即所谓的YOLOv3-SPP)。我们对原始训练策略进行轻微调整:添加了EMA权值更新、cosine学习率机制、IoU损失、IoU感知分支。我们采用BCE损失训练cls与obj分支,IoU损失训练reg分支。这些广义的训练技巧与YOLOX的关键改进是正交的,因此,我们将其添加到baseline中。此外,我们添加了RandomHorizontalFlip、ColorJitter以及多尺度数据增广,移除了RandomResizedCrop。基于上述训练技巧,基线模型在COCO val上取得了38.5%AP指标,见Figure2.
2. 改进部分
2.1 Decoupled Head

在目标检测中,分类与回归任务的冲突是一种常见问题。因此,分类与定位头的解耦已被广泛应用到单阶段、两阶段检测中。然而,随着YOLO系列的骨干、特征金字塔的进化,单其检测头仍处于耦合状态,见上图。

我们分析发现:检测头耦合会影响模型性能。采用解耦头替换YOLO的检测头可以显著改善模型收敛速度,见上图。解耦头对于端到端版本YOLO非常重要,可参考下表。因此,我们将YOLO的检测头替换为轻量解耦头,见上面的Figure2:它包含一个1×1卷积进行通道降维,后接两个并行分支(均为3×3卷积)。注:轻量头可以带来1.1ms的推理耗时。

code部分
- 网络的输入为:1×3×640×640
- yolo的输出为:[1/8, 1/16, 1/32]stride, 分别的输出尺寸为:80×80,40 ×40,20×20
- 这里对3个分支,每个分支有两个解耦头;同时回归分支,再解耦为box + object 两个输出
for k, (cls_conv, reg_conv, stride_this_level, x) in enumerate(zip(self.cls_convs, self.reg_convs, self.strides, xin)):x = self.stems[k](x)cls_x = xreg_x = xcls_feat = cls_conv(cls_x)cls_output = self.cls_preds[k](cls_feat)reg_feat = reg_conv(reg_x)reg_output = self.reg_preds[k](reg_feat)obj_output = self.obj_preds[k](reg_feat)if self.training:output = torch.cat([reg_output, obj_output, cls_output], 1)output, grid = self.get_output_and_grid(output, k, stride_this_level, xin[0].type()) # 6400*85, 1600*85, 400*85x_shifts.append(grid[:, :, 0])y_shifts.append(grid[:, :, 1])expanded_strides.append(torch.zeros(1, grid.shape[1]).fill_(stride_this_level).type_as(xin[0]) # 1 × (outsize * outsize)
2.2 Strong data augmentation
我们添加了Mosaic与Mixup两种数据增广以提升YOLOX的性能。Mosaic是U版YOLOv3中引入的一种有效增广策略,后来被广泛应用于YOLOv4、YOLOv5等检测器中。MixUp早期是为图像分类设计后在BoF中进行修改用于目标检测训练。通过这种额外的数据增广,基线模型取得了42.0%AP指标。注:由于采用了更强的数据增广,我们发现ImageNet预训练将毫无意义,因此,所有模型我们均从头开始训练。
Mosaic数据增强方法
mosaic数据增强则利用了四张图片,对四张图片进行拼接,每一张图片都有其对应的框框,将四张图片拼接之后就获得一张新的图片,同时也获得这张图片对应的框框,然后我们将这样一张新的图片传入到神经网络当中去学习,相当于一下子传入四张图片进行学习了。论文中说这极大丰富了检测物体的背景!且在标准化BN计算的时候一下子会计算四张图片的数据!如下图所示:

mixup
最开始用于图像分类中的。这里我们直接给出效果图。
code
代码部分在Mosaicdetection.py中
- 首先获得4张图片,进行
Mosaic增强 - 然后再随机选一张进行
mixup增强
# 1. Mosaic增强# 3 additional image indicesindices = [idx] + [random.randint(0, len(self._dataset) - 1) for _ in range(3)]for i_mosaic, index in enumerate(indices):img, _labels, _, _ = self._dataset.pull_item(index)             # labels:x1,y1,x2,y2,idx(0~n-1): 3*5h0, w0 = img.shape[:2]  # orig hwscale = min(1. * input_h / h0, 1. * input_w / w0)img = cv2.resize(img, (int(w0 * scale), int(h0 * scale)), interpolation=cv2.INTER_LINEAR)# generate output mosaic image(h, w, c) = img.shape[:3]if i_mosaic == 0:mosaic_img = np.full((input_h * 2, input_w * 2, c), 114, dtype=np.uint8)# suffix l means large image, while s means small image in mosaic aug.(l_x1, l_y1, l_x2, l_y2), (s_x1, s_y1, s_x2, s_y2) = get_mosaic_coordinate(mosaic_img, i_mosaic, xc, yc, w, h, input_h, input_w)mosaic_img[l_y1:l_y2, l_x1:l_x2] = img[s_y1:s_y2, s_x1:s_x2]padw, padh = l_x1 - s_x1, l_y1 - s_y1labels = _labels.copy()# Normalized xywh to pixel xyxy formatif _labels.size > 0:labels[:, 0] = scale * _labels[:, 0] + padwlabels[:, 1] = scale * _labels[:, 1] + padhlabels[:, 2] = scale * _labels[:, 2] + padwlabels[:, 3] = scale * _labels[:, 3] + padhmosaic_labels.append(labels)if len(mosaic_labels):mosaic_labels = np.concatenate(mosaic_labels, 0)np.clip(mosaic_labels[:, 0], 0, 2 * input_w, out=mosaic_labels[:, 0])np.clip(mosaic_labels[:, 1], 0, 2 * input_h, out=mosaic_labels[:, 1])np.clip(mosaic_labels[:, 2], 0, 2 * input_w, out=mosaic_labels[:, 2])np.clip(mosaic_labels[:, 3], 0, 2 * input_h, out=mosaic_labels[:, 3])# 2. mixup
origin_img = 0.5 * origin_img + 0.5 * padded_cropped_img.astype(np.float32)
2.3 Anchor-free
YOLOv4、YOLOv5均采用了YOLOv3原始的anchor设置。然而anchor机制存在诸多问题:(1) 为获得最优检测性能,需要在训练之前进行聚类分析以确定最佳anchor集合,这些anchor集合存在数据相关性,泛化性能较差;(2) anchor机制提升了检测头的复杂度。
Anchor-free检测器在过去两年得到了长足发展并取得了与anchor检测器相当的性能。将YOLO转换为anchor-free形式非常简单,我们将每个位置的预测从3下降为1并直接预测四个值:即两个offset以及高宽。参考FCOS,我们将每个目标的中心定位正样本并预定义一个尺度范围以便于对每个目标指派FPN水平。这种改进可以降低检测器的参数量于GFLOPs进而取得更快更优的性能:42.9%AP。
2.4 Multi positives
为确保与YOLOv3的一致性,前述anchor-free版本仅仅对每个目标赋予一个正样本,而忽视了其他高质量预测。参考FCOS,我们简单的赋予中心3×3区域为正样本。此时模型性能提升到45.0%,超过了当前最佳U版YOLOv3的44.3%。
对8400个yolo块的中心点,看是否在不同scale的中心区域,如果在,则将该点的pred暂时认定为正样本
center_radius = 2.5gt_bboxes_per_image_l = (gt_bboxes_per_image[:, 0]).unsqueeze(1).repeat(1, total_num_anchors) - center_radius * expanded_strides_per_image.unsqueeze(0)gt_bboxes_per_image_r = (gt_bboxes_per_image[:, 0]).unsqueeze(1).repeat(1, total_num_anchors) + center_radius * expanded_strides_per_image.unsqueeze(0)gt_bboxes_per_image_t = (gt_bboxes_per_image[:, 1]).unsqueeze(1).repeat(1, total_num_anchors) - center_radius * expanded_strides_per_image.unsqueeze(0)gt_bboxes_per_image_b = (gt_bboxes_per_image[:, 1]).unsqueeze(1).repeat(1, total_num_anchors) + center_radius * expanded_strides_per_image.unsqueeze(0)c_l = x_centers_per_image - gt_bboxes_per_image_l # 对8400个yolo块的中心点,看是否在不同scale的中心区域c_r = gt_bboxes_per_image_r - x_centers_per_imagec_t = y_centers_per_image - gt_bboxes_per_image_tc_b = gt_bboxes_per_image_b - y_centers_per_imagecenter_deltas = torch.stack([c_l, c_t, c_r, c_b], 2)is_in_centers = center_deltas.min(dim=-1).values > 0.0is_in_centers_all = is_in_centers.sum(dim=0) > 0
2.5 SimOTA标签分配
参考自:https://zhuanlan.zhihu.com/p/392221567
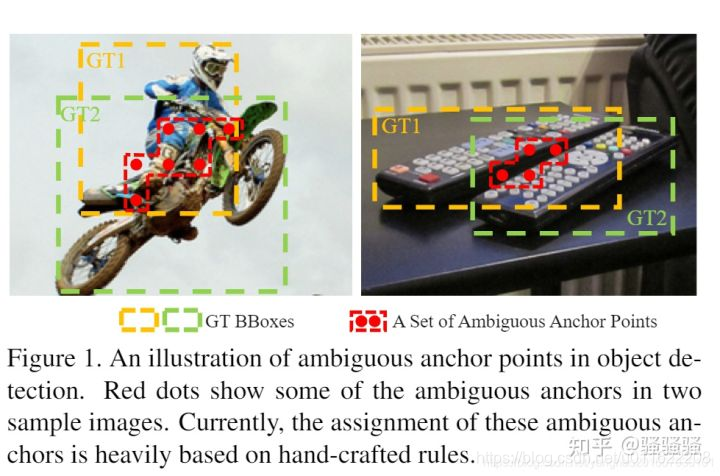
这里不得不提到OTA(Optimal Transport Assignment,Paper: https://arxiv.org/abs/2103.14259),在目标检测中,有时候经常会出现一些模棱两可的anchor,如图3,即某一个anchor,按照正样本匹配规则,会匹配到两个gt,而retinanet这样基于IoU分配是会把anchor分配给IoU最大的gt,而OTA作者认为,将模糊的anchor分配给任何gt或背景都会对其他gt的梯度造成不利影响,因此,对模糊anchor样本的分配是特殊的,除了局部视图之外还需要其他信息。因此,更好的分配策略应该摆脱对每个gt对象进行最优分配的惯例,而转向全局最优的思想,换句话说,为图像中的所有gt对象找到全局的高置信度分配。(和DeTR中使用匈牙利算法一对一分配有点类似)

然而,我们发现:最优运输问题优化会带来25%的额外训练耗时。因此,我们将其简化为动态top-k策略以得到一个近似解(SimOTA)。SimOTA不仅可以降低训练时间,同时可以避免额外的超参问题。SimOTA的引入可以将模型的性能从45.0%提升到47.3%,大幅超越U版YOLOv的44.3%。
code
- 首先进行筛选 anchor的中心在 box & 在 box 的中心一定区域
- 进行 simota 标签分配
- OTA分配的时候,cost是一个 n_gt × m_anchor 的矩阵。个人想法:1. 为m个anchor,每个match一个gt; 2. 通过OTA方法进行分配,为m中的m2个anchor分配目标gt,这样可以节省计算量
# 1. 首先进行筛选 anchor的中心在 box & 在 box 的中心一定区域fg_mask, is_in_boxes_and_center = self.get_in_boxes_info( # fg_mask, 用来做目标预测,初筛,anchor的中心在 box & 在 box 的中心一定区域gt_bboxes_per_image, expanded_strides, x_shifts, y_shifts, total_num_anchors, num_gt,)bboxes_preds_per_image = bboxes_preds_per_image[fg_mask] # fg_mask: 3471cls_preds_ = cls_preds[batch_idx][fg_mask]obj_preds_ = obj_preds[batch_idx][fg_mask]num_in_boxes_anchor = bboxes_preds_per_image.shape[0]if mode == "cpu":gt_bboxes_per_image = gt_bboxes_per_image.cpu()bboxes_preds_per_image = bboxes_preds_per_image.cpu()pair_wise_ious = bboxes_iou( # 3471*31gt_bboxes_per_image, bboxes_preds_per_image, False)gt_cls_per_image = (F.one_hot(gt_classes.to(torch.int64), self.num_classes).float() # 31*80.unsqueeze(1).repeat(1, num_in_boxes_anchor, 1))pair_wise_ious_loss = -torch.log(pair_wise_ious + 1e-8) # 9*3471if mode == "cpu":cls_preds_, obj_preds_ = cls_preds_.cpu(), obj_preds_.cpu()cls_preds_ = ( # 9*3471*80cls_preds_.float().unsqueeze(0).repeat(num_gt, 1, 1).sigmoid_()* obj_preds_.unsqueeze(0).repeat(num_gt, 1, 1).sigmoid_())pair_wise_cls_loss = F.binary_cross_entropy( # 9*3471cls_preds_.sqrt_(), gt_cls_per_image, reduction="none").sum(-1)del cls_preds_cost = ( # 9*3471, 标签分配pair_wise_cls_loss+ 3.0 * pair_wise_ious_loss+ 100000.0 * (~is_in_boxes_and_center))# 2. 进行 simota 标签分配(num_fg, gt_matched_classes, pred_ious_this_matching, matched_gt_inds) = self.dynamic_k_matching(cost, pair_wise_ious, gt_classes, num_gt, fg_mask)del pair_wise_cls_loss, cost, pair_wise_ious, pair_wise_ious_lossif mode == "cpu":gt_matched_classes = gt_matched_classes.cuda()fg_mask = fg_mask.cuda()pred_ious_this_matching = pred_ious_this_matching.cuda()matched_gt_inds = matched_gt_inds.cuda()return gt_matched_classes, fg_mask, pred_ious_this_matching, matched_gt_inds, num_fg
3. 其他
合适的增广策略会随模型大小而变化。从下表可以看到:MixUp可以帮助YOLOX-L取得0.9%AP指标提升,但会弱化YOLOX-Nano的性能。基于上述对比,当训练小模型时,我们移除MixUp,并弱化Mosaic增广,模型性能可以从24.0%提升到25.3%。而对于大模型则采用默认配置。

这篇关于【YOLOX】——目标监测(代码与原理详解)的文章就介绍到这儿,希望我们推荐的文章对编程师们有所帮助!


