本文主要是介绍LDAP扩展ssh与sudo,希望对大家解决编程问题提供一定的参考价值,需要的开发者们随着小编来一起学习吧!
配置 支持 SUDO 与 SSH
服务器端
SUDO 部分
-
查看系统安装
sudo包过滤出OpenLDAPrpm -qal | grep sudo | grep -i "OpenLDAP" /usr/share/doc/sudo-1.8.19p2/schema.OpenLDAP -
拷贝该档案到
LDAPschema中cp /usr/share/doc/sudo-1.8.19p2/schema.OpenLDAP /etc/openldap/schema/sudo.schema
SSH 部分
-
安装
openssh-ldap如果不存在yum -y install openssh-ldap [root@ldap-server ~]# rpm -qal | grep openssh-ldap /usr/share/doc/openssh-ldap-7.4p1 /usr/share/doc/openssh-ldap-7.4p1/HOWTO.ldap-keys /usr/share/doc/openssh-ldap-7.4p1/ldap.conf /usr/share/doc/openssh-ldap-7.4p1/openssh-lpk-openldap.ldif /usr/share/doc/openssh-ldap-7.4p1/openssh-lpk-openldap.schema /usr/share/doc/openssh-ldap-7.4p1/openssh-lpk-sun.ldif /usr/share/doc/openssh-ldap-7.4p1/openssh-lpk-sun.schema -
拷贝档案到
schema中cp /usr/share/doc/openssh-ldap-7.4p1/openssh-lpk-openldap.schema /etc/openldap/schema
公共部分
增加自定义的 sudo.schema 与 openssh-lpk-openldap.schema
-
删除源模式配置文件
rm -rf /etc/openldap/slapd.d/cn=config/cn=schema/* -
重新导入
LDAP模式# 可根据自己的需要酌情导入, 此处一定注意顺序。 cat schema_convert.conf # include /etc/openldap/schema/corba.schema include /etc/openldap/schema/core.schema include /etc/openldap/schema/cosine.schema # include /etc/openldap/schema/duaconf.schema # include /etc/openldap/schema/dyngroup.schema include /etc/openldap/schema/inetorgperson.schema # include /etc/openldap/schema/java.schema # include /etc/openldap/schema/misc.schema include /etc/openldap/schema/nis.schema # include /etc/openldap/schema/openldap.schema # include /etc/openldap/schema/pmi.schema include /etc/openldap/schema/collective.schema # include /etc/openldap/schema/ppolicy.schema include /etc/openldap/schema/sudo.schema include /etc/openldap/schema/openssh-lpk-openldap.schema -
导入
LDAP模式slaptest -f schema_convert.conf -F /etc/openldap/slapd.d config file testing succeeded -
赋权与验证
# 查看生成的文件
ls -l /etc/openldap/slapd.d/cn=config/cn=schema/cn={0}corba.ldif
cn={10}pmi.ldif
cn={11}collective.ldif
cn={12}ppolicy.ldif
cn={13}sudo.ldif
cn={14}openssh-lpk-openldap.ldif
cn={1}core.ldif
cn={2}cosine.ldif
cn={3}duaconf.ldif
cn={4}dyngroup.ldif
cn={5}inetorgperson.ldif
cn={6}java.ldif
cn={7}misc.ldif
cn={8}nis.ldif
cn={9}openldap.ldif
# 更改权限
chown -R ldap.ldap /etc/openldap/slapd.d/
# 重启服务
systemctl restart slapd
配置页面
查看页面配置请移步到: 页面配置
phpldapadmin 預設是不支援 sudo 的設定,所以要到下面的網址抓 template
获取 Templates 网址
服务端配置
sudo页面配置
vim /usr/share/phpldapadmin/templates/creation/sudo.xml
<?xml version="1.0" encoding="UTF-8" standalone="no"?>
<!DOCTYPE template SYSTEM "template.dtd">
<template>
<title>Sudo Policy</title>
<regexp>^ou=sudoers,dc=.*</regexp>
<icon>images/door.png</icon>
<description>New Sudo Policy</description>
<askcontainer>1</askcontainer>
<rdn>cn</rdn>
<visible>1</visible><objectClasses>
<objectClass id="sudoRole"></objectClass>
</objectClasses><attributes>
<attribute id="cn"><display>Policy Name</display><order>1</order><page>1</page>
</attribute>
<attribute id="sudoCommand"><display>Sudo Command</display><order>2</order><page>1</page><spacer>1</spacer>
</attribute>
<attribute id="sudoUser"><display>Sudo Users</display><option>=php.MultiList(/,(objectClass=posixAccount),uid,%uid%
(%cn%),sudoUser)</option><order>3</order><page>1</page><spacer>1</spacer>
</attribute>
<attribute id="sudoHost"><display>Sudo Hosts</display><array>10</array><order>3</order><page>1</page><spacer>1</spacer>
</attribute>
<attribute id="description"><type>textarea</type><display>Description</display><order>4</order><page>1</page>
</attribute>
</attributes>
</template>
vim /usr/share/phpldapadmin/templates/modification/sudo.xml
<?xml version="1.0" encoding="UTF-8" standalone="no"?>
<!DOCTYPE template SYSTEM "template.dtd">
<template>
<title>Sudo Policy</title>
<regexp>^cn=.*,ou=sudoers,dc=.*</regexp>
<icon>images/door.png</icon>
<description>Sudo Policy</description>
<askcontainer>1</askcontainer>
<rdn>cn</rdn>
<visible>1</visible><objectClasses>
<objectClass id="sudoRole"></objectClass>
</objectClasses><attributes>
<attribute id="cn"><display>Policy Name</display><order>1</order><page>1</page>
</attribute>
<attribute id="sudoCommand"><display>Sudo Command</display><order>2</order><page>1</page><spacer>1</spacer>
</attribute>
<attribute id="sudoUser"><display>Sudo Users</display><order>3</order><page>1</page><spacer>1</spacer>
</attribute>
<attribute id="sudoHost"><display>Sudo Hosts</display><!-- <array>10</array> --><order>3</order><page>1</page><spacer>1</spacer>
</attribute>
<attribute id="description"><type>textarea</type><display>Description</display><order>4</order><page>1</page><cols>200</cols><rows>10</rows>
</attribute>
</attributes>
</template>
- 建立
ou为sudoers与sudo的规则
ou


role与应用


客户端配置
SUDO 部分
- 配置
sudo-ldap.conf以支持使用LDAP服务端配置
vim /etc/sudo-ldap.conf
uri ldap://172.16.10.220
# ou 与页面配置的 ou 保持一致
sudoers_base ou=sudoers,dc=laoshiren,dc=com
- 配置
nsswitch.conf文件, 支持使用LDAP配置
vim /etc/nsswitch.conf
sudoers:    files   ldap
验证
与配置信息吻合,成功
➜  ~ ssh test_user@172.16.10.10
test_user@172.16.10.10's password:
Last login: Tue Jan  8 03:49:49 2019 from 172.16.10.1
-sh-4.2$ whoami
test_user
-sh-4.2$ id
uid=1000(test_user) gid=500(ldap_users) 组=500(ldap_users)
-sh-4.2$ sudo -l
[sudo] test_user 的密码:
匹配 %2$s 上 %1$s 的默认条目:!visiblepw, always_set_home, match_group_by_gid, env_reset, env_keep="COLORS DISPLAY HOSTNAME HISTSIZE KDEDIR LS_COLORS", env_keep+="MAIL PS1 PS2 QTDIR USERNAME LANG LC_ADDRESS LC_CTYPE", env_keep+="LC_COLLATE LC_IDENTIFICATION LC_MEASUREMENT LC_MESSAGES",env_keep+="LC_MONETARY LC_NAME LC_NUMERIC LC_PAPER LC_TELEPHONE", env_keep+="LC_TIME LC_ALL LANGUAGE LINGUAS _XKB_CHARSET XAUTHORITY", secure_path=/sbin\:/bin\:/usr/sbin\:/usr/bin用户 test_user 可以在 kubernetes-node1 上运行以下命令:(root) ALL
SSH 部分
LDAP 使用 publicKey 登录
套件openssh-ldap配置
- 安装套件
openssh-ldap
yum install openssh-ldap
- 拷贝配置文件
cp /usr/share/doc/openssh-ldap-7.4p1/ldap.conf /etc/ssh/
- 配置使用
TLS
具体配置移步: LDAP开启TLS&LDAPS
TLS_REQCERT [never、allow、try、demand | hard]
设置是否在TLS会话中检查server证书
Never:不检查任何证书。
Allow:检查server证书,没有证书或证书错误,都允许连接。
Try:检查server证书,没有证书(允许连接),证书错误(终止连接)。
demand | hard:检查server证书,没有证书或证书错误都将立即终止连接。
vim /etc/ssh/ldap.conf
# 添加如下几行
# ldap 服务器
uri ldap://172.16.10.220/
# 开启 tls 认证,并且配置证书位置, 以及认证方式
ssl start_tls
tls_cacertdir /etc/openldap/cacerts
tls_cacertfile /etc/openldap/cacerts/laoshirenCA.pem
tls_reqcert never
SSH 服务配置
- 更改认证方式
vim /etc/ssh/sshd_config
# 增加如下
# 脚本将从LDAP获取密钥并将其提供给SSH服务器
AuthorizedKeysCommand /usr/libexec/openssh/ssh-ldap-wrapper
AuthorizedKeysCommandUser nobody
PubkeyAuthentication yes
验证 SSH-KEY 登录方式
- 创建用户

- 验证用户登录
ssh tssh@172.16.10.10
tssh@172.16.10.10's password:
Creating directory '/home/users/tssh'.
-sh-4.2$ id
uid=1001(tssh) gid=500(linux_group) 组=500(linux_group)
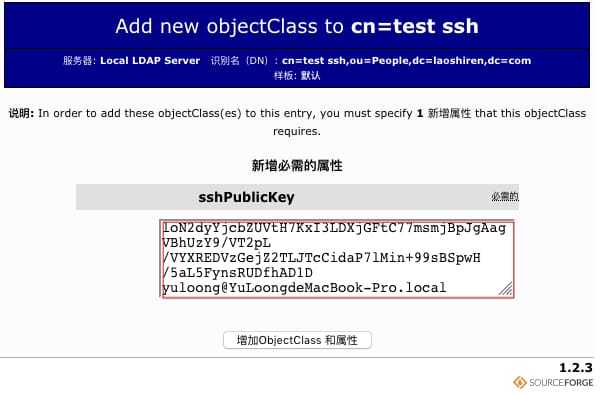
- 增加公钥属性到
LDAP该用户中


- 测试使用私钥远程连接
ssh -i ~/.ssh/id_rsa tssh@172.16.10.10
Last login: Wed Jan  9 00:50:10 2019 from 172.16.10.1
-sh-4.2$ id
uid=1001(tssh) gid=500(linux_group) 组=500(linux_group)
- 成功
这篇关于LDAP扩展ssh与sudo的文章就介绍到这儿,希望我们推荐的文章对编程师们有所帮助!


