本文主要是介绍【ubuntu22.04~mysql-MHA-mycat】,希望对大家解决编程问题提供一定的参考价值,需要的开发者们随着小编来一起学习吧!
ubuntu22.04~mysql-MHA-mycat
- 前言
- 一、安装指定版本mysql-server(8.0.23)
- 1、安装mysql
- 2、启用修改mysql配置
- 1、安装
- 3、修改权限
- 3.1、用户密码存放位置,
- 3.2、创建用户root@%
- 4、mysql配置文件my.cnf修改
- 1、主节点my.cnf
- 2、slave1~my.cnf修改项
- 3、slave2~my.cnf修改项
- 5、重启mysql,创建replica_user,设置主从
- 二、MHA部署安装
- 1、安装mha
- 2、所有mysql服务器,创建mha用户
- 1227报错
- 3、创建配置文件
- db3作为mha主节点
- 4、 check_repl报错修改该manager主机文件
- 5、mha_scripts
- 1、master_ip_failover 自动切换VIP管理脚本
- 2、master_ip_online_change 在线切换VIP管理
- 3、power_manager 故障发生后关闭主机的脚本
- 4、send_report 因故障切换后发送报警的脚本
- 6、check ssh及repl
- 7、运行启停mha
- 8、实验
- 9、恢复mha状态三节点
- 1、原主节点change master恢复主从
- 2、原 主节点执行change master
- 3、修改mha配置
- 三、mysqlrouter读写分离搭建
- 四、mycat读写分离
- 1、解压,修改数据源
- 2、 修改集群主副节点
- 3、修改mycat登录密码为:
- 4、修改服务器server配置
- 5、启动mycat
- 6、查看mycat日志
- 7、mycat实用命令
- 五.canal部署
- 1、创建用户canal
- 2、查看mysql配置文件
- 3、下载解压,改配置
- 六、题外话Mysqlslap、Sysbench压力测试
- 1、mysqlslap 是 MySQL 自带的压力测试工具,能够模拟多种查询模式,对数据库性能进行评估。
- 2、指定 SQL 脚本测试
- a、sysbench压力测试
- b、执行测试
- c、清理测试数据
- 七、主从同步报错
- 1、找到问题执行语句
- 2、跳过
- 3、重新change master
- 4、手动备份同步
- 八、xbk备份
- 1、安装
- 2、常用参数
- 3、全量备份恢复
前言
##三台服务器之间相互免密
ssh-key-gen -t rsa -b 2048
ssh-copy-id
192.168.220.66 db-master1
192.168.220.77 db-slave1
192.168.220.99 db-slave2
一、安装指定版本mysql-server(8.0.23)
mysql官网
1、安装mysql
wget https://dev.mysql.com/get/mysql-apt-config_0.8.23-1_all.debdpkg -i mysql-apt-config_0.8.23-1_all.deb apt-get update ##报错Err:1 http://repo.mysql.com/apt/ubuntu jammy InRelease The following signatures couldn't be verified because the public key is not available: NO_PUBKEY B7B3B788A8D3785C
##解决报错--recv-keys 后加报错NO_PUBKEY的值
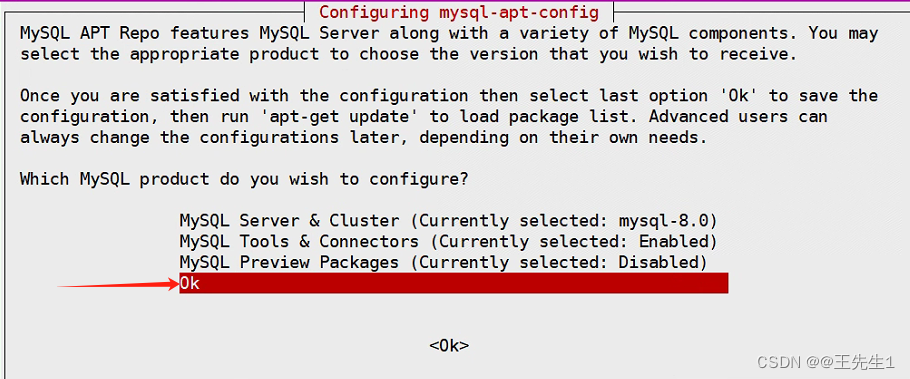
apt-key adv --keyserver keyserver.ubuntu.com --recv-keys B7B3B788A8D3785Capt-get install mysql-server
##可以看下想要的配置,如果没有点ok就可以。
2、启用修改mysql配置
1、安装
root@db1:/etc/mysql# mysql_secure_installation mysql_secure_installation: [ERROR] unknown variable 'default-character-set=utf8mb4'.

Securing the MySQL server deployment.

Connecting to MySQL using a blank password.

VALIDATE PASSWORD COMPONENT can be used to test passwords
and improve security. It checks the strength of password
and allows the users to set only those passwords which are
secure enough. Would you like to setup VALIDATE PASSWORD component?

Press y|Y for Yes, any other key for No: y   ##是否启用密码组件

There are three levels of password validation policy:

LOW    Length >= 8
MEDIUM Length >= 8, numeric, mixed case, and special characters
STRONG Length >= 8, numeric, mixed case, special characters and dictionary                  file

Please enter 0 = LOW, 1 = MEDIUM and 2 = STRONG: 0  ##密码策略,线下环境选了0

Skipping password set for root as authentication with auth_socket is used by default.
If you would like to use password authentication instead, this can be done with the "ALTER_USER" command.
See https://dev.mysql.com/doc/refman/8.0/en/alter-user.html#alter-user-password-management for more information.

By default, a MySQL installation has an anonymous user,
allowing anyone to log into MySQL without having to have
a user account created for them. This is intended only for
testing, and to make the installation go a bit smoother.
You should remove them before moving into a production
environment.

Remove anonymous users? (Press y|Y for Yes, any other key for No) : y  ##是否删除匿名用户
Success.


Normally, root should only be allowed to connect from
'localhost'. This ensures that someone cannot guess at
the root password from the network.

Disallow root login remotely? (Press y|Y for Yes, any other key for No) : n   ##是否禁止rootu远程登录

... skipping.
By default, MySQL comes with a database named 'test' that
anyone can access. This is also intended only for testing,
and should be removed before moving into a production
environment.


Remove test database and access to it? (Press y|Y for Yes, any other key for No) : y  ##是否删除测试库并访问
- Dropping test database...
Success.

- Removing privileges on test database...
Success.

Reloading the privilege tables will ensure that all changes
made so far will take effect immediately.

Reload privilege tables now? (Press y|Y for Yes, any other key for No) : y   ##重新加载权限
Success.

All done!
3、修改权限
3.1、用户密码存放位置,
cat /etc/mysql/debian.cnf
3.2、创建用户root@%
## 主库#更改root权限,并修改密码
ALTER USER 'root'@'localhost' IDENTIFIED WITH mysql_native_password BY 'Qwer1234';
update mysql.user set host = '%' where user = 'root';
4、mysql配置文件my.cnf修改
1、主节点my.cnf
# MySQL 8.0.23 Configuration File[mysql]
# 设置MySQL客户端默认字符集
default-character-set=utf8mb4[mysqld]
user		= mysql
pid-file        = /var/run/mysqld/mysqld.pid
bind-address= 0.0.0.0
mysqlx-bind-address= 0.0.0.0
key_buffer_size= 16M
myisam-recover-options  = BACKUP
skip-name-resolve
sync_binlog=0# 设置服务器字符集
character-set-server=utf8mb4# 设置MySQL数据存储目录
datadir=/var/lib/mysql# 设置MySQL套接字文件路径
socket=/var/run/mysqld/mysqld.sock# 设置MySQL服务器ID
server-id=66# 启用二进制日志记录
log-bin=mysql-bin-master
log-bin-index=mysql-bin-master.index# 二进制日志格式
binlog-format=row
max_binlog_size   = 100M
# 写在主库配置文件里参数(对所有从库都有效)
#binlog_do_db=库名列表 //允许同步的库
#binlog_ignore_db=库名列表 //不允许同步的库# 开启GTID功能
#gtid-mode=ON
#enforce-gtid-consistency=ON# 设置日志输出格式为JSON
log-output=TABLE# 设置MySQL错误日志路径
log-error=/var/log/mysql/error.log# 设置慢查询日志
slow-query-log=1
slow-query-log-file=/var/log/mysql/slow.log
long_query_time=10# 设置innodb_buffer_pool_size为服务器总内存的70%
innodb_buffer_pool_size=12G# 设置innodb_log_file_size为4GB
innodb_log_file_size=4G# 设置innodb_flush_log_at_trx_commit为1,同步刷新日志
innodb_flush_log_at_trx_commit=0# 设置innodb_flush_method为O_DIRECT,直接写入磁盘
innodb_flush_method=O_DIRECT# 设置innodb_file_per_table为ON,每个表独立存储表空间
innodb_file_per_table=ON# 设置innodb_autoinc_lock_mode为2,自增锁定模式为interleaved
innodb_autoinc_lock_mode=2#innodb_large_prefix            = ON
#innodb_log_files_in_group      = 3
#innodb_open_files              = 4000
#innodb_read_io_threads         = 8
#innodb_write_io_threads        = 8
#innodb_thread_concurrency      = 8
#innodb_io_capacity             = 2000
#innodb_io_capacity_max         = 6000
#innodb_lru_scan_depth          = 2000
#innodb_max_dirty_pages_pct     = 85# 设置max_connections为2000,最大连接数
max_connections=2000# 设置interactive_timeout和wait_timeout为600s
interactive_timeout=600
wait_timeout=600# 关闭ONLY_FULL_GROUP_BY,允许SELECT列表中的非聚合列不在GROUP BY子句中
sql_mode=STRICT_TRANS_TABLES,NO_ZERO_IN_DATE,NO_ZERO_DATE,ERROR_FOR_DIVISION_BY_ZERO,NO_ENGINE_SUBSTITUTION# 关闭SQL中的大小写敏感
#lower_case_table_names=1# 设置MySQL端口号
port=3306# 设置最大包大小
max_allowed_packet=512M# 设置字符集
collation-server=utf8mb4_unicode_ci# 设置日志输出格式为表格
log-output=TABLE# 设置跟踪日志文件大小
log-raw=/var/log/mysql/raw.log# 设置跟踪日志的错误
log-tc=tc.log# 设置跟踪日志
log-slow-admin-statements=ON# 设置中继日志路径
relay-log=/var/lib/mysql/relay-bin-master
relay-log-index=/var/lib/mysql/relay-bin-master.index
relay-log-purge = 0  # 禁用或启用不再需要中继日志时是否自动清空它们#[mysqldump]
#quick
#quote-names
#max_allowed_packet = 16M
#[isamchk]
#key_buffer       = 128M
#sort_buffer_size = 4M
#read_buffer      = 2M
#write_buffer     = 2M#[myisamchk]
#key_buffer       = 128M
#sort_buffer_size = 4M
#read_buffer      = 2M
#write_buffer     = 2M!includedir /etc/mysql/conf.d/
!includedir /etc/mysql/mysql.conf.d/
2、slave1~my.cnf修改项
# 设置MySQL服务器ID
server-id=77# 启用二进制日志记录
log-bin=mysql-bin-slave1
log-bin-index=mysql-bin-slave1.index#记录从库更新,允许链式复制(A-B-C)
#log_slave_updates#写在从库配置文件里参数(只针对从库本机有效)默认全部复制。
#replicate_do_db=库名列表 //指定只同步的库
#replicate_ignore_db=库名列表 //指定不同步的库# 设置中继日志路径
relay-log=/var/lib/mysql/relay-bin-slave1
relay-log-index=/var/lib/mysql/relay-bin-slave1.index
relay-log-purge = 0  # 禁用或启用不再需要中继日志时是否自动清空它们
read_only = 1
3、slave2~my.cnf修改项
# 设置MySQL服务器ID
server-id=99# 启用二进制日志记录
log-bin=mysql-bin-slave2
log-bin-index=mysql-bin-slave2.index# 设置中继日志路径
relay-log=/var/lib/mysql/relay-bin-slave2
relay-log-index=/var/lib/mysql/relay-bin-slave2.index
relay-log-purge = 0  # 禁用或启用不再需要中继日志时是否自动清空它们
read_only = 1
5、重启mysql,创建replica_user,设置主从
#密码策略设置(线下测试环境)
show variables like '%pass%';
set global validate_password.policy="LOW";# 创建用户
create user 'slave'@'%' identified with mysql_native_password by 'Qwer1234';# 授权
grant replication slave on *.* to 'slave'@'%';
flush privileges;show master status;change master to master_host='192.168.220.66',master_port=3306,master_user='slave',master_password='Qwer1234',master_log_file='mysql-bin-master.000004',master_log_pos=1322;show master status;
flush privileges;
##设置只读节点
mysql> set global interactive_timeout=31536000;mysql> set global wait_timeout=31536000;mysql> set global read_only=1;

# 开始同步
start slave;# 若出现错误,则停止同步,重置后再次启动
stop slave;
reset slave;
start slave;# 查询Slave状态
show slave status\G# 查看是否配置成功
# 查看参数 Slave_IO_Running 和 Slave_SQL_Running 是否都为yes,则证明配置成功。若为no,则需要查看对应的 Last_IO_Error 或 Last_SQL_Error 的异常值。# 在主数据库创建数据库test
create database test;# 从数据库查看
show databases;# 在主数据库创建表
use test;
create table t_user(id int, name varchar(20));# 插入数据
insert into t_user values(1, 'C3Stones');# 在从数据库查看
use test;
select * from t_user;
二、MHA部署安装
mha_manager_github源代码及安装包等下载
mha_node_github源代码及安装包等下载
1、安装mha
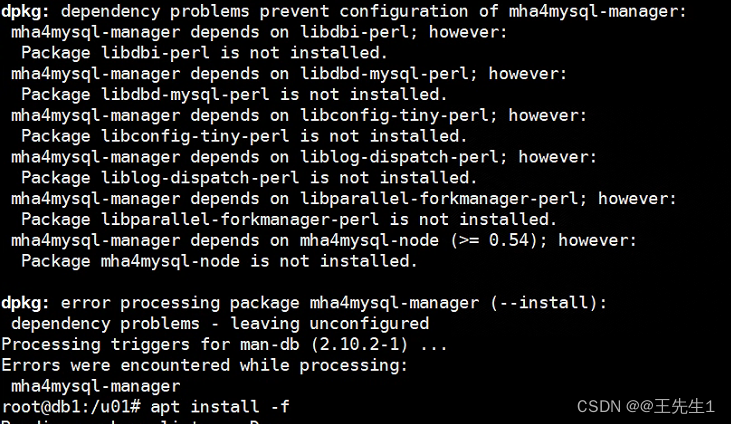
ubuntu安装软件最便捷的是当你安装一个包缺少依赖时,只需要一条命令就可以解决:
##全部节点安装manager,安装manager后自带node
##或全部节点安装node,单节点安装manager
dpkg -i mha4mysql-manager_0.58-0_all.deb
dpkg -i mha4mysql-node_0.58-0_all.debapt install -f
##创建虚拟ip需要用到ifconfig命令
apt install  net-tools
2、所有mysql服务器,创建mha用户
#密码策略设置(线下测试环境)
show variables like '%pass%';
set global validate_password.policy="LOW";#创建用户
create user 'mha'@'%' identified by 'Qwer1234';
grant all privileges on *.* to 'mha'@'%';
flush privileges;
1227报错
 Access denied; you need (at least one of) the SYSTEM_USER privilege(s) for this operation
##授权grant system_user on *.* to 'root';
3、创建配置文件
db3作为mha主节点
##可以多集群搭建
mkdir  -p /etc/mha/  && cd  /etc/mha/ vim  app1.conf[server default]
manager_log=/var/log/mha/app1/manager.log
manager_workdir=/var/log/mha/app1
master_binlog_dir=/var/lib/mysql
master_ip_failover_script=/usr/local/bin/master_ip_failover
master_ip_online_change_script=/usr/local/bin/master_ip_online_changeuser=mha
password=Qwer1234
ping_interval=1
remote_workdir=/tmp
repl_user=mha
repl_password=Qwer1234
ssh_user=root[server01]
hostname=192.168.220.66
port=3306[server02]
hostname=192.168.220.77
port=3306
candidate_master=1
check_repl_delay=1[server03]
hostname=192.168.220.99
port=3306
4、 check_repl报错修改该manager主机文件
vim /usr/share/perl5/MHA/NodeUtil.pmsub parse_mysql_major_version($) {my $str = shift;my $result = sprintf( '%03d%03d', $str =~ m/(\d+)/g );return $result;
}改为sub parse_mysql_major_version($) {my $str = shift;$str =~ /(\d+)\.(\d+)/;my $strmajor = "$1.$2";my $result = sprintf( '%03d%03d', $strmajor =~ m/(\d+)/g );return $result;
}
5、mha_scripts
这篇关于【ubuntu22.04~mysql-MHA-mycat】的文章就介绍到这儿,希望我们推荐的文章对编程师们有所帮助!


