本文主要是介绍【Pyqt6 学习笔记】DIY一个二维码解析生成小工具,希望对大家解决编程问题提供一定的参考价值,需要的开发者们随着小编来一起学习吧!
文章目录
- Pycharm 配置
- QtDesigner
- PyUIC
- 基本模板
- 代码示例
- 依赖包
- main.py
- screen_shot_module.py
- untitled.py
- untitled.ui
Pycharm 配置
摘自PyQT6的从零开始在Pycharm中配置与使用——蹦跑的蜗牛
pip install PyQt6 PyQt6-tools
QtDesigner
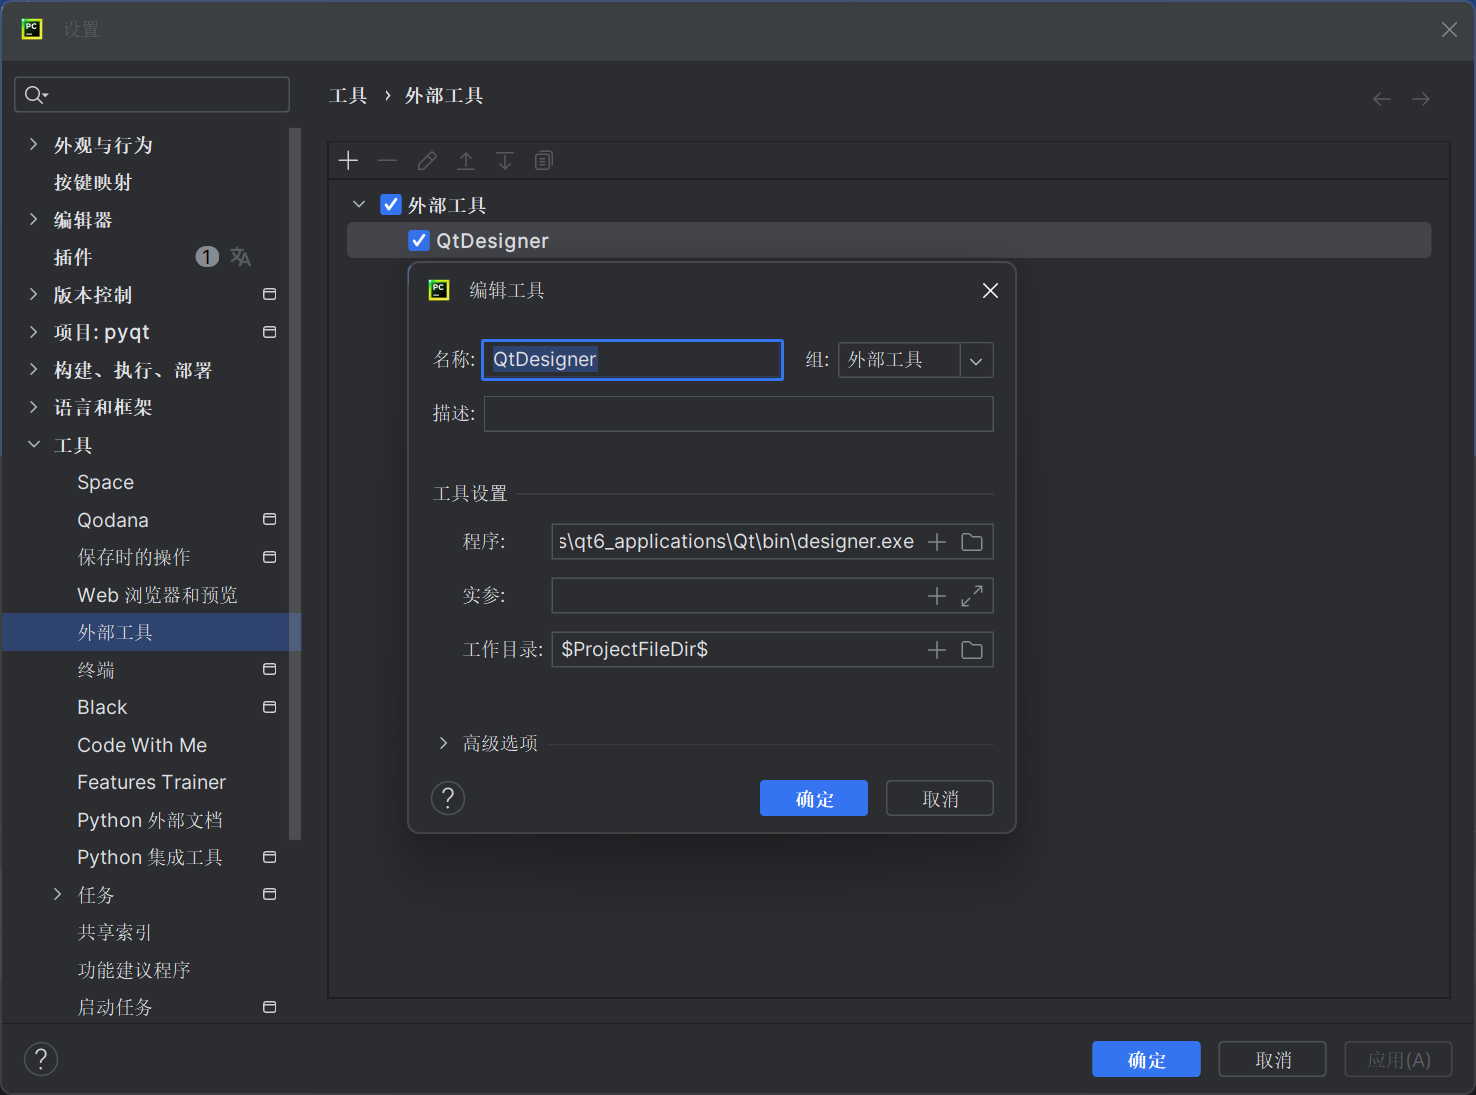
File -> Settings -> External Tools
用于绘制ui文件

程序:venv\Lib\site-packages\qt6_applications\Qt\bin\designer.exe
工作目录:$ProjectFileDir$
PyUIC
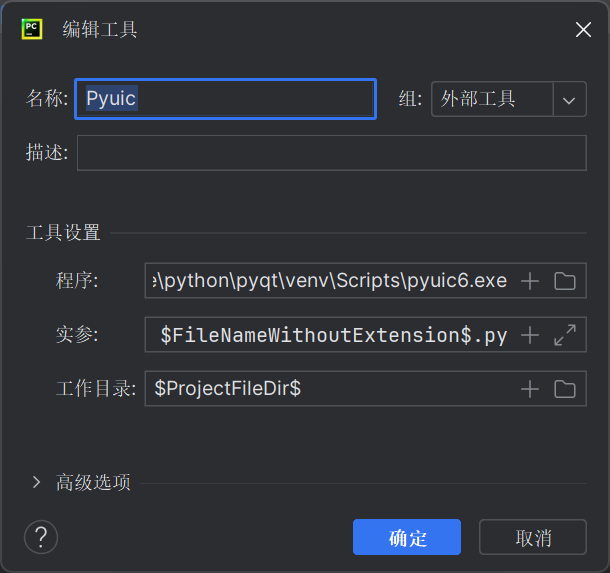
用于将QtDesigner生成的ui文件生成对应的py文件
程序:venv\Scripts\pyuic6.exe
实参:$FileName$ -o $FileNameWithoutExtension$.py
工作目录:$ProjectFileDir$

基本模板
其中 untitled为 PyUIC将QtDesigner ui文件转化为对应py文件的文件名,
不直接在ui脚本上进行修改,实现前后端分离
我这里为了方便就默认没改名了
import sysfrom PyQt6.QtWidgets import QApplication, QMainWindowfrom untitled import Ui_MainWindowclass MainPageWindow(QMainWindow, Ui_MainWindow):def __init__(self, parent=None):super(MainPageWindow, self).__init__(parent)self.setupUi(self)def run_main():app = QApplication(sys.argv)mainWindow = MainPageWindow()mainWindow.show()sys.exit(app.exec())if __name__ == '__main__':run_main()
代码示例
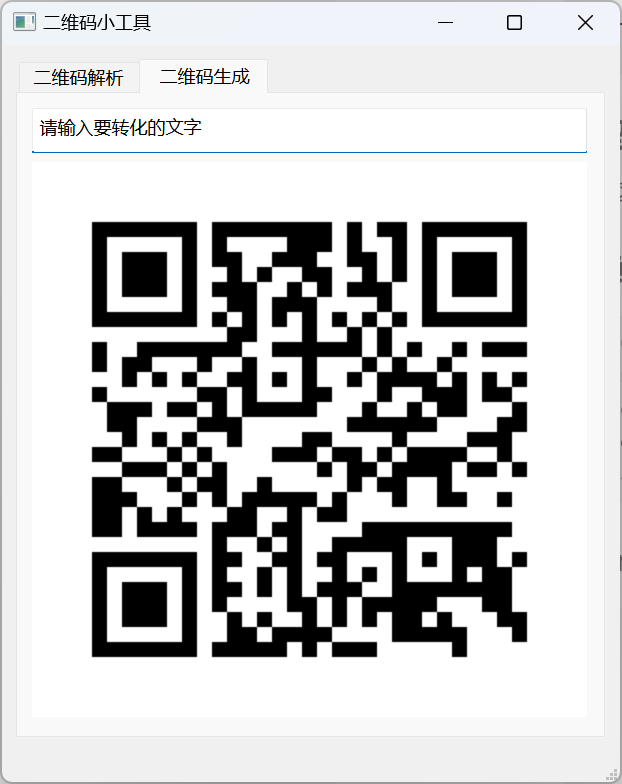
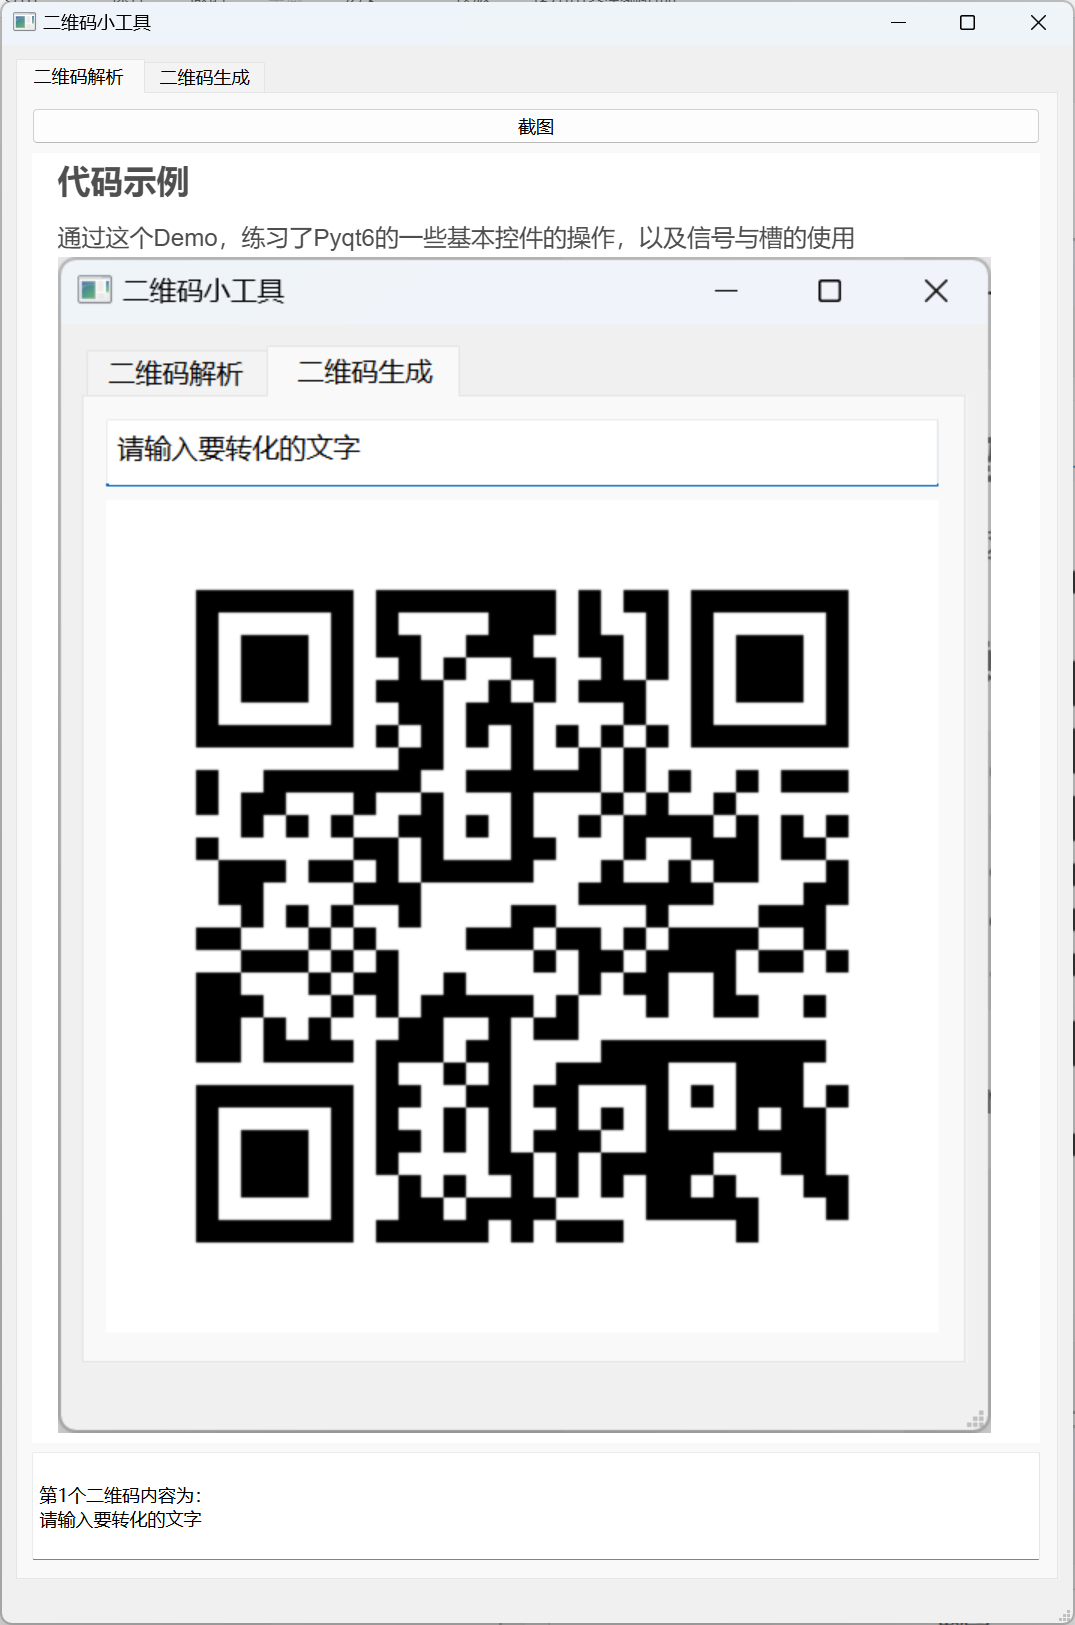
通过这个Demo,练习了Pyqt6的一些基本控件的操作,以及信号与槽的使用


依赖包
PyQt6~=6.4.2
pywinauto~=0.6.8
qrcode~=7.4.2
pillow~=10.3.0
pyzbar~=0.1.9
main.py
import sysimport PyQt6
import qrcodefrom PIL import ImageQt
from PyQt6.QtCore import pyqtSignal
from PyQt6.QtGui import QGuiApplication, QPixmap
from PyQt6.QtWidgets import QApplication, QMainWindow
from PyQt6 import QtCore
from pyzbar.pyzbar import decodefrom screen_shot_module import ScreenShotWidget
from untitled import Ui_MainWindowclass ScreenShotModule(ScreenShotWidget):"""继承ScreenShotWidget类,改写 save2Clipboard、save2Local 函数,新增通过自定义信号 QImageSignal 传递截图对象的功能"""QImageSignal = pyqtSignal(PyQt6.QtGui.QImage)  # 自定义信号def save2Clipboard(self):if self.hasScreenShot:mimData = QtCore.QMimeData()this_QImage = self.screenArea.centerPhysicalPixmap().toImage()mimData.setImageData(this_QImage)QApplication.clipboard().setMimeData(mimData)self.close()self.QImageSignal.emit(this_QImage)  # 发射图像对象def save2Local(self):fileType = self.fileType_imgfilePath, fileFormat = self.sys_selectSaveFilePath(self, fileType=fileType)if filePath:self.screenArea.centerPhysicalPixmap().save(filePath, quality=100)this_QImage = self.screenArea.centerPhysicalPixmap().toImage()self.close()self.QImageSignal.emit(this_QImage)  # 发射图像对象class MainPageWindow(QMainWindow, Ui_MainWindow):def __init__(self, parent=None):super(MainPageWindow, self).__init__(parent)self.setupUi(self)self.display_text_edit_qr()self.textEdit.textChanged.connect(self.display_text_edit_qr)  # 文本框切换事件与二维码生成绑定self.screenShotWg = ScreenShotModule()  # 截图模块self.pushButton_screenshot.clicked.connect(self.screenShotWg.start)  # 按钮绑定截图模块self.screenShotWg.QImageSignal.connect(self.get_screenshot_QImage)  # 接收截图模块的图像def get_screenshot_QImage(self, this_QImage):"""接收截图模块的图像:param this_QImage: 来自截图模块的图像:return:"""self.label_screenshot.setPixmap(QPixmap.fromImage(this_QImage))this_Image = ImageQt.fromqimage(this_QImage)self.decode_qrcode(this_Image)def display_text_edit_qr(self):"""self.pic_label 根据 self.textEdit 的文本生成并显示对应的二维码:return:"""current_text = self.textEdit.toPlainText()qr_img = qrcode.make(current_text)  # 根据文本生成二维码qt_image = ImageQt.toqpixmap(qr_img)  # PIL格式图片转为Qt格式图片self.pic_label.setPixmap(qt_image)  # QLabel显示图片def decode_qrcode(self, qr_pil_Image):"""解析二维码:param qr_pil_Image::return:"""result = decode(qr_pil_Image)result_str = ""for i, decoded_type_obj in enumerate(result):result_str = "{}\n第{}个二维码内容为:\n{}".format(result_str, i + 1, decoded_type_obj.data.decode())if result_str:self.textBrowser_show_decode_result.setText(result_str)else:self.textBrowser_show_decode_result.setText("未能成功识别截图中的二维码")def run_main():app = QApplication(sys.argv)mainWindow = MainPageWindow()mainWindow.show()sys.exit(app.exec())if __name__ == '__main__':run_main()
screen_shot_module.py
截图模块,摘自用pyqt原生功能实现自由屏幕截图 —— fardeas
# coding=utf-8"""
版权声明:本文为博主原创文章,遵循 CC 4.0 BY-SA 版权协议,转载请附上原文出处链接和本声明。
本文链接:https://blog.csdn.net/u010501845/article/details/124931326
"""import os
import sys
from datetime import datetime
from PyQt6 import QtCore, QtGui
from PyQt6.QtWidgets import *
from PyQt6.QtCore import QRectF, QRect, QSizeF, QPointF, QPoint, QMarginsF
from PyQt6.QtGui import QPainter, QPen, QPixmap, QColor, QAction, QIconclass TextInputWidget(QTextEdit):"""在截图区域内的文本输入框"""def __init__(self, god=None):super().__init__(god)self.god = god# 设置背景透明# self.setStyleSheet("QTextEdit{background-color: transparent;}")palette = self.palette()palette.setBrush(QtGui.QPalette.ColorRole.Base, self.god.color_transparent)self.setPalette(palette)self.setTextColor(self.god.toolbar.curColor())self.setCurrentFont(self.god.toolbar.curFont())self._doc = self.document()  # QTextDocumentself.textChanged.connect(self.adjustSizeByContent)self.adjustSizeByContent()  # 初始化调整高度为一行self.hide()def adjustSizeByContent(self, margin=30):"""限制宽度不超出截图区域,根据文本内容调整高度,不会出现滚动条"""self._doc.setTextWidth(self.viewport().width())margins = self.contentsMargins()h = int(self._doc.size().height() + margins.top() + margins.bottom())self.setFixedHeight(h)def beginNewInput(self, pos, endPointF):"""开始新的文本输入"""self._maxRect = self.god.screenArea.normalizeRectF(pos, endPointF)self.waitForInput()def waitForInput(self):self.setGeometry(self._maxRect.toRect())# self.setGeometry(self._maxRect.adjusted(0, 0, -1, 0))  # 宽度-1self.setFocus()self.show()def loadTextInputBy(self, action):"""载入修改旧的文本action:(type, color, font, rectf, txt)"""self.setTextColor(action[1])self.setCurrentFont(action[2])self._maxRect = action[3]self.append(action[4])self.god.isDrawing = Trueself.waitForInput()class LineWidthAction(QAction):"""画笔粗细选择器"""def __init__(self, text, parent, lineWidth):super().__init__(text, parent)self._lineWidth = lineWidthself.refresh(QtCore.Qt.GlobalColor.red)self.triggered.connect(self.onTriggered)self.setVisible(False)def refresh(self, color):painter = self.parent().god.screenArea._painterdotRadius = QPointF(self._lineWidth, self._lineWidth)centerPoint = self.parent().iconPixmapCenter()pixmap = self.parent().iconPixmapCopy()painter.begin(pixmap)painter.setPen(self.parent().god.pen_transparent)painter.setBrush(color)painter.drawEllipse(QRectF(centerPoint - dotRadius, centerPoint + dotRadius))painter.end()self.setIcon(QIcon(pixmap))def onTriggered(self):self.parent()._curLineWidth = self._lineWidthclass FontAction(QAction):"""字体选择器"""def __init__(self, text, parent):super().__init__(text, parent)self.setIcon(QIcon(r"img/sys/font.png"))self._curFont = self.parent().god.font_textInputself.triggered.connect(self.onTriggered)self.setVisible(False)def onTriggered(self):font, ok = QFontDialog.getFont(self._curFont, self.parent(), caption='选择字体')if ok:self._curFont = fontself.parent().god.textInputWg.setCurrentFont(font)class ColorAction(QAction):"""颜色选择器"""def __init__(self, text, parent):super().__init__(text, parent)self._curColor = QtCore.Qt.GlobalColor.redself._pixmap = QPixmap(32, 32)self.refresh(self._curColor)self.triggered.connect(self.onTriggered)def refresh(self, color):self._curColor = colorself._pixmap.fill(color)self.setIcon(QIcon(self._pixmap))self.parent()._at_line_small.refresh(color)self.parent()._at_line_normal.refresh(color)self.parent()._at_line_big.refresh(color)def onTriggered(self):col = QColorDialog.getColor(self._curColor, self.parent(), title='选择颜色')if col.isValid():self.refresh(col)self.parent().god.textInputWg.setTextColor(col)class ScreenShotToolBar(QToolBar):"""截图区域工具条"""def __init__(self, god):super().__init__(god)self.god = godself.setToolButtonStyle(QtCore.Qt.ToolButtonStyle.ToolButtonTextUnderIcon)self.setStyleSheet("QToolBar {border-radius: 5px;padding: 3px;background-color: #eeeeef;}")self._style_normal = "QToolBar QToolButton{color: black;}"self._style_selected = "QToolBar QToolButton{color: #ff7300;border: 1px solid #BEDAF2;background-color: #D6E4F1}"  # 与鼠标悬停样式一样self._iconPixmap = QPixmap(32, 32)self._iconPixmap.fill(self.god.color_transparent)self._iconPixmapCenter = QPointF(self._iconPixmap.rect().center())self._curLineWidth = 3self._at_line_small = LineWidthAction('细', self, self._curLineWidth - 2)self._at_line_normal = LineWidthAction('中', self, self._curLineWidth)self._at_line_big = LineWidthAction('粗', self, self._curLineWidth + 2)self._at_font = FontAction('字体', self)self._at_color = ColorAction('颜色', self)self._at_rectangle = QAction(QIcon(r"img/sys/rectangle.png"), '矩形', self, triggered=self.beforeDrawRectangle)self._at_ellipse = QAction(QIcon(r"img/sys/ellipse.png"), '椭圆', self, triggered=self.beforeDrawEllipse)self._at_graffiti = QAction(QIcon(r"img/sys/graffiti.png"), '涂鸦', self, triggered=self.beforeDrawGraffiti)self._at_textInput = QAction(QIcon(r"img/sys/write.png"), '文字', self, triggered=self.beforeDrawText)self.addAction(self._at_line_small)self.addAction(self._at_line_normal)self.addAction(self._at_line_big)self.addAction(self._at_font)self.addAction(self._at_color)self.addSeparator()self.addAction(self._at_rectangle)self.addAction(self._at_ellipse)self.addAction(self._at_graffiti)self.addAction(self._at_textInput)self.addAction(QAction(QIcon(r"img/sys/undo.png"), '撤销', self, triggered=self.undo))self.addSeparator()self.addAction(QAction(QIcon(r"img/sys/logout.png"), '退出', self, triggered=self.god.close))self.addAction(QAction(QIcon(r"img/chat/download.png"), '保存', self, triggered=lambda: self.beforeSave('local')))self.addAction(QAction(QIcon(r"img/chat/sendImg.png"), '确认并复制到剪切板', self, triggered=lambda: self.beforeSave('clipboard')))self.actionTriggered.connect(self.onActionTriggered)def curLineWidth(self):return self._curLineWidthdef curFont(self):return self._at_font._curFontdef curColor(self):return self._at_color._curColor# return QColor(self._at_color._curColor.toRgb())  # 颜色的副本def iconPixmapCopy(self):return self._iconPixmap.copy()def iconPixmapCenter(self):return self._iconPixmapCenterdef onActionTriggered(self, action):"""突出显示已选中的画笔粗细、编辑模式"""for at in [self._at_line_small, self._at_line_normal, self._at_line_big]:if at._lineWidth == self._curLineWidth:self.widgetForAction(at).setStyleSheet(self._style_selected)else:self.widgetForAction(at).setStyleSheet(self._style_normal)if self.god.isDrawRectangle:self.widgetForAction(self._at_rectangle).setStyleSheet(self._style_selected)else:self.widgetForAction(self._at_rectangle).setStyleSheet(self._style_normal)if self.god.isDrawEllipse:self.widgetForAction(self._at_ellipse).setStyleSheet(self._style_selected)else:self.widgetForAction(self._at_ellipse).setStyleSheet(self._style_normal)if self.god.isDrawGraffiti:self.widgetForAction(self._at_graffiti).setStyleSheet(self._style_selected)else:self.widgetForAction(self._at_graffiti).setStyleSheet(self._style_normal)if self.god.isDrawText:self.widgetForAction(self._at_textInput).setStyleSheet(self._style_selected)else:self.widgetForAction(self._at_textInput).setStyleSheet(self._style_normal)def setLineWidthActionVisible(self, flag):self._at_line_small.setVisible(flag)self._at_line_normal.setVisible(flag)self._at_line_big.setVisible(flag)def beforeDrawRectangle(self):self.god.clearEditFlags()self.god.isDrawRectangle = Trueself.setLineWidthActionVisible(True)self._at_font.setVisible(False)def beforeDrawEllipse(self):self.god.clearEditFlags()self.god.isDrawEllipse = Trueself.setLineWidthActionVisible(True)self._at_font.setVisible(False)def beforeDrawGraffiti(self):self.god.clearEditFlags()self.god.isDrawGraffiti = Trueself.setLineWidthActionVisible(True)self._at_font.setVisible(False)def beforeDrawText(self):self.god.clearEditFlags()self.god.isDrawText = Trueself.setLineWidthActionVisible(False)self._at_font.setVisible(True)def undo(self):"""撤销上次编辑行为"""if self.god.screenArea.undoEditAction():self.god.update()def beforeSave(self, target):# 若正在编辑文本未保存,先完成编辑if self.god.isDrawing and self.god.isDrawText:self.god.screenArea.saveTextInputAction()if target == 'local':self.god.save2Local()elif target == 'clipboard':self.god.save2Clipboard()def enterEvent(self, event):self.god.setCursor(QtCore.Qt.CursorShape.ArrowCursor)  # 工具条上显示标准箭头cursordef leaveEvent(self, event):self.god.setCursor(QtCore.Qt.CursorShape.CrossCursor)  # 十字无箭头class ScreenArea(QtCore.QObject):"""屏幕区域(提供各种算法的核心类),划分为9个子区域:TopLeft,Top,TopRightLeft,Center,RightBottomLeft,Bottom,BottomRight其中Center根据start、end两个QPointF确定"""def __init__(self, god):super().__init__()self.god = godself._pt_start = QPointF()  # 划定截图区域时鼠标左键按下的位置(topLeft)self._pt_end = QPointF()  # 划定截图区域时鼠标左键松开的位置(bottomRight)self._rt_toolbar = QRectF()  # 工具条的矩形self._actions = []  # 在截图区域上的所有编辑行为(矩形、椭圆、涂鸦、文本输入等)self._pt_startEdit = QPointF()  # 在截图区域上绘制矩形、椭圆时鼠标左键按下的位置(topLeft)self._pt_endEdit = QPointF()  # 在截图区域上绘制矩形、椭圆时鼠标左键松开的位置(bottomRight)self._pointfs = []  # 涂鸦经过的所有点self._painter = QPainter()  # 独立于ScreenShotWidget之外的画家类self._textOption = QtGui.QTextOption(QtCore.Qt.AlignmentFlag.AlignLeft | QtCore.Qt.AlignmentFlag.AlignTop)self._textOption.setWrapMode(QtGui.QTextOption.WrapMode.WrapAnywhere)  # 文本在矩形内自动换行# self._textOption.setWrapMode(QtGui.QTextOption.WrapMode.WrapAtWordBoundaryOrAnywhere)self.captureScreen()def captureScreen(self):"""抓取整个屏幕的截图"""# screen = QtGui.QGuiApplication.primaryScreen()self._screenPixmap = QApplication.primaryScreen().grabWindow()self._pixelRatio = self._screenPixmap.devicePixelRatio()  # 设备像素比self._rt_screen = self.screenLogicalRectF()self.remakeNightArea()def normalizeRectF(self, topLeftPoint, bottomRightPoint):"""根据起止点生成宽高非负数的QRectF,通常用于bottomRightPoint比topLeftPoint更左更上的情况入参可以是QPoint或QPointF"""rectf = QRectF(topLeftPoint, bottomRightPoint)x = rectf.x()y = rectf.y()w = rectf.width()h = rectf.height()if w < 0:  # bottomRightPoint在topLeftPoint左侧时,topLeftPoint往左移动x = x + ww = -wif h < 0:  # bottomRightPoint在topLeftPoint上侧时,topLeftPoint往上移动y = y + hh = -hreturn QRectF(x, y, w, h)def physicalRectF(self, rectf):"""计算划定的截图区域的(缩放倍率1.0的)原始矩形(会变大)rectf:划定的截图区域的矩形。可为QRect或QRectF"""return QRectF(rectf.x() * self._pixelRatio, rectf.y() * self._pixelRatio,rectf.width() * self._pixelRatio, rectf.height() * self._pixelRatio)def logicalRectF(self, physicalRectF):"""根据原始矩形计算缩放后的矩形(会变小)physicalRectF:缩放倍率1.0的原始矩形。可为QRect或QRectF"""return QRectF(physicalRectF.x() / self._pixelRatio, physicalRectF.y() / self._pixelRatio,physicalRectF.width() / self._pixelRatio, physicalRectF.height() / self._pixelRatio)def physicalPixmap(self, rectf, editAction=False):"""根据指定区域获取其原始大小的(缩放倍率1.0的)QPixmaprectf:指定区域。可为QRect或QRectFeditAction:是否带上编辑结果"""if editAction:canvasPixmap = self.screenPhysicalPixmapCopy()self._painter.begin(canvasPixmap)self.paintEachEditAction(self._painter, textBorder=False)self._painter.end()return canvasPixmap.copy(self.physicalRectF(rectf).toRect())else:return self._screenPixmap.copy(self.physicalRectF(rectf).toRect())def screenPhysicalRectF(self):return QRectF(self._screenPixmap.rect())def screenLogicalRectF(self):return QRectF(QPointF(0, 0), self.screenLogicalSizeF())  # 即当前屏幕显示的大小def screenPhysicalSizeF(self):return QSizeF(self._screenPixmap.size())def screenLogicalSizeF(self):return QSizeF(self._screenPixmap.width() / self._pixelRatio, self._screenPixmap.height() / self._pixelRatio)def screenPhysicalPixmapCopy(self):return self._screenPixmap.copy()def screenLogicalPixmapCopy(self):return self._screenPixmap.scaled(self.screenLogicalSizeF().toSize())def centerPhysicalRectF(self):return self.physicalRectF(self._rt_center)def centerLogicalRectF(self):"""根据屏幕上的start、end两个QPointF确定"""return self._rt_centerdef centerPhysicalPixmap(self, editAction=True):"""截图区域的QPixmapeditAction:是否带上编辑结果"""return self.physicalPixmap(self._rt_center + QMarginsF(-1, -1, 1, 1), editAction=editAction)def centerTopMid(self):return self._pt_centerTopMiddef centerBottomMid(self):return self._pt_centerBottomMiddef centerLeftMid(self):return self._pt_centerLeftMiddef centerRightMid(self):return self._pt_centerRightMiddef setStartPoint(self, pointf, remake=False):self._pt_start = pointfif remake:self.remakeNightArea()def setEndPoint(self, pointf, remake=False):self._pt_end = pointfif remake:self.remakeNightArea()def setCenterArea(self, start, end):self._pt_start = startself._pt_end = endself.remakeNightArea()def remakeNightArea(self):"""重新划分九宫格区域。根据中央截图区域计算出来的其他8个区域、截图区域四个边框中点坐标等都是logical的"""self._rt_center = self.normalizeRectF(self._pt_start, self._pt_end)# 中央区域上下左右边框的中点,用于调整大小self._pt_centerTopMid = (self._rt_center.topLeft() + self._rt_center.topRight()) / 2self._pt_centerBottomMid = (self._rt_center.bottomLeft() + self._rt_center.bottomRight()) / 2self._pt_centerLeftMid = (self._rt_center.topLeft() + self._rt_center.bottomLeft()) / 2self._pt_centerRightMid = (self._rt_center.topRight() + self._rt_center.bottomRight()) / 2# 以截图区域左上、上中、右上、左中、右中、左下、下中、右下为中心的正方形区域,用于调整大小self._square_topLeft = self.squareAreaByCenter(self._rt_center.topLeft())self._square_topRight = self.squareAreaByCenter(self._rt_center.topRight())self._square_bottomLeft = self.squareAreaByCenter(self._rt_center.bottomLeft())self._square_bottomRight = self.squareAreaByCenter(self._rt_center.bottomRight())self._square_topMid = self.squareAreaByCenter(self._pt_centerTopMid)self._square_bottomMid = self.squareAreaByCenter(self._pt_centerBottomMid)self._square_leftMid = self.squareAreaByCenter(self._pt_centerLeftMid)self._square_rightMid = self.squareAreaByCenter(self._pt_centerRightMid)# 除中央截图区域外的8个区域self._rt_topLeft = QRectF(self._rt_screen.topLeft(), self._rt_center.topLeft())self._rt_top = QRectF(QPointF(self._rt_center.topLeft().x(), 0), self._rt_center.topRight())self._rt_topRight = QRectF(QPointF(self._rt_center.topRight().x(), 0),QPointF(self._rt_screen.width(), self._rt_center.topRight().y()))self._rt_left = QRectF(QPointF(0, self._rt_center.topLeft().y()), self._rt_center.bottomLeft())self._rt_right = QRectF(self._rt_center.topRight(),QPointF(self._rt_screen.width(), self._rt_center.bottomRight().y()))self._rt_bottomLeft = QRectF(QPointF(0, self._rt_center.bottomLeft().y()),QPointF(self._rt_center.bottomLeft().x(), self._rt_screen.height()))self._rt_bottom = QRectF(self._rt_center.bottomLeft(),QPointF(self._rt_center.bottomRight().x(), self._rt_screen.height()))self._rt_bottomRight = QRectF(self._rt_center.bottomRight(), self._rt_screen.bottomRight())def squareAreaByCenter(self, pointf):"""以QPointF为中心的正方形QRectF"""rectf = QRectF(0, 0, 15, 15)rectf.moveCenter(pointf)return rectfdef aroundAreaIn8Direction(self):"""中央区域周边的8个方向的区域(无交集)"""return [self._rt_topLeft, self._rt_top, self._rt_topRight,self._rt_left, self._rt_right,self._rt_bottomLeft, self._rt_bottom, self._rt_bottomRight]def aroundAreaIn4Direction(self):"""中央区域周边的4个方向的区域(有交集)上区域(左上、上、右上):0, 0, maxX, topRight.y下区域(左下、下、右下):0, bottomLeft.y, maxX, maxY-bottomLeft.y左区域(左上、左、左下):0, 0, bottomLeft.x, maxY右区域(右上、右、右下):topRight.x, 0, maxX - topRight.x, maxY"""screenSizeF = self.screenLogicalSizeF()pt_topRight = self._rt_center.topRight()pt_bottomLeft = self._rt_center.bottomLeft()return [QRectF(0, 0, screenSizeF.width(), pt_topRight.y()),QRectF(0, pt_bottomLeft.y(), screenSizeF.width(), screenSizeF.height() - pt_bottomLeft.y()),QRectF(0, 0, pt_bottomLeft.x(), screenSizeF.height()),QRectF(pt_topRight.x(), 0, screenSizeF.width() - pt_topRight.x(), screenSizeF.height())]def aroundAreaWithoutIntersection(self):"""中央区域周边的4个方向的区域(无交集)上区域(左上、上、右上):0, 0, maxX, topRight.y下区域(左下、下、右下):0, bottomLeft.y, maxX, maxY-bottomLeft.y左区域(左):0, topRight.y, bottomLeft.x-1, center.height右区域(右):topRight.x+1, topRight.y, maxX - topRight.x, center.height"""screenSizeF = self.screenLogicalSizeF()pt_topRight = self._rt_center.topRight()pt_bottomLeft = self._rt_center.bottomLeft()centerHeight = pt_bottomLeft.y() - pt_topRight.y()return [QRectF(0, 0, screenSizeF.width(), pt_topRight.y()),QRectF(0, pt_bottomLeft.y(), screenSizeF.width(), screenSizeF.height() - pt_bottomLeft.y()),QRectF(0, pt_topRight.y(), pt_bottomLeft.x() - 1, centerHeight),QRectF(pt_topRight.x() + 1, pt_topRight.y(), screenSizeF.width() - pt_topRight.x(), centerHeight)]def setBeginDragPoint(self, pointf):"""计算开始拖拽位置距离截图区域左上角的向量"""self._drag_vector = pointf - self._rt_center.topLeft()def getNewPosAfterDrag(self, pointf):"""计算拖拽后截图区域左上角的新位置"""return pointf - self._drag_vectordef moveCenterAreaTo(self, pointf):"""限制拖拽不能超出屏幕范围"""self._rt_center.moveTo(self.getNewPosAfterDrag(pointf))startPointF = self._rt_center.topLeft()if startPointF.x() < 0:self._rt_center.moveTo(0, startPointF.y())startPointF = self._rt_center.topLeft()if startPointF.y() < 0:self._rt_center.moveTo(startPointF.x(), 0)screenSizeF = self.screenLogicalSizeF()endPointF = self._rt_center.bottomRight()if endPointF.x() > screenSizeF.width():self._rt_center.moveBottomRight(QPointF(screenSizeF.width(), endPointF.y()))endPointF = self._rt_center.bottomRight()if endPointF.y() > screenSizeF.height():self._rt_center.moveBottomRight(QPointF(endPointF.x(), screenSizeF.height()))self.setCenterArea(self._rt_center.topLeft(), self._rt_center.bottomRight())def setBeginAdjustPoint(self, pointf):"""判断开始调整截图区域大小时鼠标左键在哪个区(不可能是中央区域),用于判断调整大小的意图方向"""self._mousePos = self.getMousePosBy(pointf)def getMousePosBy(self, pointf):if self._square_topLeft.contains(pointf):return 'TL'elif self._square_topMid.contains(pointf):return 'T'elif self._square_topRight.contains(pointf):return 'TR'elif self._square_leftMid.contains(pointf):return 'L'elif self._rt_center.contains(pointf):return 'CENTER'elif self._square_rightMid.contains(pointf):return 'R'elif self._square_bottomLeft.contains(pointf):return 'BL'elif self._square_bottomMid.contains(pointf):return 'B'elif self._square_bottomRight.contains(pointf):return 'BR'else:return 'ERROR'def adjustCenterAreaBy(self, pointf):"""根据开始调整截图区域大小时鼠标左键在哪个区(不可能是中央区域),判断调整大小的意图方向,判定新的开始、结束位置"""startPointF = self._rt_center.topLeft()endPointF = self._rt_center.bottomRight()if self._mousePos == 'TL':startPointF = pointfelif self._mousePos == 'T':startPointF = QPointF(startPointF.x(), pointf.y())elif self._mousePos == 'TR':startPointF = QPointF(startPointF.x(), pointf.y())endPointF = QPointF(pointf.x(), endPointF.y())elif self._mousePos == 'L':startPointF = QPointF(pointf.x(), startPointF.y())elif self._mousePos == 'R':endPointF = QPointF(pointf.x(), endPointF.y())elif self._mousePos == 'BL':startPointF = QPointF(pointf.x(), startPointF.y())endPointF = QPointF(endPointF.x(), pointf.y())elif self._mousePos == 'B':endPointF = QPointF(endPointF.x(), pointf.y())elif self._mousePos == 'BR':endPointF = pointfelse:  # 'ERROR'returnnewRectF = self.normalizeRectF(startPointF, endPointF)self.setCenterArea(newRectF.topLeft(), newRectF.bottomRight())def getMouseShapeBy(self, pointf):"""根据鼠标位置返回对应的鼠标样式"""if self._rt_center.contains(pointf):if self.god.isDrawRectangle or self.god.isDrawEllipse:return QtCore.Qt.CursorShape.ArrowCursorelif self.god.isDrawGraffiti:return QtCore.Qt.CursorShape.PointingHandCursor  # 超链接上的手势elif self.god.isDrawText:return QtCore.Qt.CursorShape.IBeamCursor  # 工字else:return QtCore.Qt.CursorShape.SizeAllCursor  # 十字有箭头# return QtCore.Qt.CursorShape.OpenHandCursor  # 打开的手,表示可拖拽elif self._square_topLeft.contains(pointf) or self._square_bottomRight.contains(pointf):return QtCore.Qt.CursorShape.SizeFDiagCursor  # ↖↘elif self._square_topMid.contains(pointf) or self._square_bottomMid.contains(pointf):return QtCore.Qt.CursorShape.SizeVerCursor  # ↑↓elif self._square_topRight.contains(pointf) or self._square_bottomLeft.contains(pointf):return QtCore.Qt.CursorShape.SizeBDiagCursor  # ↙↗elif self._square_leftMid.contains(pointf) or self._square_rightMid.contains(pointf):return QtCore.Qt.CursorShape.SizeHorCursor  # ←→else:return QtCore.Qt.CursorShape.CrossCursor  # 十字无箭头def isMousePosInCenterRectF(self, pointf):return self._rt_center.contains(pointf)def paintMagnifyingGlassPixmap(self, pos, glassSize):"""绘制放大镜内的图像(含纵横十字线)pos:鼠标光标位置glassSize:放大镜边框大小"""pixmapRect = QRect(0, 0, 20, 20)  # 以鼠标光标为中心的正方形区域,最好是偶数pixmapRect.moveCenter(pos)glassPixmap = self.physicalPixmap(pixmapRect)glassPixmap.setDevicePixelRatio(1.0)glassPixmap = glassPixmap.scaled(glassSize, glassSize, QtCore.Qt.AspectRatioMode.KeepAspectRatio)# 在放大后的QPixmap上画纵横十字线self._painter.begin(glassPixmap)halfWidth = glassPixmap.width() / 2halfHeight = glassPixmap.height() / 2self._painter.setPen(self.god.pen_SolidLine_lightBlue)self._painter.drawLine(QPointF(0, halfHeight), QPointF(glassPixmap.width(), halfHeight))self._painter.drawLine(QPointF(halfWidth, 0), QPointF(halfWidth, glassPixmap.height()))self._painter.end()return glassPixmapdef paintEachEditAction(self, painter, textBorder=True):"""绘制所有已保存的编辑行为。编辑行为超出截图区域也无所谓,保存图像时只截取截图区域内textBorder:是否绘制文本边框"""for action in self.getEditActions():if action[0] == 'rectangle':  # (type, color, lineWidth, startPoint, endPoint)self.paintRectangle(painter, action[1], action[2], action[3], action[4])elif action[0] == 'ellipse':  # (type, color, lineWidth, startPoint, endPoint)self.paintEllipse(painter, action[1], action[2], action[3], action[4])elif action[0] == 'graffiti':  # (type, color, lineWidth, points)self.paintGraffiti(painter, action[1], action[2], action[3])elif action[0] == 'text':  # (type, color, font, rectf, txt)self.paintTextInput(painter, action[1], action[2], action[3], action[4], textBorder=textBorder)def paintRectangle(self, painter, color, lineWidth, startPoint=None, endPoint=None):if not startPoint:startPoint = self._pt_startEditif not endPoint:endPoint = self._pt_endEditqrectf = self.normalizeRectF(startPoint, endPoint)if qrectf.isValid():pen = QPen(color)pen.setWidth(lineWidth)painter.setPen(pen)painter.setBrush(self.god.color_transparent)painter.drawRect(qrectf)def paintEllipse(self, painter, color, lineWidth, startPoint=None, endPoint=None):if not startPoint:startPoint = self._pt_startEditif not endPoint:endPoint = self._pt_endEditqrectf = self.normalizeRectF(startPoint, endPoint)if qrectf.isValid():pen = QPen(color)pen.setWidth(lineWidth)painter.setPen(pen)painter.setBrush(self.god.color_transparent)painter.drawEllipse(qrectf)def paintGraffiti(self, painter, color, lineWidth, pointfs=None):if not pointfs:pointfs = self.getGraffitiPointFs()pen = QPen(color)pen.setWidth(lineWidth)painter.setPen(pen)total = len(pointfs)if total == 0:returnelif total == 1:painter.drawPoint(pointfs[0])else:previousPoint = pointfs[0]for i in range(1, total):nextPoint = pointfs[i]painter.drawLine(previousPoint, nextPoint)previousPoint = nextPointdef paintTextInput(self, painter, color, font, rectf, txt, textBorder=True):painter.setPen(color)painter.setFont(font)painter.drawText(rectf, txt, self._textOption)if textBorder:painter.setPen(QtCore.Qt.PenStyle.DotLine)  # 点线painter.setBrush(self.god.color_transparent)painter.drawRect(rectf)def getEditActions(self):return self._actions.copy()def takeTextInputActionAt(self, pointf):"""根据鼠标位置查找已保存的文本输入结果,找到后取出"""for i in range(len(self._actions)):action = self._actions[i]if action[0] == 'text' and action[3].contains(pointf):return self._actions.pop(i)return Nonedef undoEditAction(self):reply = Falseif self._actions:reply = self._actions.pop()if not self._actions:  # 所有编辑行为都被撤销后退出编辑模式self.god.exitEditMode()else:self.god.exitEditMode()return replydef clearEditActions(self):self._actions.clear()def setBeginEditPoint(self, pointf):"""在截图区域上绘制矩形、椭圆时鼠标左键按下的位置(topLeft)"""self._pt_startEdit = pointfself.god.isDrawing = Truedef setEndEditPoint(self, pointf):"""在截图区域上绘制矩形、椭圆时鼠标左键松开的位置(bottomRight)"""self._pt_endEdit = pointfdef saveRectangleAction(self):rectf = self.normalizeRectF(self._pt_startEdit, self._pt_endEdit)self._actions.append(('rectangle', self.god.toolbar.curColor(), self.god.toolbar.curLineWidth(),rectf.topLeft(), rectf.bottomRight()))self._pt_startEdit = QPointF()self._pt_endEdit = QPointF()self.god.isDrawing = Falsedef saveEllipseleAction(self):rectf = self.normalizeRectF(self._pt_startEdit, self._pt_endEdit)self._actions.append(('ellipse', self.god.toolbar.curColor(), self.god.toolbar.curLineWidth(),rectf.topLeft(), rectf.bottomRight()))self._pt_startEdit = QPointF()self._pt_endEdit = QPointF()self.god.isDrawing = Falsedef saveGraffitiPointF(self, pointf, first=False):self._pointfs.append(pointf)if first:self.god.isDrawing = Truedef getGraffitiPointFs(self):return self._pointfs.copy()def saveGraffitiAction(self):if self._pointfs:self._actions.append(('graffiti', self.god.toolbar.curColor(), self.god.toolbar.curLineWidth(), self._pointfs.copy()))self._pointfs.clear()self.god.isDrawing = Falsedef setBeginInputTextPoint(self, pointf):"""在截图区域上输入文字时鼠标左键按下的位置(topLeft)"""self.god.isDrawing = Trueself.god.textInputWg.beginNewInput(pointf, self._pt_end)def saveTextInputAction(self):txt = self.god.textInputWg.toPlainText()if txt:rectf = self.god.textInputWg._maxRect  # 取最大矩形的topLeftrectf.setSize(QRectF(self.god.textInputWg.rect()).size())  # 取实际矩形的宽高self._actions.append(('text', self.god.toolbar.curColor(), self.god.toolbar.curFont(),rectf, txt))self.god.textInputWg.clear()self.god.textInputWg.hide()  # 不管保存成功与否都取消编辑self.god.isDrawing = Falsedef saveNightAreaImg(self):"""将九宫格区域保存为本地图片,仅用于开发测试"""screenPixmap = self.screenPhysicalPixmapCopy()self._painter.begin(screenPixmap)self._painter.setPen(self.pen_SolidLine_lightBlue)self._painter.setFont(self.god.font_normal)self._painter.drawRect(self._rt_center)for area in self.aroundAreaIn8Direction():self._painter.drawRect(area)for pointf in [self._rt_center.topLeft(), self._rt_center.topRight(),self._rt_center.bottomLeft(), self._rt_center.bottomRight(),self._pt_centerTopMid, self._pt_centerBottomMid,self._pt_centerLeftMid, self._pt_centerRightMid]:self._painter.drawText(pointf + QPointF(5, -5), '(%s, %s)' % (pointf.x(), pointf.y()))self._painter.end()screenPixmap.save('1.jpg', quality=100)self.centerPhysicalPixmap().save('2.jpg', quality=100)class ScreenShotWidget(QWidget):fileType_all = '所有文件 (*);;Excel文件 (*.xls *.xlsx);;图片文件 (*.jpg *.jpeg *.gif *.png *.bmp)'fileType_img = '图片文件 (*.jpg *.jpeg *.gif *.png *.bmp)'dir_lastAccess = os.getcwd()  # 最后访问目录def __init__(self):super().__init__()self.setMouseTracking(True)self.setWindowFlags(QtCore.Qt.WindowType.FramelessWindowHint | QtCore.Qt.WindowType.WindowStaysOnTopHint)self.initPainterTool()self.initFunctionalFlag()self.screenArea = ScreenArea(self)self.toolbar = ScreenShotToolBar(self)self.textInputWg = TextInputWidget(self)# 设置 screenPixmap 为窗口背景# palette = QtGui.QPalette()# palette.setBrush(QtGui.QPalette.ColorRole.Window, QtGui.QBrush(self.screenArea.screenPhysicalPixmapCopy()))# self.setPalette(palette)def start(self):self.screenArea.captureScreen()self.setGeometry(self.screenArea.screenPhysicalRectF().toRect())self.clearScreenShotArea()self.showFullScreen()def initPainterTool(self):self.painter = QPainter()self.color_transparent = QtCore.Qt.GlobalColor.transparentself.color_black = QColor(0, 0, 0, 64)  # 黑色背景self.color_lightBlue = QColor(30, 120, 255)  # 浅蓝色。深蓝色QtCore.Qt.GlobalColor.blueself.font_normal = QtGui.QFont('Times New Roman', 11, QtGui.QFont.Weight.Normal)self.font_textInput = QtGui.QFont('微软雅黑', 16, QtGui.QFont.Weight.Normal)  # 工具条文字工具默认字体self.pen_transparent = QPen(QtCore.Qt.PenStyle.NoPen)  # 没有笔迹,画不出线条self.pen_white = QPen(QtCore.Qt.GlobalColor.white)self.pen_SolidLine_lightBlue = QPen(self.color_lightBlue)  # 实线,浅蓝色self.pen_SolidLine_lightBlue.setStyle(QtCore.Qt.PenStyle.DashLine)  # 实线SolidLine,虚线DashLine,点线DotLineself.pen_SolidLine_lightBlue.setWidthF(0)  # 0表示线宽为1self.pen_DashLine_lightBlue = QPen(self.color_lightBlue)  # 虚线,浅蓝色self.pen_DashLine_lightBlue.setStyle(QtCore.Qt.PenStyle.DashLine)def initFunctionalFlag(self):self.hasScreenShot = False  # 是否已通过拖动鼠标左键划定截图区域self.isCapturing = False  # 正在拖动鼠标左键选定截图区域时self.isMoving = False  # 在截图区域内拖动时self.isAdjusting = False  # 在截图区域的边框按住鼠标左键调整大小时self.isDrawing = False  # 是否已在截图区域内开始绘制self.isDrawRectangle = False  # 正在截图区域内画矩形self.isDrawEllipse = False  # 正在截图区域内画椭圆self.isDrawGraffiti = False  # 正在截图区域内进行涂鸦self.isDrawText = False  # 正在截图区域内画文字self.setCursor(QtCore.Qt.CursorShape.CrossCursor)  # 设置鼠标样式 十字def paintEvent(self, event):centerRectF = self.screenArea.centerLogicalRectF()screenSizeF = self.screenArea.screenLogicalSizeF()canvasPixmap = self.screenArea.screenPhysicalPixmapCopy()# canvasPixmap = QPixmap(screenSizeF.toSize())# canvasPixmap.fill(self.color_transparent)# 在屏幕截图的副本上绘制已选定的截图区域self.painter.begin(canvasPixmap)if self.hasScreenShot:self.paintCenterArea(centerRectF)  # 绘制中央截图区域self.paintMaskLayer(screenSizeF, fullScreen=False)  # 绘制截图区域的周边区域遮罩层else:self.paintMaskLayer(screenSizeF)self.paintMagnifyingGlass(screenSizeF)  # 在鼠标光标右下角显示放大镜self.paintToolbar(centerRectF, screenSizeF)  # 在截图区域右下角显示工具条self.paintEditActions()  # 在截图区域绘制编辑行为结果self.painter.end()# 把画好的绘制结果显示到窗口上self.painter.begin(self)self.painter.drawPixmap(0, 0, canvasPixmap)  # 从坐标(0, 0)开始绘制self.painter.end()def paintCenterArea(self, centerRectF):"""绘制已选定的截图区域"""self.painter.setRenderHint(QPainter.RenderHint.Antialiasing, True)  # 反走样# 1.绘制矩形线框self.painter.setPen(self.pen_DashLine_lightBlue)self.painter.drawRect(centerRectF)# 2.绘制矩形线框4个端点和4条边框的中间点if centerRectF.width() >= 100 and centerRectF.height() >= 100:points = [  # 点坐标centerRectF.topLeft(), centerRectF.topRight(), centerRectF.bottomLeft(), centerRectF.bottomRight(),self.screenArea.centerLeftMid(), self.screenArea.centerRightMid(),self.screenArea.centerTopMid(), self.screenArea.centerBottomMid()]blueDotRadius = QPointF(2, 2)  # 椭圆蓝点self.painter.setBrush(self.color_lightBlue)for point in points:self.painter.drawEllipse(QRectF(point - blueDotRadius, point + blueDotRadius))# 3.在截图区域左上角显示截图区域宽高if centerRectF.topLeft().y() > 20:labelPos = centerRectF.topLeft() + QPointF(5, -5)else:  # 拖拽截图区域到贴近屏幕上边缘时“宽x高”移动到截图区域左上角的下侧labelPos = centerRectF.topLeft() + QPointF(5, 15)centerPhysicalRect = self.screenArea.centerPhysicalRectF().toRect()self.painter.setPen(self.pen_white)self.painter.setFont(self.font_normal)self.painter.drawText(labelPos, '%s x %s' % (centerPhysicalRect.width(), centerPhysicalRect.height()))# 4.在屏幕左上角预览截图结果# self.painter.drawPixmap(0, 0, self.screenArea.centerPhysicalPixmap())  # 从坐标(0, 0)开始绘制def paintMaskLayer(self, screenSizeF, fullScreen=True):if fullScreen:  # 全屏遮罩层maskPixmap = QPixmap(screenSizeF.toSize())maskPixmap.fill(self.color_black)self.painter.drawPixmap(0, 0, maskPixmap)else:  # 绘制截图区域的周边区域遮罩层,以凸显截图区域# 方法一:截图区域以外的8个方向区域# for area in self.screenArea.aroundAreaIn8Direction():#     area = area.normalized()#     maskPixmap = QPixmap(area.size().toSize())  # 由于float转int的精度问题,可能会存在黑线条缝隙#     maskPixmap.fill(self.color_black)#     self.painter.drawPixmap(area.topLeft(), maskPixmap)# 方法二:截图区域以外的上下左右区域(有交集,交集部分颜色加深,有明显的纵横效果)# for area in self.screenArea.aroundAreaIn4Direction():#     maskPixmap = QPixmap(area.size().toSize())#     maskPixmap.fill(self.color_black)#     self.painter.drawPixmap(area.topLeft(), maskPixmap)# 方法三:截图区域以外的上下左右区域(无交集)for area in self.screenArea.aroundAreaWithoutIntersection():maskPixmap = QPixmap(area.size().toSize())maskPixmap.fill(self.color_black)self.painter.drawPixmap(area.topLeft(), maskPixmap)def paintMagnifyingGlass(self, screenSizeF, glassSize=150, offset=30, labelHeight=30):"""未划定截图区域模式时、正在划定截取区域时、调整截取区域大小时在鼠标光标右下角显示放大镜glassSize:放大镜正方形边长offset:放大镜任意一个端点距离鼠标光标位置的最近距离labelHeight:pos和rgb两行文字的高度"""if self.hasScreenShot and (not self.isCapturing) and (not self.isAdjusting):returnpos = QtGui.QCursor.pos()glassPixmap = self.screenArea.paintMagnifyingGlassPixmap(pos, glassSize)  # 画好纵横十字线后的放大镜内QPixmap# 限制放大镜显示不超出屏幕外glassRect = glassPixmap.rect()if (pos.x() + glassSize + offset) < screenSizeF.width():if (pos.y() + offset + glassSize + labelHeight) < screenSizeF.height():glassRect.moveTo(pos + QPoint(offset, offset))else:glassRect.moveBottomLeft(pos + QPoint(offset, -offset))else:if (pos.y() + offset + glassSize + labelHeight) < screenSizeF.height():glassRect.moveTopRight(pos + QPoint(-offset, offset))else:glassRect.moveBottomRight(pos + QPoint(-offset, -offset))self.painter.drawPixmap(glassRect.topLeft(), glassPixmap)# 显示pos:(x, y)、rgb:(255,255,255)qrgb = QtGui.QRgba64.fromArgb32(glassPixmap.toImage().pixel(glassPixmap.rect().center()))labelRectF = QRectF(glassRect.bottomLeft().x(), glassRect.bottomLeft().y(), glassSize, labelHeight)self.painter.setPen(self.pen_transparent)self.painter.setBrush(self.color_black)  # 黑底self.painter.drawRect(labelRectF)self.painter.setPen(self.pen_white)self.painter.setFont(self.font_normal)self.painter.drawText(labelRectF,QtCore.Qt.AlignmentFlag.AlignLeft | QtCore.Qt.AlignmentFlag.AlignVCenter,'pos:(%s, %s)\nrgb:(%s, %s, %s)' % (pos.x(), pos.y(), qrgb.red8(), qrgb.green8(), qrgb.blue8()))def paintToolbar(self, centerRectF, screenSizeF):"""在截图区域右下角显示工具条"""if self.hasScreenShot:if self.isCapturing or self.isAdjusting:self.toolbar.hide()  # 正在划定截取区域时、调整截图区域大小时不显示工具条else:self.toolbar.adjustSize()toolbarRectF = QRectF(self.toolbar.rect())# 工具条位置优先顺序:右下角下侧,右上角上侧,右下角上侧if (screenSizeF.height() - centerRectF.bottomRight().y()) > toolbarRectF.height():toolbarRectF.moveTopRight(centerRectF.bottomRight() + QPointF(-5, 5))elif centerRectF.topRight().y() > toolbarRectF.height():toolbarRectF.moveBottomRight(centerRectF.topRight() + QPointF(-5, -5))else:toolbarRectF.moveBottomRight(centerRectF.bottomRight() + QPointF(-5, -5))# 限制工具条的x坐标不为负数,不能移出屏幕外if toolbarRectF.x() < 0:pos = toolbarRectF.topLeft()pos.setX(centerRectF.x() + 5)toolbarRectF.moveTo(pos)self.toolbar.move(toolbarRectF.topLeft().toPoint())self.toolbar.show()else:self.toolbar.hide()def paintEditActions(self):"""在截图区域绘制编辑行为结果。编辑行为超出截图区域也无所谓,保存图像时只截取截图区域内"""# 1.绘制正在拖拽编辑中的矩形、椭圆、涂鸦if self.isDrawRectangle:self.screenArea.paintRectangle(self.painter, self.toolbar.curColor(), self.toolbar.curLineWidth())elif self.isDrawEllipse:self.screenArea.paintEllipse(self.painter, self.toolbar.curColor(), self.toolbar.curLineWidth())elif self.isDrawGraffiti:self.screenArea.paintGraffiti(self.painter, self.toolbar.curColor(), self.toolbar.curLineWidth())# 2.绘制所有已保存的编辑行为self.screenArea.paintEachEditAction(self.painter)def clearEditFlags(self):self.isDrawing = Falseself.isDrawRectangle = Falseself.isDrawEllipse = Falseself.isDrawGraffiti = Falseself.isDrawText = Falsedef exitEditMode(self):"""退出编辑模式"""self.clearEditFlags()self.toolbar.onActionTriggered(None)  # 清空工具条工具按钮选中状态self.textInputWg.hide()def clearScreenShotArea(self):"""清空已划定的截取区域"""self.screenArea.clearEditActions()  # 清除已保存的编辑行为self.exitEditMode()self.hasScreenShot = Falseself.isCapturing = Falsepos = QPointF()self.screenArea.setCenterArea(pos, pos)self.update()self.setCursor(QtCore.Qt.CursorShape.CrossCursor)  # 设置鼠标样式 十字def mousePressEvent(self, event):if event.button() == QtCore.Qt.MouseButton.LeftButton:pos = event.position()if self.hasScreenShot:if self.isDrawRectangle or self.isDrawEllipse:self.screenArea.setBeginEditPoint(pos)elif self.isDrawGraffiti:  # 保存涂鸦经过的每一个点self.screenArea.saveGraffitiPointF(pos, first=True)elif self.isDrawText:if self.isDrawing:if QRectF(self.textInputWg.rect()).contains(pos):pass  # 在输入框内调整光标位置,忽略else:  # 鼠标点到输入框之外,完成编辑self.screenArea.saveTextInputAction()else:  # 未开始编辑时(暂不支持文本拖拽)action = self.screenArea.takeTextInputActionAt(pos)if action:  # 鼠标点到输入框之内,修改旧的文本输入self.textInputWg.loadTextInputBy(action)else:  # 鼠标点到输入框之外,开始新的文本输入self.screenArea.setBeginInputTextPoint(pos)elif self.screenArea.isMousePosInCenterRectF(pos):self.isMoving = True  # 进入拖拽移动模式self.screenArea.setBeginDragPoint(pos)else:self.isAdjusting = True  # 进入调整大小模式self.screenArea.setBeginAdjustPoint(pos)else:self.screenArea.setCenterArea(pos, pos)self.isCapturing = True  # 进入划定截图区域模式if event.button() == QtCore.Qt.MouseButton.RightButton:if self.hasScreenShot or self.isCapturing:  # 清空已划定的的截图区域self.clearScreenShotArea()else:self.close()def mouseReleaseEvent(self, event):if event.button() == QtCore.Qt.MouseButton.LeftButton:if self.isDrawRectangle:self.screenArea.saveRectangleAction()elif self.isDrawEllipse:self.screenArea.saveEllipseleAction()elif self.isDrawGraffiti:self.screenArea.saveGraffitiAction()self.isCapturing = Falseself.isMoving = Falseself.isAdjusting = Falseself.toolbar.show()def mouseMoveEvent(self, event):pos = event.position()if self.isDrawing:if self.isDrawRectangle or self.isDrawEllipse:self.screenArea.setEndEditPoint(pos)elif self.isDrawGraffiti:self.screenArea.saveGraffitiPointF(pos)elif self.isCapturing:self.hasScreenShot = Trueself.screenArea.setEndPoint(pos, remake=True)elif self.isMoving:self.screenArea.moveCenterAreaTo(pos)elif self.isAdjusting:self.screenArea.adjustCenterAreaBy(pos)self.update()if self.hasScreenShot:self.setCursor(self.screenArea.getMouseShapeBy(pos))else:self.setCursor(QtCore.Qt.CursorShape.CrossCursor)  # 设置鼠标样式 十字def mouseDoubleClickEvent(self, event):if event.button() == QtCore.Qt.MouseButton.LeftButton:if self.screenArea.isMousePosInCenterRectF(event.position()):self.save2Clipboard()self.close()def keyPressEvent(self, QKeyEvent):if QKeyEvent.key() == QtCore.Qt.Key.Key_Escape:self.close()if QKeyEvent.key() in (QtCore.Qt.Key.Key_Return, QtCore.Qt.Key.Key_Enter):  # 大键盘、小键盘回车self.save2Clipboard()self.close()def save2Clipboard(self):"""将截图区域复制到剪贴板"""if self.hasScreenShot:mimData = QtCore.QMimeData()mimData.setImageData(self.screenArea.centerPhysicalPixmap().toImage())QApplication.clipboard().setMimeData(mimData)# self.screenArea.saveNightAreaImg()self.close()def save2Local(self):fileType = self.fileType_imgfilePath, fileFormat = self.sys_selectSaveFilePath(self, fileType=fileType)if filePath:self.screenArea.centerPhysicalPixmap().save(filePath, quality=100)self.close()def sys_getCurTime(self, fmt='%Y-%m-%d %H:%M:%S'):"""获取字符串格式的当前时间"""# return QtCore.QDateTime.currentDateTime().toString('yyyy-MM-dd hh:mm:ss')return datetime.now().strftime(fmt)def sys_selectSaveFilePath(self, widget, title='选择文件保存路径', saveFileDir=None,saveFileName='', defaultFileFmt='%Y%m%d%H%M%S', fileType=None):"""选择文件保存路径title:选择窗口标题saveFileDir:指定保存目录saveFileName:默认保存文件名defaultFileFmt:不指定saveFileName时,自动以此格式的时间字符串命名文件fileType:可以选择的文件类型return:(所选的文件保存路径, 文件的类型)"""options = QFileDialog.Option.ReadOnlyif saveFileName == '':saveFileName = self.sys_getCurTime(defaultFileFmt)if not saveFileDir:saveFileDir = self.dir_lastAccesssaveFilePath = os.path.join(saveFileDir, saveFileName)if not fileType:fileType = self.fileType_allfilePath, fileFormat = QFileDialog.getSaveFileName(widget, title, saveFilePath, fileType, options=options)if filePath:self.dir_lastAccess = os.path.dirname(filePath)return (filePath, fileFormat)class MainWindow(QMainWindow):def __init__(self):super(MainWindow, self).__init__()self.setWindowTitle('自定义截图工具展示')self.screenShotWg = ScreenShotWidget()centralLayout = QVBoxLayout()centralLayout.addWidget(QPushButton('开始截图', clicked=lambda: self.screenShot()))centralLayout.addWidget(QPushButton('隐藏本窗口后截图', clicked=lambda: self.screenShot(True)))centralWidget = QWidget()centralWidget.setLayout(centralLayout)self.setCentralWidget(centralWidget)def screenShot(self, hide=False):if hide:self.showMinimized()self.screenShotWg.start()if __name__ == '__main__':app = QApplication(sys.argv)translator = QtCore.QTranslator()  # 颜色选取窗口、字体选择窗口中文化# if translator.load("D:/dev/Python38/Lib/site-packages/PyQt6/Qt6/translations/qtbase_zh_CN.qm"):#     app.installTranslator(translator)main = MainWindow()main.show()sys.exit(app.exec())
untitled.py
此为用PyUIC将QtDesigner ui文件转化生成的脚本,不需要自行修改
# Form implementation generated from reading ui file 'untitled.ui'
#
# Created by: PyQt6 UI code generator 6.4.2
#
# WARNING: Any manual changes made to this file will be lost when pyuic6 is
# run again.  Do not edit this file unless you know what you are doing.from PyQt6 import QtCore, QtGui, QtWidgetsclass Ui_MainWindow(object):def setupUi(self, MainWindow):MainWindow.setObjectName("MainWindow")MainWindow.resize(376, 400)self.centralwidget = QtWidgets.QWidget(parent=MainWindow)self.centralwidget.setObjectName("centralwidget")self.gridLayout = QtWidgets.QGridLayout(self.centralwidget)self.gridLayout.setObjectName("gridLayout")self.tabWidget = QtWidgets.QTabWidget(parent=self.centralwidget)self.tabWidget.setObjectName("tabWidget")self.read_qrcode_tab = QtWidgets.QWidget()self.read_qrcode_tab.setObjectName("read_qrcode_tab")self.gridLayout_3 = QtWidgets.QGridLayout(self.read_qrcode_tab)self.gridLayout_3.setObjectName("gridLayout_3")self.pushButton_screenshot = QtWidgets.QPushButton(parent=self.read_qrcode_tab)self.pushButton_screenshot.setObjectName("pushButton_screenshot")self.gridLayout_3.addWidget(self.pushButton_screenshot, 0, 0, 1, 1)self.label_screenshot = QtWidgets.QLabel(parent=self.read_qrcode_tab)self.label_screenshot.setText("")self.label_screenshot.setAlignment(QtCore.Qt.AlignmentFlag.AlignCenter)self.label_screenshot.setObjectName("label_screenshot")self.gridLayout_3.addWidget(self.label_screenshot, 2, 0, 1, 1)self.textBrowser_show_decode_result = QtWidgets.QTextBrowser(parent=self.read_qrcode_tab)self.textBrowser_show_decode_result.setObjectName("textBrowser_show_decode_result")self.gridLayout_3.addWidget(self.textBrowser_show_decode_result, 3, 0, 1, 1)self.tabWidget.addTab(self.read_qrcode_tab, "")self.qr_creator_tab = QtWidgets.QWidget()self.qr_creator_tab.setObjectName("qr_creator_tab")self.gridLayout_2 = QtWidgets.QGridLayout(self.qr_creator_tab)self.gridLayout_2.setObjectName("gridLayout_2")self.pic_label = QtWidgets.QLabel(parent=self.qr_creator_tab)self.pic_label.setText("")self.pic_label.setAlignment(QtCore.Qt.AlignmentFlag.AlignCenter)self.pic_label.setObjectName("pic_label")self.gridLayout_2.addWidget(self.pic_label, 1, 0, 1, 2)self.textEdit = QtWidgets.QTextEdit(parent=self.qr_creator_tab)self.textEdit.setMaximumSize(QtCore.QSize(16777215, 30))self.textEdit.setObjectName("textEdit")self.gridLayout_2.addWidget(self.textEdit, 0, 0, 1, 2)self.tabWidget.addTab(self.qr_creator_tab, "")self.gridLayout.addWidget(self.tabWidget, 1, 0, 1, 1)MainWindow.setCentralWidget(self.centralwidget)self.menubar = QtWidgets.QMenuBar(parent=MainWindow)self.menubar.setGeometry(QtCore.QRect(0, 0, 376, 22))self.menubar.setObjectName("menubar")MainWindow.setMenuBar(self.menubar)self.statusbar = QtWidgets.QStatusBar(parent=MainWindow)self.statusbar.setObjectName("statusbar")MainWindow.setStatusBar(self.statusbar)self.retranslateUi(MainWindow)self.tabWidget.setCurrentIndex(1)QtCore.QMetaObject.connectSlotsByName(MainWindow)def retranslateUi(self, MainWindow):_translate = QtCore.QCoreApplication.translateMainWindow.setWindowTitle(_translate("MainWindow", "二维码小工具"))self.pushButton_screenshot.setText(_translate("MainWindow", "截图"))self.tabWidget.setTabText(self.tabWidget.indexOf(self.read_qrcode_tab), _translate("MainWindow", "二维码解析"))self.textEdit.setHtml(_translate("MainWindow", "<!DOCTYPE HTML PUBLIC \"-//W3C//DTD HTML 4.0//EN\" \"http://www.w3.org/TR/REC-html40/strict.dtd\">\n"
"<html><head><meta name=\"qrichtext\" content=\"1\" /><meta charset=\"utf-8\" /><style type=\"text/css\">\n"
"p, li { white-space: pre-wrap; }\n"
"hr { height: 1px; border-width: 0; }\n"
"li.unchecked::marker { content: \"\\2610\"; }\n"
"li.checked::marker { content: \"\\2612\"; }\n"
"</style></head><body style=\" font-family:\'Microsoft YaHei UI\'; font-size:9pt; font-weight:400; font-style:normal;\">\n"
"<p style=\" margin-top:0px; margin-bottom:0px; margin-left:0px; margin-right:0px; -qt-block-indent:0; text-indent:0px;\">请输入要转化的文字</p></body></html>"))self.tabWidget.setTabText(self.tabWidget.indexOf(self.qr_creator_tab), _translate("MainWindow", "二维码生成"))
untitled.ui
ui文件
<?xml version="1.0" encoding="UTF-8"?>
<ui version="4.0"><class>MainWindow</class><widget class="QMainWindow" name="MainWindow"><property name="geometry"><rect><x>0</x><y>0</y><width>376</width><height>400</height></rect></property><property name="windowTitle"><string>二维码小工具</string></property><widget class="QWidget" name="centralwidget"><layout class="QGridLayout" name="gridLayout"><item row="1" column="0"><widget class="QTabWidget" name="tabWidget"><property name="currentIndex"><number>1</number></property><widget class="QWidget" name="read_qrcode_tab"><attribute name="title"><string>二维码解析</string></attribute><layout class="QGridLayout" name="gridLayout_3"><item row="0" column="0"><widget class="QPushButton" name="pushButton_screenshot"><property name="text"><string>截图</string></property></widget></item><item row="2" column="0"><widget class="QLabel" name="label_screenshot"><property name="text"><string/></property><property name="alignment"><set>Qt::AlignCenter</set></property></widget></item><item row="3" column="0"><widget class="QTextBrowser" name="textBrowser_show_decode_result"/></item></layout></widget><widget class="QWidget" name="qr_creator_tab"><attribute name="title"><string>二维码生成</string></attribute><layout class="QGridLayout" name="gridLayout_2"><item row="1" column="0" colspan="2"><widget class="QLabel" name="pic_label"><property name="text"><string/></property><property name="alignment"><set>Qt::AlignCenter</set></property></widget></item><item row="0" column="0" colspan="2"><widget class="QTextEdit" name="textEdit"><property name="maximumSize"><size><width>16777215</width><height>30</height></size></property><property name="html"><string><!DOCTYPE HTML PUBLIC "-//W3C//DTD HTML 4.0//EN" "http://www.w3.org/TR/REC-html40/strict.dtd">
<html><head><meta name="qrichtext" content="1" /><meta charset="utf-8" /><style type="text/css">
p, li { white-space: pre-wrap; }
hr { height: 1px; border-width: 0; }
li.unchecked::marker { content: "\2610"; }
li.checked::marker { content: "\2612"; }
</style></head><body style=" font-family:'Microsoft YaHei UI'; font-size:9pt; font-weight:400; font-style:normal;">
<p style=" margin-top:0px; margin-bottom:0px; margin-left:0px; margin-right:0px; -qt-block-indent:0; text-indent:0px;">请输入要转化的文字</p></body></html></string></property></widget></item></layout></widget></widget></item></layout></widget><widget class="QMenuBar" name="menubar"><property name="geometry"><rect><x>0</x><y>0</y><width>376</width><height>22</height></rect></property></widget><widget class="QStatusBar" name="statusbar"/></widget><resources/><connections/>
</ui>这篇关于【Pyqt6 学习笔记】DIY一个二维码解析生成小工具的文章就介绍到这儿,希望我们推荐的文章对编程师们有所帮助!


