本文主要是介绍QT系列教程(10) QTextEdit学习,希望对大家解决编程问题提供一定的参考价值,需要的开发者们随着小编来一起学习吧!
简介
QTextEdit是文本编辑器,支持富文本功能。接下来我们创建一个Qt Application 应用,然后在ui中添加一个QTextEdit插件。
运行程序后,可以在QTextEdit中输入任何文字也包括富文本。
文本块
我们在MainWindow的ui文件中添加了textedit插件,然后在MainWindow的构造函数中写代码,修改文本框样式
MainWindow::MainWindow(QWidget *parent) :QMainWindow(parent),ui(new Ui::MainWindow)
{ui->setupUi(this);QTextDocument *doc= ui->textEdit->document();QTextFrame* root_frame = doc->rootFrame();QTextFrameFormat format;format.setBorderBrush(Qt::blue);format.setBorder(3);root_frame->setFrameFormat(format);
}
通过textEdit的document函数返回文本块,再通过rootFrame获取根框架,设置这个框架的边框样式为蓝色,边框为3.
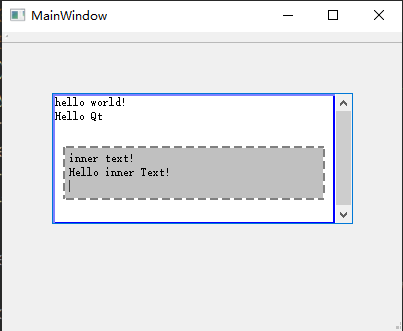
运行程序后可以看到主窗口的textedit会显示一个蓝色边框的输入框,那就是根节点。我们可以插入两个纯文本
MainWindow::MainWindow(QWidget *parent) :QMainWindow(parent),ui(new Ui::MainWindow)
{ui->setupUi(this);QTextDocument *doc= ui->textEdit->document();QTextFrame* root_frame = doc->rootFrame();QTextFrameFormat format;format.setBorderBrush(Qt::blue);format.setBorder(3);root_frame->setFrameFormat(format);ui->textEdit->insertPlainText("hello world!\n");ui->textEdit->insertPlainText("Hello Qt\n");
}
运行程序会看到插入的纯文本在根文本块里。我们可以再设置一个文本样式,然后插入到光标所在的位置,这样会生成一个新的文本框架,然后插入两行文字,这样会生成两个文本块
QTextFrameFormat frameFormat;frameFormat.setBackground(Qt::lightGray);frameFormat.setMargin(10);frameFormat.setPadding(5);frameFormat.setBorder(2);frameFormat.setBorderStyle(QTextFrameFormat::BorderStyle_Dashed);QTextCursor cursor = ui->textEdit->textCursor();cursor.insertFrame(frameFormat);ui->textEdit->insertPlainText("inner text!\n");ui->textEdit->insertPlainText("Hello inner Text!\n");
效果就是这样
遍历文本块
我们可以遍历文本块和框架节点。先在构造函数中添加一个菜单,用来打印Frame和TextBlock
QAction * action_frame = new QAction("Frame",this);connect(action_frame, &QAction::triggered,this, &MainWindow::showTextFrame);ui->mainToolBar->addAction(action_frame);
然后实现showTextFrame
void MainWindow::showTextFrame()
{auto doc = ui->textEdit->document();auto rootFrame = doc->rootFrame();for(auto iter = rootFrame->begin(); iter != rootFrame->end(); iter++){auto cur_frame = iter.currentFrame();auto cur_block = iter.currentBlock();if(cur_frame){qDebug() << "cur node is frame " ;} else if(cur_block.isValid()){qDebug() << "cur node is text block ,text is " << cur_block.text();}}
}
程序输出
cur node is text block ,text is  "hello world!"
cur node is text block ,text is  "Hello Qt"
cur node is text block ,text is  ""
cur node is frame
cur node is text block ,text is  ""
如果只想打印文本块,我们可以用这种方式, 现在MainWindow的构造函数中添加一个显示文本的菜单项
QAction* action_textBlock = new QAction(tr("文本块"),this);connect(action_textBlock, &QAction::triggered, this, &MainWindow::showTextBlock);ui->mainToolBar->addAction(action_textBlock);
显示文本块的逻辑如下
void MainWindow::showTextBlock()
{QTextDocument* document = ui->textEdit->document();QTextBlock block = document->firstBlock();for(int i = 0; i < document->blockCount(); i++){qDebug() << tr("文本块%1, 文本块首行行号%2, 长度%3, 内容%4").arg(i).arg(block.firstLineNumber()).arg(block.length())<< block.text();block = block.next();}
}
运行程序后点击文本块菜单,会输出如下
"文本块0, 文本块首行行号0, 长度13, 内容%4" "hello world!"
"文本块1, 文本块首行行号1, 长度9, 内容%4" "Hello Qt"
"文本块2, 文本块首行行号2, 长度1, 内容%4" ""
"文本块3, 文本块首行行号3, 长度12, 内容%4" "inner text!"
"文本块4, 文本块首行行号4, 长度18, 内容%4" "Hello inner Text!"
"文本块5, 文本块首行行号5, 长度1, 内容%4" ""
"文本块6, 文本块首行行号6, 长度1, 内容%4" ""
设置文本块样式
之前我们设置的都是文本框架的样式,这次我们设置文本块的样式.
在构造函数中添加字体菜单,用来设置文本块的字体样式
QAction* action_font = new QAction(tr("字体"), this);action_font->setCheckable(true);connect(action_font, &QAction::toggled, this, &MainWindow::setTextFont);ui->mainToolBar->addAction(action_font);
setTextFont槽函数实现如下
void MainWindow::setTextFont(bool checked)
{if(checked){QTextCursor cursor = ui->textEdit->textCursor();QTextBlockFormat blockFormat;blockFormat.setAlignment(Qt::AlignCenter);cursor.insertBlock(blockFormat);QTextCharFormat charFormat;charFormat.setBackground(Qt::lightGray);charFormat.setForeground(Qt::blue);charFormat.setFont(QFont(tr("宋体"),12,QFont::Bold,true));charFormat.setFontUnderline(true);cursor.setCharFormat(charFormat);cursor.insertText(tr("插入字体"));}else{QTextCursor cursor = ui->textEdit->textCursor();QTextBlockFormat blockFormat;blockFormat.setAlignment(Qt::AlignLeft);cursor.insertBlock(blockFormat);QTextCharFormat charFormat;
//        charFormat.setBackground(Qt::white);
//        charFormat.setForeground(Qt::black);
//        charFormat.setFont(QFont(tr("微软雅黑"),12,QFont::Normal, false));
//        charFormat.setFontUnderline(false);cursor.setCharFormat(charFormat);cursor.insertText(tr("微软雅黑字体"));}
}
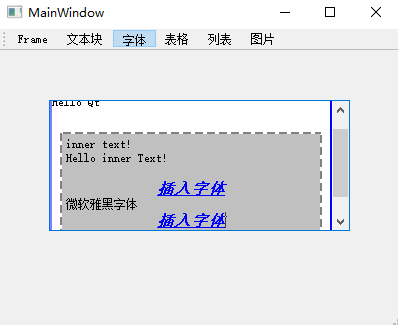
如果选中字体菜单,则设置插入新的文本块,文本块格式为宋体,加粗字样。如果取消选中,则插入新的文本块,设置为微软雅黑字体。
运行程序后, 选中字体菜单,然后再点击字体菜单取消选中,会插入不同字体的文本块,显示如下
插入表格列表图片
QTextEdit也支持插入表格,列表,图片等资源。在MainWindow的构造函数里增加列表,图片,表格的信号和槽函数连接逻辑
QAction* action_textTable = new QAction(tr("表格"), this);QAction* action_textList = new QAction(tr("列表"), this);QAction* action_textImage = new QAction(tr("图片"), this);connect(action_textTable, &QAction::triggered,this, &MainWindow::insertTable);ui->mainToolBar->addAction(action_textTable);connect(action_textList, &QAction::triggered,this, &MainWindow::insertList);ui->mainToolBar->addAction(action_textList);connect(action_textImage, &QAction::triggered,this, &MainWindow::insertImage);ui->mainToolBar->addAction(action_textImage);
然后实现这几个槽函数
void MainWindow::insertTable()
{QTextCursor cursor = ui->textEdit->textCursor();QTextTableFormat format;format.setCellSpacing(2);format.setCellPadding(10);cursor.insertTable(2,2,format);
}void MainWindow::insertList(){QTextListFormat format;format.setStyle(QTextListFormat::ListDecimal);ui->textEdit->textCursor().insertList(format);
}void MainWindow::insertImage(){QTextImageFormat format;format.setName(":/img/head.jpg");ui->textEdit->textCursor().insertImage(format);
}
运行程序后,点击这几个菜单,会依次插入表格,列表,图片等。
实现查找功能
在构造函数里添加查找信号和槽函数的连接
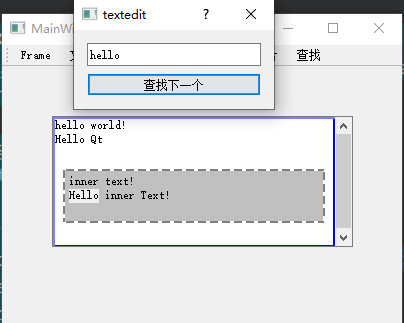
QAction* action_textFind = new QAction(tr("查找"), this);connect(action_textFind, &QAction::triggered, this, &MainWindow::textFind);ui->mainToolBar->addAction(action_textFind);findDialog = new QDialog(this);lineEdit = new QLineEdit(findDialog);QPushButton * btn = new QPushButton(findDialog);btn->setText(tr("查找下一个"));connect(btn, &QPushButton::clicked, this, &MainWindow::findNext);QVBoxLayout* layout = new QVBoxLayout();layout->addWidget(lineEdit);layout->addWidget(btn);findDialog->setLayout(layout);
在构造函数里连接了查找菜单和槽函数textFind。然后创建了一个对话框,对话框上有一个lineedit,以及查找按钮,每次点击这个按钮就执行查找下一个的功能。
运行后显示如下
总结
源码链接https://gitee.com/secondtonone1/qt-learning-notes
这篇关于QT系列教程(10) QTextEdit学习的文章就介绍到这儿,希望我们推荐的文章对编程师们有所帮助!


