本文主要是介绍BitmapFactory.Options介绍(整理自查阅),希望对大家解决编程问题提供一定的参考价值,需要的开发者们随着小编来一起学习吧!
Android 图片压缩也即生成缩略图方法
Bitmap是Android系统中的图像处理的最重要类之一。用它可以获取图像文件信息,进行图像剪切、旋转、缩放等操作,并可以指定格式保存图像文件。本文从应用的角度,着重介绍怎么用Bitmap来实现这些功能。
一、Bitmap的生成
1.1 BitmapFactory decode出Bitmap
Bitmap实现在android.graphics包中。但是Bitmap类的构造函数是私有的,外面并不能实例化,只能是通过JNI实例化。这必然是某个辅助类提供了创建Bitmap的接口,而这个类的实现通过JNI接口来实例化Bitmap的,这个类就是BitmapFactory。

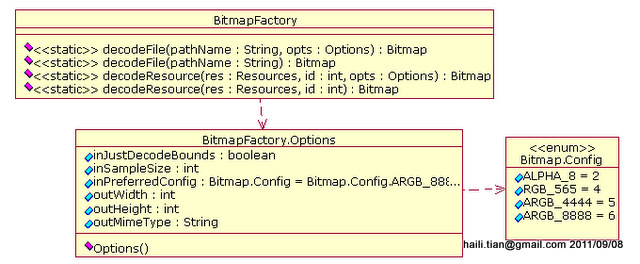
图一、BitmapFactory主要方法及Options选项
利用BitmapFactory可以从一个指定文件中,利用decodeFile()解出Bitmap;也可以定义的图片资源中,利用decodeResource()解出Bitmap。
1.2 decode时的选项
在使用方法decodeFile()/decodeResource()时,都可以指定一个BitmapFacotry.Options。
利用Options的下列属性,可以指定decode的选项:
- inPreferredConfig 指定decode到内存中,手机中所采用的编码,可选值定义在Bitmap.Config中。缺省值是ARGB_8888。
- inJustDecodeBounds 如果设置为true,并不会把图像的数据完全解码,亦即decodeXyz()返回值为null,但是Options的outAbc中解出了图像的基本信息。
- inSampleSize 设置decode时的缩放比例。
利用Options的这些值就可以高效的得到一幅缩略图。

图二、BitmapFactory.decodeFile()
先设置inJustDecodeBounds= true,调用decodeFile()得到图像的基本信息[Step#2~4];
利用图像的宽度(或者高度,或综合)以及目标的宽度,得到inSampleSize值,再设置inJustDecodeBounds= false,调用decodeFile()得到完整的图像数据[Step#5~8]。
先获取比例,再读入数据,如果欲读入大比例缩小的图,将显著的节约内容资源。有时候还会读入大量的缩略图,这效果就更明显了。
二、利用Bitmap和Matrix实现图像变换
Bitmap可以和Matrix结合实现图像的剪切、旋转、缩放等操作。

图三、Bitmap方法
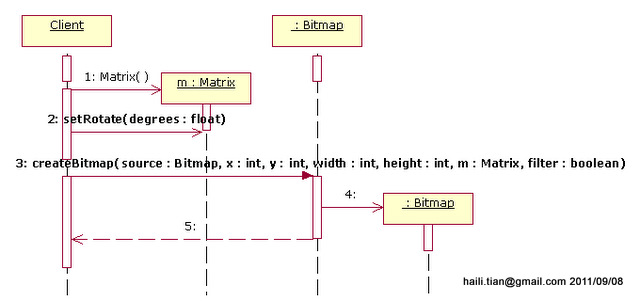
用源Bitmap通过变换生成新的Bitmap的方法:
- public static Bitmap createBitmap(Bitmap source, int x, int y, intwidth, int height,
- Matrix m, boolean filter)
- public static Bitmap createBitmap(Bitmap source, int x, int y, intwidth, int height)
- public static Bitmap createScaledBitmap(Bitmap src, int dstWidth,
- int dstHeight,boolean filter)
第一个方法是最终的实现,后两种只是对第一种方法的封装。
第二个方法可以从源Bitmap中指定区域(x,y, width, height)中挖出一块来实现剪切;第三个方法可以把源Bitmap缩放为dstWidth x dstHeight的Bitmap。
设置Matrix的Rotate(通过setRotate())或者Scale(通过setScale()),传入第一个方法,可实现旋转或缩放。

图四、Bitmap实现旋转
三、保存图像文件
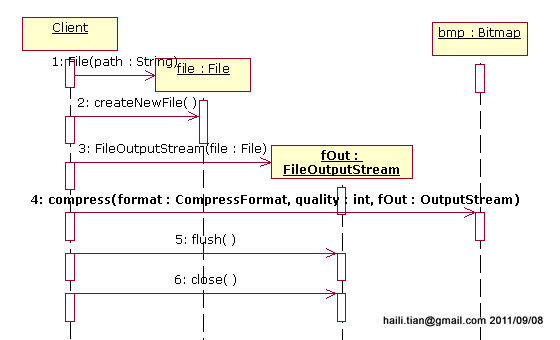
经过图像变换之后的Bitmap里的数据可以保存到图像压缩文件里(JPG/PNG)。

图五、保存Bitmap数据到文件
这个操作过程中,Bitmap.compress()方法的参数format可设置JPEG或PNG格式;quality可选择压缩质量;fOut是输出流(OutputStream),这里的FileOutputStream是OutputStream的一个子类。
总结一下,本文介绍Bitmap的使用方法——用Bitmap实现图像文件的读取和写入,并用Bitmap实现图像的剪切、旋转和缩放变换。
在开发图片浏览器等软件是,很多时候要显示图片的缩略图,而一般情况下,我们要将图片按照固定大小取缩略图,一般取缩略图的方法是使用BitmapFactory的decodeFile方法,然后通过传递进去 BitmapFactory.Option类型的参数进行取缩略图,在Option中,属性值inSampleSize表示缩略图大小为原始图片大小的几分之一,即如果这个值为2,则取出的缩略图的宽和高都是原始图片的1/2,图片大小就为原始大小的1/4。
然而,如果我们想取固定大小的缩略图就比较困难了,比如,我们想将不同大小的图片去出来的缩略图高度都为200px,而且要保证图片不失真,那怎么办?我们总不能将原始图片加载到内存中再进行缩放处理吧,要知道在移动开发中,内存是相当宝贵的,而且一张100K的图片,加载完所占用的内存何止 100K?
经过研究,发现,Options中有个属性inJustDecodeBounds,研究了一下,终于明白是什么意思了,SDK中的E文是这么说的
If set to true, the decoder will return null (no bitmap), but the out... fields will still be set, allowing the caller to query the bitmap without having to allocate the memory for its pixels.
意思就是说如果该值设为true那么将不返回实际的bitmap不给其分配内存空间而里面只包括一些解码边界信息即图片大小信息,那么相应的方法也就出来了,通过设置inJustDecodeBounds为true,获取到outHeight(图片原始高度)和 outWidth(图片的原始宽度),然后计算一个inSampleSize(缩放值),然后就可以取图片了,这里要注意的是,inSampleSize 可能小于0,必须做判断。
具体代码如下:
FrameLayout fr=(FrameLayout)findViewById(R.id.FrameLayout01);
BitmapFactory.Options options = new BitmapFactory.Options();
options.inJustDecodeBounds = true;
// 获取这个图片的宽和高
Bitmap bitmap = BitmapFactory.decodeFile("/sdcard/test.jpg", options); //此时返回bm为空
options.inJustDecodeBounds = false;
//计算缩放比
int be = (int)(options.outHeight / (float)200);
if (be <= 0)
be = 1;
options.inSampleSize = be;
//重新读入图片,注意这次要把options.inJustDecodeBounds 设为 false哦
bitmap=BitmapFactory.decodeFile("/sdcard/test.jpg",options);
int w = bitmap.getWidth();
int h = bitmap.getHeight();
System.out.println(w+" "+h);
ImageView iv=new ImageView(this);
iv.setImageBitmap(bitmap);
这样我们就可以读取较大的图片而不会内存溢出了。如果你想把压缩后的图片保存在Sdcard上的话就很简单了:
File file=new File("/sdcard/feng.png");
try {
FileOutputStream out=new FileOutputStream(file);
if(bitmap.compress(Bitmap.CompressFormat.PNG, 100, out)){
out.flush();
out.close();
}
} catch (FileNotFoundException e) {
// TODO Auto-generated catch block
e.printStackTrace();
} catch (IOException e) {
// TODO Auto-generated catch block
e.printStackTrace();
}
ok,这样就把图片保存在/sdcard/feng.png这个文件里面了,呵呵。
Android使用BitmapFactory.Options解决加载大图片内存溢出问题
由于Android对图片使用内存有限制,若是加载几兆的大图片便内存溢出。Bitmap会将图片的所有像素(即长x宽)加载到内存中,如果图片分辨率过大,会直接导致内存溢出(java.lang.OutOfMemoryError),只有在BitmapFactory加载图片时使用BitmapFactory.Options对相关参数进行配置来减少加载的像素。
1、设置缩放大小对图片作处理
public Bitmap getBitmapFromFile(File dst, int width, int height) {
if (null != dst && dst.exists()) {
BitmapFactory.Options opts = null;
if (width > 0 && height > 0) {
opts = new BitmapFactory.Options();
opts.inJustDecodeBounds = true;
BitmapFactory.decodeFile(dst.getPath(), opts);
// 计算图片缩放比例
final int minSideLength = Math.min(width, height);
opts.inSampleSize = computeSampleSize(opts, minSideLength,
width * height);
opts.inJustDecodeBounds = false;
opts.inInputShareable = true;
opts.inPurgeable = true;
}
try {
return BitmapFactory.decodeFile(dst.getPath(), opts);
} catch (OutOfMemoryError e) {
e.printStackTrace();
}
}
return null;
}
public static int computeSampleSize(BitmapFactory.Options options,
int minSideLength, int maxNumOfPixels) {
int initialSize = computeInitialSampleSize(options, minSideLength,
maxNumOfPixels);
int roundedSize;
if (initialSize <= 8) {
roundedSize = 1;
while (roundedSize < initialSize) {
roundedSize <<= 1;
}
} else {
roundedSize = (initialSize + 7) / 8 * 8;
}
return roundedSize;
}
private static int computeInitialSampleSize(BitmapFactory.Options options,
int minSideLength, int maxNumOfPixels) {
double w = options.outWidth;
double h = options.outHeight;
int lowerBound = (maxNumOfPixels == -1) ? 1 : (int) Math.ceil(Math
.sqrt(w * h / maxNumOfPixels));
int upperBound = (minSideLength == -1) ? 128 : (int) Math.min(Math
.floor(w / minSideLength), Math.floor(h / minSideLength));
if (upperBound < lowerBound) {
// return the larger one when there is no overlapping zone.
return lowerBound;
}
if ((maxNumOfPixels == -1) && (minSideLength == -1)) {
return 1;
} else if (minSideLength == -1) {
return lowerBound;
} else {
return upperBound;
}
}
BitmapFactory.Options这个类简介
BitmapFactory.Options这个类,有一个字段叫做 inJustDecodeBounds 。SDK中对这个成员的说明是这样的:
If set to true, the decoder will return null (no bitmap), but the out…
也就是说,如果我们把它设为true,那么BitmapFactory.decodeFile(String path, Options opt)并不会真的返回一个Bitmap给你,它仅仅会把它的宽,高取回来给你,这样就不会占用太多的内存,也就不会那么频繁的发生OOM了。
示例代码如下:
1. BitmapFactory.Options options = new BitmapFactory.Options();
2. options.inJustDecodeBounds = true;
3. Bitmap bmp = BitmapFactory.decodeFile(path, options);
这段代码之后,options.outWidth 和 options.outHeight就是我们想要的宽和高了。
有了宽,高的信息,我们怎样在图片不变形的情况下获取到图片指定大小的缩略图呢?
比如我们需要在图片不变形的前提下得到宽度为200的缩略图。
那么我们需要先计算一下缩放之后,图片的高度是多少
1. int height = options.outHeight * 200 / options.outWidth;
2. options.outWidth = 200;
3. options.outHeight = height;
4. options.inJustDecodeBounds = false;
5. Bitmap bmp = BitmapFactory.decodeFile(path, options);
6. image.setImageBitmap(bmp);
这样虽然我们可以得到我们期望大小的ImageView
但是在执行BitmapFactory.decodeFile(path, options);时,并没有节约内存。要想节约内存,还需要用到BitmapFactory.Options这个类里的 inSampleSize 这个成员变量。
我们可以根据图片实际的宽高和我们期望的宽高来计算得到这个值。
1. inSampleSize = options.outWidth / 200;
另外,为了节约内存我们还可以使用下面的几个字段:
1. options.inPreferredConfig = Bitmap.Config.ARGB_4444;// 默认是Bitmap.Config.ARGB_8888
2. options.inPurgeable = true;
3. options.inInputShareable = true;
这篇关于BitmapFactory.Options介绍(整理自查阅)的文章就介绍到这儿,希望我们推荐的文章对编程师们有所帮助!


