本文主要是介绍【C++】STL中List的基本功能的模拟实现,希望对大家解决编程问题提供一定的参考价值,需要的开发者们随着小编来一起学习吧!
前言:在前面学习了STL中list的使用方法,现在我们就进一步的讲解List的一些基本功能的模拟实现,这一讲博主认为是最近比较难的一个地方,各位一起加油。
💖 博主CSDN主页:卫卫卫的个人主页 💞
👉 专栏分类:高质量C++学习 👈
💯代码仓库:卫卫周大胖的学习日记💫
💪关注博主和博主一起学习!一起努力!

目录标题
- List的模拟实现
- List三个基本类
- 结点类接口的实现
- list的正向迭代器类的实现
- List正向迭代器的接口实现
- 构造函数
- operator*运算符重载
- operator->运算符重载
- operator前置++和--与后置++和--
- operator==与operator!=
- List类的接口的实现
- 构造函数
- begin()和end()
- 尾插函数- push_back(const T& x)
- insert(iterator pos, const T& val)插入(pos之前的位置)
- push_front(const T& x)头插
- iterator erase(iterator pos)删除pos位置的值
- 尾删与头删
- clear()清空list
- size_t size() 查看链表元素
- bool empty()查看链表元素是否为空
- 拷贝构造函数
- 析构函数
- swap函数 交换链表中的元素
- operator=运算符重载
- 整体代码
List的模拟实现
List三个基本类
前面我们提到过,list本质上就是一个带头双向循环链表,这里我们要实现list的功能就要实现三个类:
- 模拟实现结点类
- 模拟实现迭代器的类
- 模拟list主要功能的类
结点类接口的实现
这里如果对带头双向链表不太熟悉的小伙伴可以去看看博主之前的文章带头双向循环链表
template <class T>
struct ListNode//链表的主体
{ListNode<T>* _prev;//C++中可不写struct,直接用名定义ListNode<T>* _next;T _data;//存节点的值ListNode(const T& x = T())//这个地方在讲模拟实现vector的时候也讲了,需要查看的可以看看之前的博客:_next(nullptr), _prev(nullptr), _data(x){}
};
看到这里很多小伙伴会有疑问为什么这里写的是ListNode*
- 在C++中是可以省略struct不写的,也就是说原本的样子应该是 struct ListNode * _prev
- 结构体模板或类模板在定义时可以不加 T,但 使用时必须加T
list的正向迭代器类的实现
template<class T, class Ref, class Ptr>
struct ListIterator//迭代器
{typedef ListNode<T> Node;typedef ListIterator<T, Ref, Ptr> Self;//T表示基本类型, Ref表示引用返回,Ptr指代指针返回Node* _node;//记录链表ListIterator(Node* node)//传过来的位置就是迭代器从哪个位置开始
}
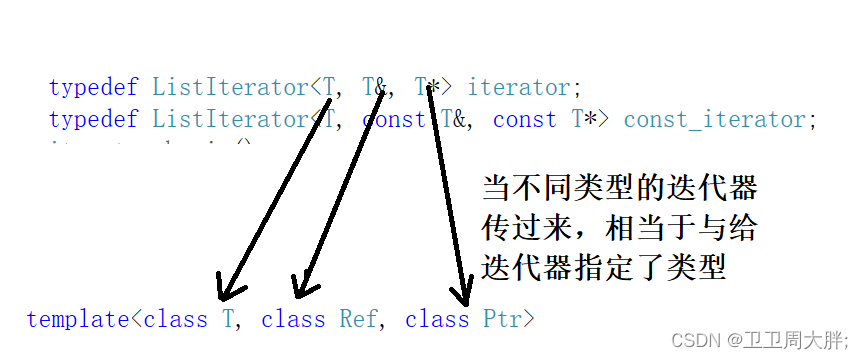
这里大部分人会有因为为什么这里迭代器的模板会有三个参数?因为如果我们只是使用普通迭代器的话确实一个参数就够了,但是有的情况我们是需要使用const迭代器的,难道我们还要在写一个类来专门放 const类型的迭代器嘛?
而后文list类的模拟实现中,我对迭代器进行了两种typedef:
普通迭代器:typedef ListIterator<T, T&, T*> iterator;
const迭代器:typedef ListIterator<T, const T&, const T*> const_iterator;
List正向迭代器的接口实现
构造函数
这里我们通过传过来的结点完成构造,让迭代器指向传过来结点的位置即可
ListIterator(Node* node)//传过来的位置就是迭代器从哪个位置开始:_node(node)
{
}
operator*运算符重载
前面我们说到过,Ref本质就是引用返回,无非就是const还是非const的类型的区分
Ref operator*()
{return _node->_data;
}
operator->运算符重载
至于为什么要写->的运算符重载,就是我们在list的使用的过程中传过去的不一定就是内置类型,还有可能是自定义类型(如下所示)
struct A
{int _a1;int _a2;A(int a1 = 0, int a2 = 0):_a1(a1), _a2(a2){}
};
void test_list2()
{list<A> lt;A aa1(1, 1);A aa2 = { 1, 1 };lt.push_back(aa1);lt.push_back(aa2);lt.push_back(A(2, 2));lt.push_back({ 3, 3 });lt.push_back({ 4, 4 });list<A>::iterator it = lt.begin();while (it != lt.end()){cout << it->_a1 << ":" << it->_a2 << endl;//本质上编译器会省略一个->,所以实际上写的是it->_A->_a1cout << it.operator->()->_a1 << ":" << it.operator->()->_a2 << endl;++it;}cout << endl;
}
Ptr operator->()//本质上就是重载自定义类型,帮你找到内置类型,然后再找到内置类型的数据
{return &_node->_data;
}
operator前置++和–与后置++和–
这里我们提一下,对于前置++和后置++还有–等,我们主要传一个int类型的数据来进行区分
Self& operator++()//前置++
{_node = _node->_next;return *this;
}Self operator++(int)//后置++,加上int以便区分
{Self tmp(*this);//浅拷贝就行了_node = _node->_next;return tmp;
}Self& operator--()//前置++
{_node = _node->_prev;return *this;
}Self operator--(int)//后置--
{Self tmp(*this);_node = _node->_prev;return tmp;
}
operator==与operator!=
代码思路:对于如何判断两个迭代器是否相等,我们只需要判断两个迭代器所指向的位置是否相等即可。
bool operator != (const Self& it)
{return _node != it._node;
}bool operator == (const Self& it)
{return _node == it._node;
}
List类的接口的实现
代码思路:这里我们主要是通过两个迭代器帮助我们去遍历list,然后一个const迭代器是只读的作用,一个非const迭代器是即可读又可写的作用
template <class T>
class list//链表
{typedef ListNode<T> Node;
public:typedef ListIterator<T, T&, T*> iterator;//正向迭代器typedef ListIterator<T, const T&, const T*> const_iterator;//const迭代器
private:Node* _head;size_t _size;//记录链表元素个数
};
构造函数
这里我们就采用双向带头链表的思路,初始化的时候让其的前驱指针和next指向他的哨兵位即可。
void empty_init()
{_head = new Node;_head->_next = _head;_head->_prev = _head;_size = 0;
}
list()//默认构造
{empty_init();
}
begin()和end()
iterator begin()//begin应该是哨兵位的下一个结点
{return _head->_next;
}
iterator end()//因为是带头双向链表,所以通常没有尾部的这个说法,一般结束的时候就是在哨兵位这个结点就是尾结点
{return _head;
}const_iterator begin()const//只读的版本
{return _head->_next;
}const_iterator end() const
{return _head;
}
尾插函数- push_back(const T& x)
关于尾插这部分的内容,我们在之前数据结构那部分讲的挺详细的不懂的话可以看看博主之前的博客。
void push_back(const T& x)//尾插
{//insert(end(), x);Node* tail = _head->_prev;//找尾Node* newnode = new Node(x);//创建一个新的结点tail->_next = newnode;newnode->_prev = tail;//使newnode和头结点_head构成循环newnode->_next = _head;
}
insert(iterator pos, const T& val)插入(pos之前的位置)
这里我们会发现使用insert会改变了底层,会导致迭代器失效,所以使用的时候要及时更新迭代器。
void insert(iterator pos, const T& val)//插入
{Node* cur = pos._node;//找到当前结点的链表Node* newnode = new Node(val);Node* prev = cur->_prev;prev->_next = newnode;newnode->_prev = prev;newnode->_next = cur;cur->_prev = newnode;_size++;
}
push_front(const T& x)头插
这里我们可以顺带把尾插也给优化一下
void push_front(const T& x)//头插
{insert(begin(), x);
}
void push_back(const T& x)//尾插
{insert(end(), x);
}
iterator erase(iterator pos)删除pos位置的值
这里我们也需要注意的是,删除和插入数据都会导致迭代器失效,因此我们需要及时的更新迭代器
iterator erase(iterator pos)//删除会导致迭代器失效,故因此要返回迭代器的下一个位置
{assert(pos != end());Node* cur = pos._node;Node* prev = cur->_prev;Node* next = cur->_next;prev->_next = next;next->_prev = prev;delete cur;_size--;return iterator(next);
}
尾删与头删
void pop_back()//尾删
{erase(end() - 1);
}void pop_front()
{erase(begin());
}
clear()清空list
void clear()
{iterator it = begin();//通过迭代器依次遍历清除while (it != end()){it = erase(it);}
}
size_t size() 查看链表元素
size_t size() const
{return _size;
}
bool empty()查看链表元素是否为空
bool empty()
{return _size == 0;
}
拷贝构造函数
代码思路:我们只需要对链表的元素依次尾插到新的链表中即可
list(const list<T>& lt)
{empty_init();for (auto& e : lt){push_back(e);}
}
析构函数
~list()//析构
{clear();delete _head;_head = nullptr;
}
swap函数 交换链表中的元素
void swap(list<T>& it)//it要被修改
{std::swap(_head, it._head);std::swap(_size, it._size);
}
operator=运算符重载
list<T>& operator=(list<T> it)
{swap(*this,it);return *this;
}
整体代码
#include<iostream>
#include <assert.h>
using namespace std;namespace bit
{template <class T>struct ListNode//链表的主体{ListNode* _prev;//C++中可不写struct,直接用名定义ListNode* _next;T _data;ListNode(const T& x = T()):_next(nullptr), _prev(nullptr), _data(x){}};template<class T, class Ref, class Ptr>struct ListIterator//迭代器{typedef ListNode<T> Node;typedef ListIterator<T, Ref, Ptr> Self;//T表示基本类型, Ref表示引用返回,Ptr指代指针返回Node* _node;//记录链表ListIterator(Node* node)//传过来的位置就是迭代器从哪个位置开始:_node(node){}Ref operator*(){return _node->_data;}// list<int>::ListIterator it;  it->data;//list<Data>::ListIterator it;  it->Data->data;Ptr operator->()//本质上就是重载自定义类型,帮你找到内置类型,然后再找到内置类型的数据{return &_node->_data;}Self& operator++()//前置++{_node = _node->_next;return *this;}Self operator++(int)//后置++{Self tmp(*this);//浅拷贝就行了_node = _node->_next;return tmp;}Self& operator--()//前置++{_node = _node->_prev;return *this;}Self operator--(int)//后置--{Self tmp(*this);_node = _node->_prev;return tmp;}bool operator != (const Self& it){return _node != it._node;}bool operator == (const Self& it){return _node == it._node;}};template <class T>class list//链表{typedef ListNode<T> Node;public:typedef ListIterator<T, T&, T*> iterator;typedef ListIterator<T, const T&, const T*> const_iterator;iterator begin(){return _head->_next;}iterator end(){return _head;}const_iterator begin()const{return _head->_next;}const_iterator end() const{return _head;}void empty_init(){_head = new Node;_head->_next = _head;_head->_prev = _head;_size = 0;}list()//默认构造{empty_init();}// lt2(lt1)list(const list<T>& lt){empty_init();for (auto& e : lt){push_back(e);}}~list()//析构{clear();delete _head;_head = nullptr;}void swap(list<T>& it)//it要被修改{std::swap(_head, it._head);std::swap(_size, it._size);}list<T>& operator=(list<T> it){swap(*this,it);return *this;}void push_back(const T& x)//尾插{//insert(end(), x);Node* tail = _head->_prev;//找尾Node* newnode = new Node(x);//创建一个新的结点tail->_next = newnode;newnode->_prev = tail;//使newnode和头结点_head构成循环newnode->_next = _head;}void push_front(const T& x)//头插{insert(begin(), x);}void insert(iterator pos, const T& val)//插入{Node* cur = pos._node;//找到当前结点的链表Node* newnode = new Node(val);Node* prev = cur->_prev;prev->_next = newnode;newnode->_prev = prev;newnode->_next = cur;cur->_prev = newnode;_size++;}iterator erase(iterator pos)//删除会导致迭代器失效,故因此要返回迭代器的下一个位置{assert(pos != end());Node* cur = pos._node;Node* prev = cur->_prev;Node* next = cur->_next;prev->_next = next;next->_prev = prev;delete cur;_size--;return iterator(next);}void pop_back()//尾删{erase(end() - 1);}void pop_front(){erase(begin());}size_t size() const{return _size;}bool empty(){return _size == 0;}void clear(){iterator it = begin();while (it != end()){it = erase(it);}}private:Node* _head;size_t _size;};
好啦,今天的内容就到这里啦,下期内容预告stl中stack和queue的使用与模拟实现.
结语:今天的内容就到这里吧,谢谢各位的观看,如果有讲的不好的地方也请各位多多指出,作者每一条评论都会读的,谢谢各位。
这篇关于【C++】STL中List的基本功能的模拟实现的文章就介绍到这儿,希望我们推荐的文章对编程师们有所帮助!


