本文主要是介绍编译和运行qemu-uboot-arm64单板的Armbian系统,希望对大家解决编程问题提供一定的参考价值,需要的开发者们随着小编来一起学习吧!
这篇文章ARM虚拟机安装OMV-CSDN博客遗留一个启动qemu-uboot-arm64单板Armbian镜像的问题,使用官方下载的镜像,会报错:
fatal: no kernel available
....
Failed to load '/vmlinuz'
......
qemu-system-aarch64 -smp 8 -m 8G -machine virt -nographic -cpu cortex-a72 -bios Armbian_24.5.0-trunk.558_Qemu-uboot-arm64_noble_current_6.6.30_minimal.u-boot.bin -nic user,model=virtio-net-pci -drive if=none,media=disk,id=drive0,file=Armbian_24.5.0-trunk.558_Qemu-uboot-arm64_noble_current_6.6.30_minimal.img.qcow2,discard=unmap,detect-zeroes=unmap -device virtio-blk-pci,drive=drive0,bootindex=0U-Boot 2023.10-armbian (Mar 14 2024 - 01:18:23 +0000)DRAM:  8 GiB
Core:  51 devices, 14 uclasses, devicetree: board
Flash: 64 MiB
Loading Environment from Flash... *** Warning - bad CRC, using default environmentIn:    pl011@9000000
Out:   pl011@9000000
Err:   pl011@9000000
Net:   eth0: virtio-net#32
Hit any key to stop autoboot:  0
Scanning for bootflows in all bootdevs
Seq  Method       State   Uclass    Part  Name                      Filename
---  -----------  ------  --------  ----  ------------------------  ----------------
Scanning global bootmeth 'efi_mgr':
Scanning bootdev 'fw-cfg@9020000.bootdev':
fatal: no kernel available
No working controllers found
scanning bus for devices...
Scanning bootdev 'virtio-blk#33.bootdev':0  script       ready   virtio       1  virtio-blk#33.bootdev.par /boot/boot.scr
** Booting bootflow 'virtio-blk#33.bootdev.part_1' with script
Device 0: 1af4 VirtIO Block DeviceType: Hard DiskCapacity: 54352.0 MB = 53.0 GB (111312896 x 512)
<DIR>       4096 .
<DIR>       4096 ..
<SYM>         28 Image
<SYM>         24 dtb
<SYM>         31 initrd.img
<SYM>         31 initrd.img.old
<SYM>         28 vmlinuz
<SYM>         28 vmlinuz.old
<DIR>       4096 dtb-6.6.30-current-arm6438518 boot.bmp0 .next
<SYM>         28 uInitrd906 boot.cmd6040282 System.map-6.6.30-current-arm64978 boot.scr48396294 uInitrd-6.6.30-current-arm64318803 config-6.6.30-current-arm6438134272 vmlinuz-6.6.30-current-arm6448396230 initrd.img-6.6.30-current-arm64
KERNEL LOAD ADDRESS: kernel_addr_r : 0x40400000
INITRD LOAD ADDRESS: ramdisk_addr_r: 0x44000000
FDT LOAD ADDRESS   : fdt_addr      : 0x40000000
Failed to load '/vmlinuz'
48396294 bytes read in 22 ms (2 GiB/s)
Bad Linux ARM64 Image magic!
Boot failed (err=-14)
BOOTP broadcast 1
DHCP client bound to address 10.0.2.15 (1 ms)
Scanning bootdev 'virtio-net#32.bootdev':
BOOTP broadcast 1
DHCP client bound to address 10.0.2.15 (0 ms)
*** Warning: no boot file name; using '0A00020F.img'
Using virtio-net#32 device
TFTP from server 10.0.2.2; our IP address is 10.0.2.15
Filename '0A00020F.img'.
Load address: 0x40400000
Loading: *
TFTP error: 'Access violation' (2)
Not retrying...
No more bootdevs
---  -----------  ------  --------  ----  ------------------------  ----------------
(1 bootflow, 1 valid)
=>
说明:上面的启动命令,参考config/boards/qemu-uboot-arm64.csc:
qemu-system-aarch64 -smp 8 -m 8G -machine virt -nographic -cpu cortex-a72 -bios Armbian_24.5.0-trunk.558_Qemu-uboot-arm64_noble_current_6.6.30_minimal.u-boot.bin -nic user,model=virtio-net-pci -drive if=none,media=disk,id=drive0,file=Armbian_24.5.0-trunk.558_Qemu-uboot-arm64_noble_current_6.6.30_minimal.img.qcow2,discard=unmap,detect-zeroes=unmap -device virtio-blk-pci,drive=drive0,bootindex=0
在网上找了好几轮,没有找到启动的方法,但是根据这篇文章Running self-build image on QEMU arm64 - Beginners - Armbian Community Forums
作者编译和启动qemu-uboot-arm64 Armbian镜像是没有问题的,因此考虑自己编译qemu-uboot-arm64镜像。
参考官网文档下载Armbian编译项目。
因为Armbian编译有系统要求,我使用了VirtualBox安装Ubuntu 22.04服务器虚拟机来编译(在Ubuntu 24.04系统上编译遇到Docker的问题无法编译,后续再研究)。
apt-get -y install git
git clone --depth=1 --branch=main https://github.com/armbian/build
cd build
./compile.sh
按照上面的方式,选择uefi-arm64单板编译,可以成功编译出镜像并运行(运行uefi-arm64参考开头提到的OMV安装的文章)。
但是在编译qemu-uboot-arm64单板的时候遇到问题:u-boot的Makefile(https://raw.githubusercontent.com/u-boot/u-boot/4459ed60cb1e0562bc5b40405e2b4b9bbf766d57/Makefile)由于网络的原因一直无法下载成功。
./compile.sh BOARD=qemu-uboot-arm64 BRANCH=current RELEASE=bookworm解决办法:
编译命令增加UBOOT_MIRROR=gitee,将u-boot改为从gitee下载:
./compile.sh BOARD=qemu-uboot-arm64 BRANCH=current RELEASE=bookworm UBOOT_MIRROR=gitee但实际上执行这个命令,u-boot还是从github下载,而不是预期的gitee。
一番跟踪代码之后,发现是UBOOT_MIRROR没有生效,再修改config/sources/families/include/uefi_common.inc文件,把BOOTSOURCE改为"${MAINLINE_UBOOT_SOURCE}":
[192.168.2.108] alpha@mascot.x ~/workspace/armbian/build $ git diff
diff --git a/config/sources/families/include/uefi_common.inc b/config/sources/families/include/uefi_common.inc
index a58f794..a783b07 100644
--- a/config/sources/families/include/uefi_common.inc
+++ b/config/sources/families/include/uefi_common.inc
@@ -47,7 +47,8 @@ if [[ "${QEMU_UBOOT_BOOTCONFIG}" != "" ]]; thendeclare -g BOOTDIR="qemu-uboot-${LINUXFAMILY}"declare -g BOOTBRANCH='tag:v2023.10'
-       declare -g BOOTSOURCE='https://github.com/u-boot/u-boot' # Gotta set this again, it is unset by grub extension
+       #declare -g BOOTSOURCE='https://github.com/u-boot/u-boot' # Gotta set this again, it is unset by grub extension
+       declare -g BOOTSOURCE="${MAINLINE_UBOOT_SOURCE}"declare -g BOOTCONFIG="${QEMU_UBOOT_BOOTCONFIG}"add_packages_to_image spice-vdagent qemu-guest-agent # Nice-to-have packages for running under qemu
再次执行上面的编译命令(或者下面更完整的编译命令),终于u-boot可以从gitee下载,可以顺利编译出qemu-uboot-arm64单板镜像(中途有出错,重新编译就可以了):
./compile.sh build BOARD=qemu-uboot-arm64 BRANCH=current BUILD_DESKTOP=no BUILD_MINIMAL=no KERNEL_CONFIGURE=no RELEASE=bookworm UBOOT_MIRROR=gitee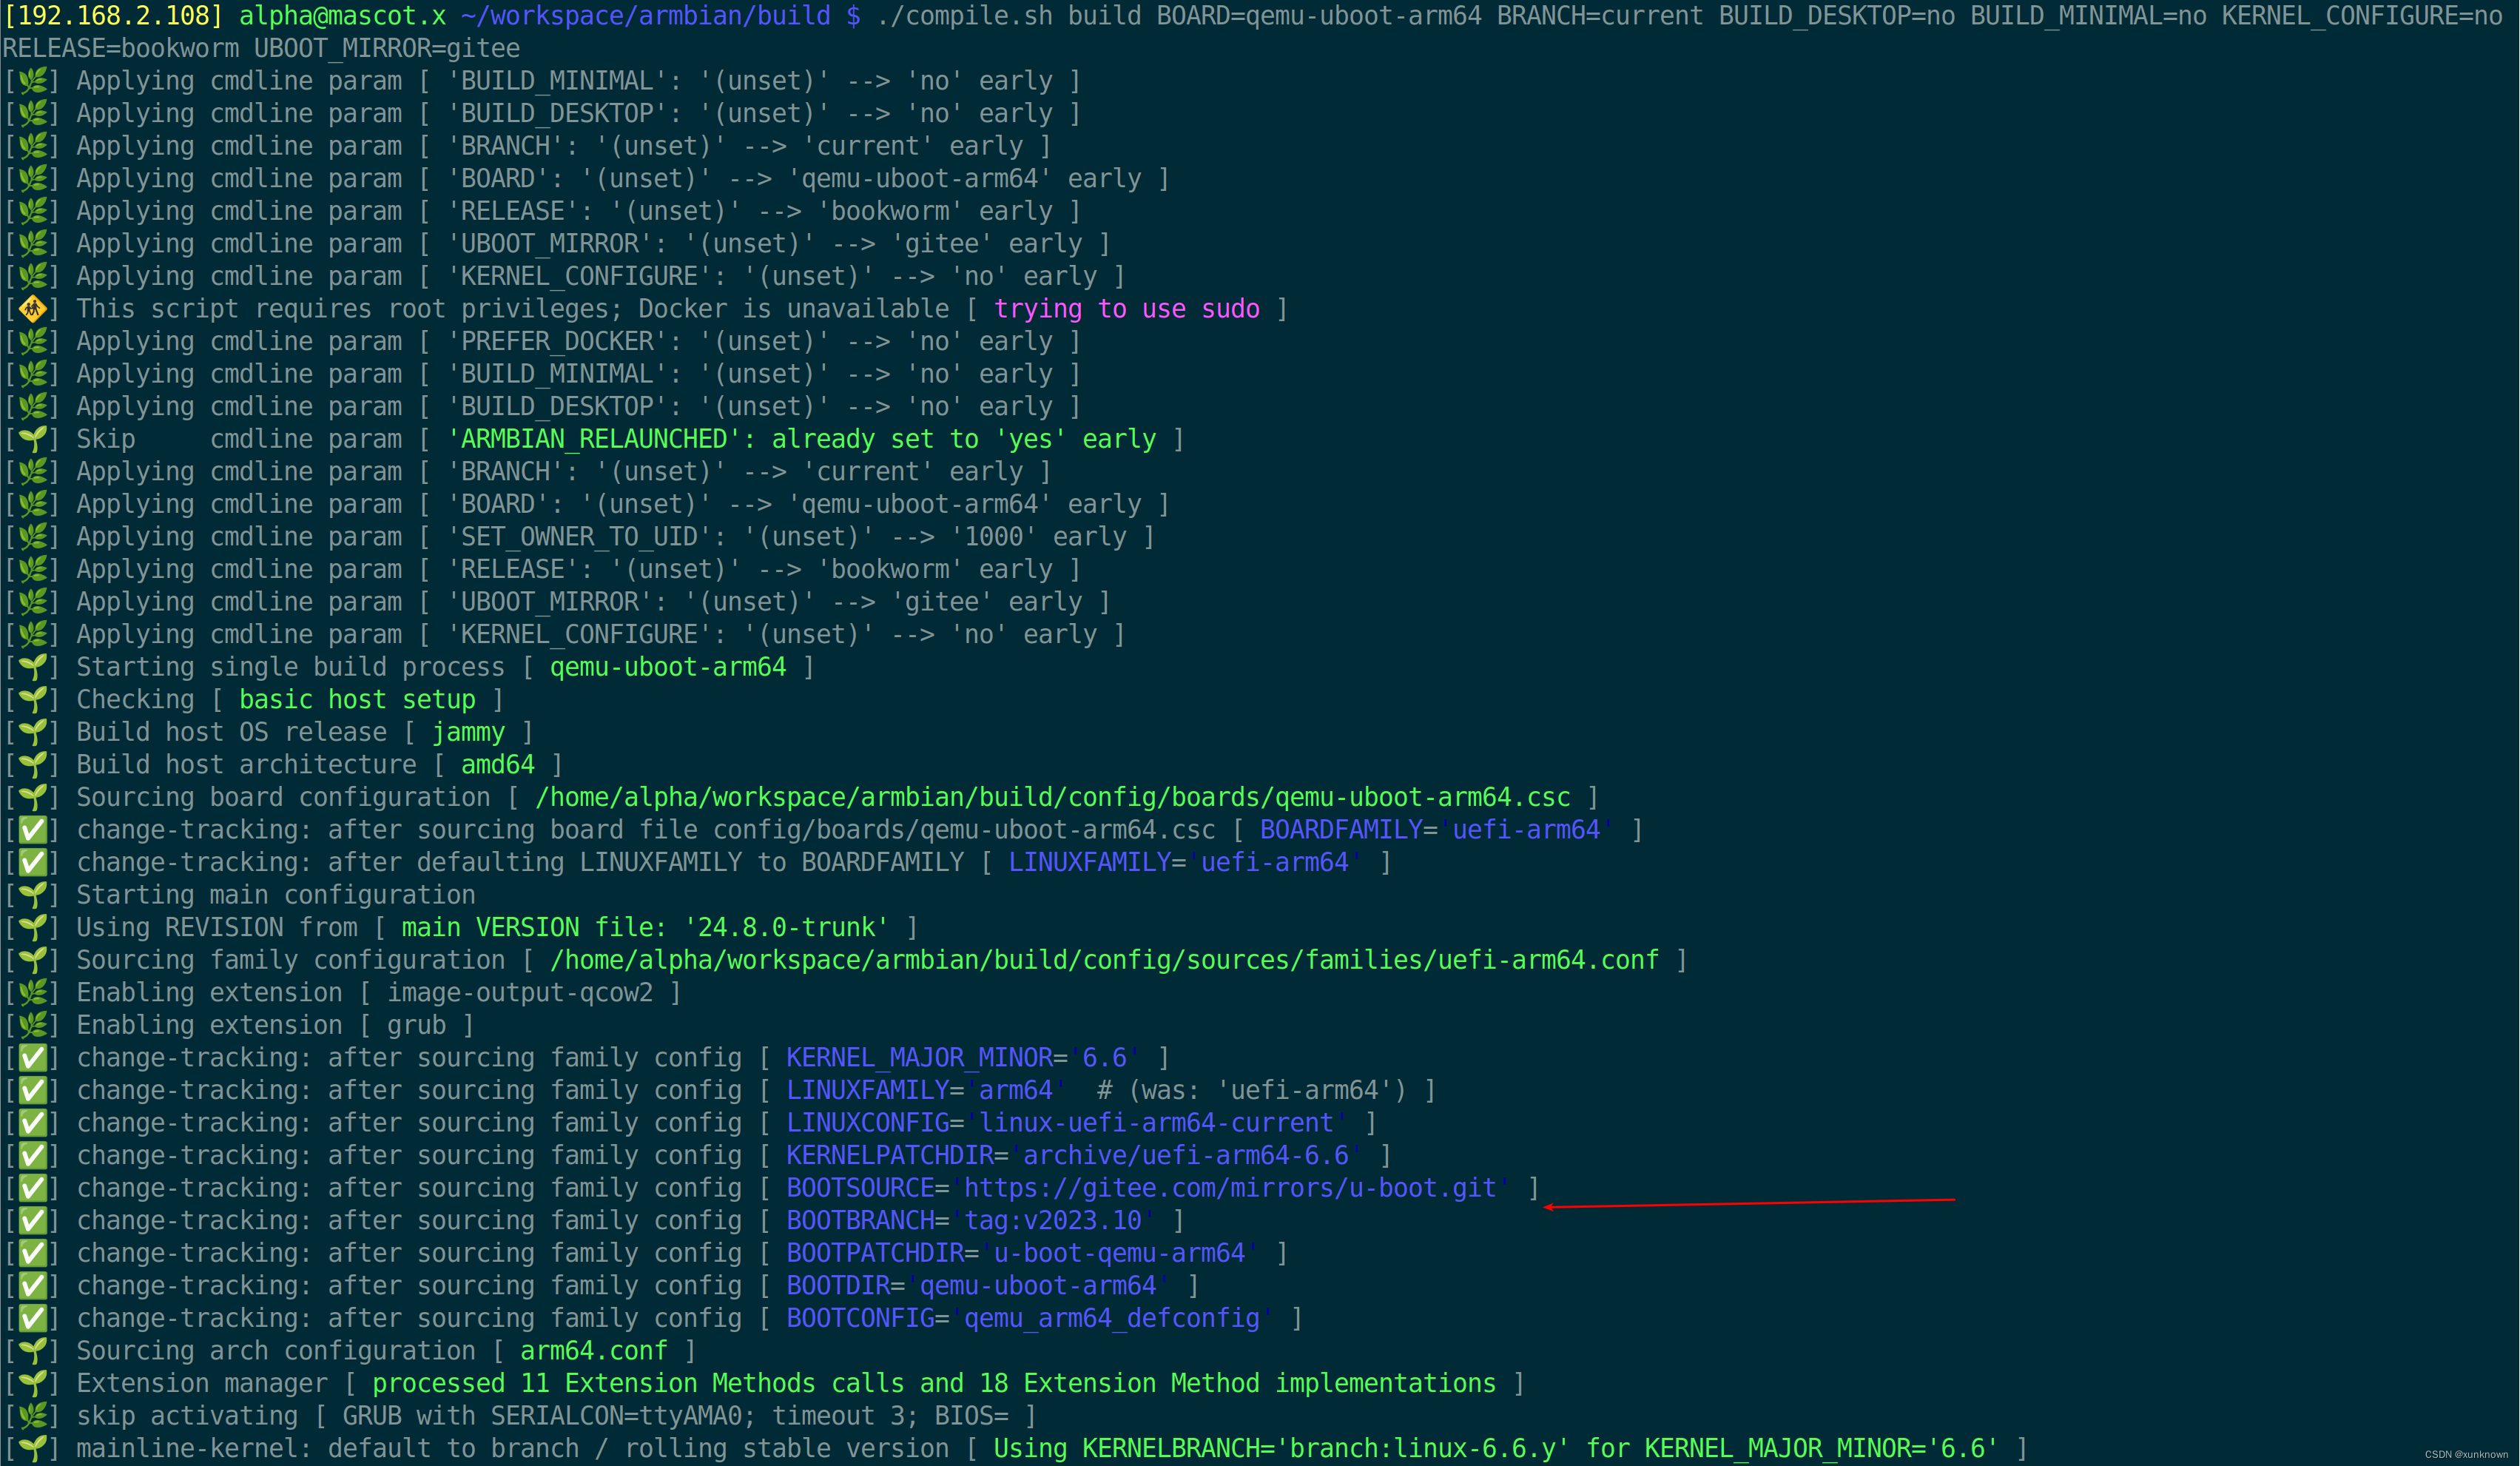
并且可以运行:
qemu-system-aarch64 -smp 8 -m 8G -machine virt -nographic -cpu cortex-a72 -bios Qemu-uboot-arm64/Armbian-unofficial_24.8.0-trunk_Qemu-uboot-arm64_bookworm_current_6.6.32.u-boot.bin -nic user,model=virtio-net-pci -drive if=none,media=disk,id=drive0,file=Qemu-uboot-arm64/Armbian-unofficial_24.8.0-trunk_Qemu-uboot-arm64_bookworm_current_6.6.32.img.qcow2,discard=unmap,detect-zeroes=unmap -device virtio-blk-pci,drive=drive0,bootindex=0U-Boot 2023.10-armbian (May 20 2024 - 00:43:01 +0000)DRAM:  8 GiB
Core:  51 devices, 14 uclasses, devicetree: board
Flash: 64 MiB
Loading Environment from Flash... *** Warning - bad CRC, using default environmentIn:    pl011@9000000
Out:   pl011@9000000
Err:   pl011@9000000
Net:   eth0: virtio-net#32
Hit any key to stop autoboot:  0
Scanning for bootflows in all bootdevs
Seq  Method       State   Uclass    Part  Name                      Filename
---  -----------  ------  --------  ----  ------------------------  ----------------
Scanning global bootmeth 'efi_mgr':
Scanning bootdev 'fw-cfg@9020000.bootdev':
fatal: no kernel available
No working controllers found
scanning bus for devices...
Scanning bootdev 'virtio-blk#33.bootdev':0  script       ready   virtio       1  virtio-blk#33.bootdev.par /boot/boot.scr
** Booting bootflow 'virtio-blk#33.bootdev.part_1' with script
Device 0: 1af4 VirtIO Block DeviceType: Hard DiskCapacity: 55240.0 MB = 53.9 GB (113131520 x 512)
<DIR>       4096 .
<DIR>       4096 ..
<SYM>         28 Image
<SYM>         24 dtb
<DIR>       4096 dtb-6.6.32-current-arm6438518 boot.bmp0 .next
<SYM>         28 uInitrd906 boot.cmd6064562 System.map-6.6.32-current-arm64978 boot.scr94944593 uInitrd-6.6.32-current-arm64324676 config-6.6.32-current-arm6438226432 vmlinuz-6.6.32-current-arm6494944529 initrd.img-6.6.32-current-arm64
KERNEL LOAD ADDRESS: kernel_addr_r : 0x40400000
INITRD LOAD ADDRESS: ramdisk_addr_r: 0x44000000
FDT LOAD ADDRESS   : fdt_addr      : 0x40000000
38226432 bytes read in 7 ms (5.1 GiB/s)
94944593 bytes read in 21 ms (4.2 GiB/s)
## Loading init Ramdisk from Legacy Image at 44000000 ...Image Name:   uInitrdCreated:      2024-06-04  15:54:47 UTCImage Type:   AArch64 Linux RAMDisk Image (gzip compressed)Data Size:    94944529 Bytes = 90.5 MiBLoad Address: 00000000Entry Point:  00000000Verifying Checksum ... OK
## Flattened Device Tree blob at 40000000Booting using the fdt blob at 0x40000000
Working FDT set to 40000000Loading Ramdisk to fa574000, end fffffd11 ... OKLoading Device Tree to 00000000fa471000, end 00000000fa573fff ... OK
Working FDT set to fa471000Starting kernel ...[    0.000000] Booting Linux on physical CPU 0x0000000000 [0x410fd083]
[    0.000000] Linux version 6.6.32-current-arm64 (armbian@next) (aarch64-linux-gnu-gcc (Ubuntu 11.4.0-1ubuntu1~22.04) 11.4.0, GNU ld (GNU Binutils for Ubuntu) 2.38) #1 SMP Sat May 25 14:22:56 UTC 2024
[    0.000000] KASLR enabled
参考:
编译Armbian:
Building Armbian - Armbian Documentation
GitHub - armbian/build: Armbian Linux build framework generates custom Debian or Ubuntu image for x86, aarch64, riscv64 & armhf
Running self-build image on QEMU arm64 - Beginners - Armbian Community Forums
Running self-build image on QEMU arm64:Running self-build image on QEMU arm64 - Beginners - Armbian Community Forums
https://github.com/armbian/build/issues/5168
qemu-uboot-arm64编译失败解决:
https://github.com/armbian/build/issues/5168
这篇关于编译和运行qemu-uboot-arm64单板的Armbian系统的文章就介绍到这儿,希望我们推荐的文章对编程师们有所帮助!


