本文主要是介绍Android push 极光通信,希望对大家解决编程问题提供一定的参考价值,需要的开发者们随着小编来一起学习吧!
Android push 极光通信
代码下载地址:http://download.csdn.net/detail/u011324501/9436135
JPush 官方提供了一个简单 Demo, 向我们演示了 JPush 基本的推送流程, 基本步骤分为下面几块, 即
-- Web 配置操作部分 : 包括 注册开发者帐号, 创建应用;
-- 下载手机示例 : 下载系统自动生成的 Android 应用示例;
-- 发送推送指令 : 在 Web 端发送推送指令, 手机端接收该指令;
-- 官方地址 : 关于该模块详细信息可参考官方文档, http://docs.jpush.cn/pages/viewpage.action?pageId=557074 ;
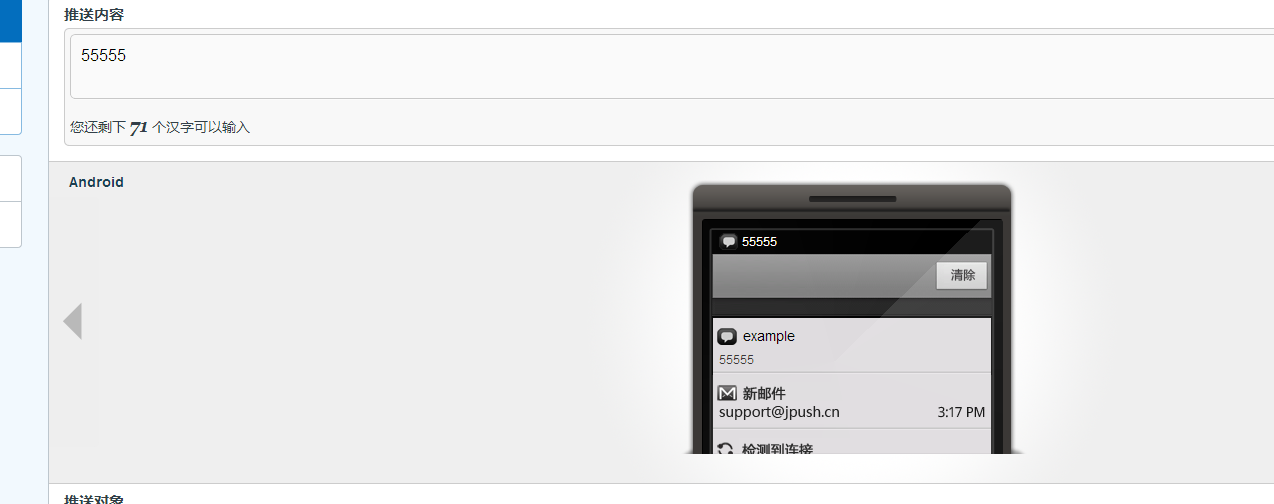
1、首先注册账号可以去注册一个账号便可:https://www.jpush.cn/push/apps/e09817a6f8d1112753979ef2/push/notification/sent/
注册完后可以点击创建应用,输入应用名称, 上传一个图标, 然后填写一个包名, JPush 系统会在后台根据你输入的包名生成的推送的 Android 应用 Demo, 该 Demo 包含了该配置的信息;
2、可以直接在这里下载一个example的代码例子。但是要在权限文件里面加上Appkey跟应用包名。
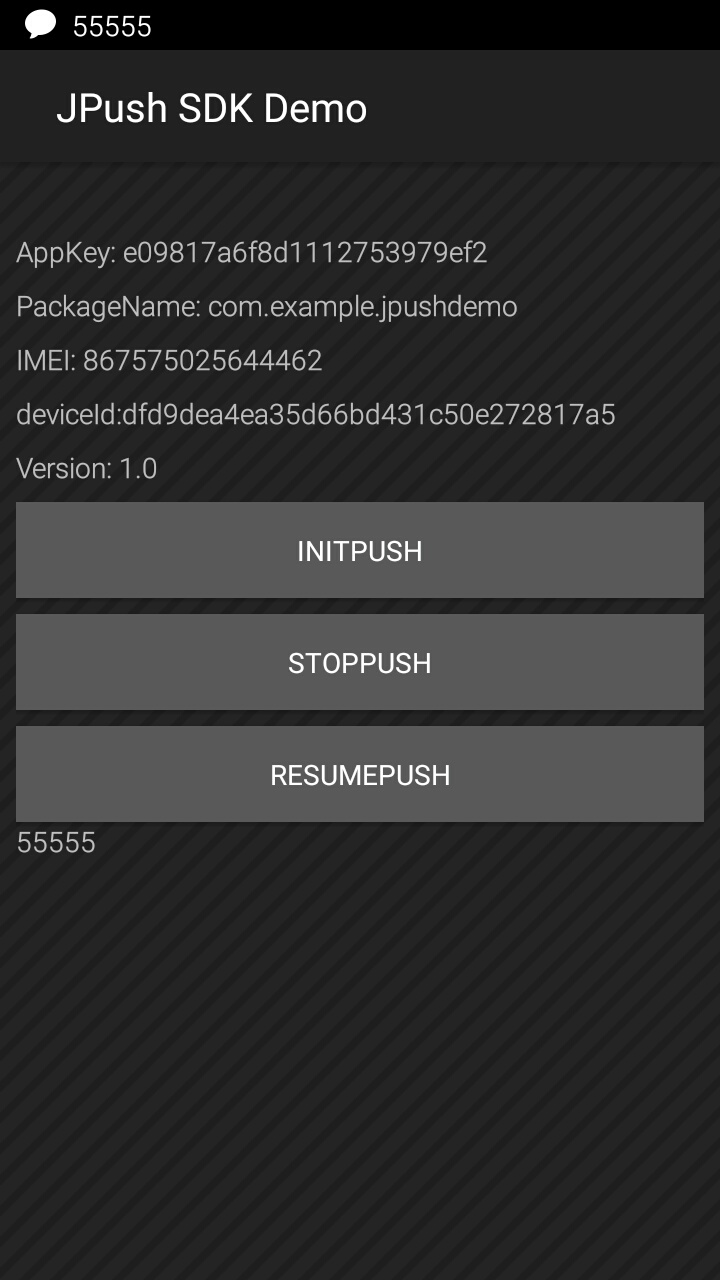
3、配置好后就可以直接在网页上点击推送-->发送通知。就可以将想要发送的消息推送出去。但前提是有安装了官方的应用跟配置好了。推送成功后可以在手机上看到有推送过来的消息。详细可看:http://www.it165.net/pro/html/201504/39082.html
代码:MainActivity.java
package com.example.jpushdemo;import java.util.Timer;
import java.util.TimerTask;import android.content.BroadcastReceiver;
import android.content.Context;
import android.content.Intent;
import android.content.IntentFilter;
import android.os.Bundle;
import android.os.Handler;
import android.os.Message;
import android.view.View;
import android.view.View.OnClickListener;
import android.widget.Button;
import android.widget.EditText;
import android.widget.TextView;
import android.widget.Toast;
import cn.jpush.android.api.InstrumentedActivity;
import cn.jpush.android.api.JPushInterface;public class MainActivity extends InstrumentedActivity implements OnClickListener{private Button mInit;private Button mStopPush;private Button mResumePush;private TextView text;public static MainActivity macActivity;public static boolean isForeground = false;@Overridepublic void onCreate(Bundle savedInstanceState) {super.onCreate(savedInstanceState);setContentView(R.layout.main);macActivity = this;initView(); }private void initView(){TextView mImei = (TextView) findViewById(R.id.tv_imei);String udid = ExampleUtil.getImei(getApplicationContext(), "");if (null != udid) mImei.setText("IMEI: " + udid);TextView mAppKey = (TextView) findViewById(R.id.tv_appkey);String appKey = ExampleUtil.getAppKey(getApplicationContext());if (null == appKey) appKey = "AppKey异常";mAppKey.setText("AppKey: " + appKey);String packageName = getPackageName();TextView mPackage = (TextView) findViewById(R.id.tv_package);mPackage.setText("PackageName: " + packageName);String deviceId = ExampleUtil.getDeviceId(getApplicationContext());TextView mDeviceId = (TextView) findViewById(R.id.tv_device_id);mDeviceId.setText("deviceId:" + deviceId);String versionName = ExampleUtil.GetVersion(getApplicationContext());TextView mVersion = (TextView) findViewById(R.id.tv_version);mVersion.setText("Version: " + versionName);mInit = (Button)findViewById(R.id.init);mInit.setOnClickListener(this);mStopPush = (Button)findViewById(R.id.stopPush);mStopPush.setOnClickListener(this);mResumePush = (Button)findViewById(R.id.resumePush);mResumePush.setOnClickListener(this);text = (TextView)findViewById(R.id.text); timer.schedule(task, 1000, 1000); // 1s后执行task,经过1s再次执行 }@Overridepublic void onClick(View v) {switch (v.getId()) {case R.id.init:init();break;case R.id.stopPush:JPushInterface.stopPush(getApplicationContext());break;case R.id.resumePush:JPushInterface.resumePush(getApplicationContext());break;}}// 初始化 JPush。如果已经初始化,但没有登录成功,则执行重新登录。private void init(){JPushInterface.init(getApplicationContext());}@Overrideprotected void onResume() {isForeground = true;super.onResume();}@Overrideprotected void onPause() {isForeground = false;super.onPause();}@Overrideprotected void onDestroy() {// unregisterReceiver(mMessageReceiver);super.onDestroy();}Handler handler = new Handler() { public void handleMessage(Message msg) { if (msg.what == 1) { //接收msg然后处理想做的事情 text.setText(MyReceiver.messg()); } super.handleMessage(msg); }; }; Timer timer = new Timer(); TimerTask task = new TimerTask() { @Override public void run() { // 需要做的事:发送消息 Message message = new Message(); message.what = 1; handler.sendMessage(message); } }; }package com.example.jpushdemo;import android.content.BroadcastReceiver;
import android.content.Context;
import android.content.Intent;
import android.content.IntentSender.SendIntentException;
import android.os.Bundle;
import android.util.Log;
import android.widget.Toast;import org.json.JSONException;
import org.json.JSONObject;import java.util.Iterator;import cn.jpush.android.api.JPushInterface;/*** 自定义接收器* * 如果不定义这个 Receiver,则:* 1) 默认用户会打开主界面* 2) 接收不到自定义消息*/
public class MyReceiver extends BroadcastReceiver {private static final String TAG = "JPush";private static String msg = "";@Overridepublic void onReceive(Context context, Intent intent) {Bundle bundle = intent.getExtras();Log.d(TAG, "[MyReceiver] onReceive - " + intent.getAction() + ", extras: " + printBundle(bundle));if (JPushInterface.ACTION_REGISTRATION_ID.equals(intent.getAction())) {String regId = bundle.getString(JPushInterface.EXTRA_REGISTRATION_ID);Log.d(TAG, "[MyReceiver] 接收Registration Id : " + regId);//send the Registration Id to your server...} else if (JPushInterface.ACTION_MESSAGE_RECEIVED.equals(intent.getAction())) {Log.d(TAG, "[MyReceiver] 接收到推送下来的自定义消息: " + bundle.getString(JPushInterface.EXTRA_MESSAGE));//processCustomMessage(context, bundle);} else if (JPushInterface.ACTION_NOTIFICATION_RECEIVED.equals(intent.getAction())) {Log.d(TAG, "[MyReceiver] 接收到推送下来的通知");int notifactionId = bundle.getInt(JPushInterface.EXTRA_NOTIFICATION_ID);Log.d(TAG, "[MyReceiver] 接收到推送下来的通知的ID: " + notifactionId);} else if (JPushInterface.ACTION_NOTIFICATION_OPENED.equals(intent.getAction())) {Log.d(TAG, "[MyReceiver] 用户点击打开了通知");//打开自定义的Activity//Intent i = new Intent(context, TestActivity.class);//i.putExtras(bundle);//i.setFlags(Intent.FLAG_ACTIVITY_NEW_TASK);// i.setFlags(Intent.FLAG_ACTIVITY_NEW_TASK | Intent.FLAG_ACTIVITY_CLEAR_TOP );// context.startActivity(i);} else if (JPushInterface.ACTION_RICHPUSH_CALLBACK.equals(intent.getAction())) {Log.d(TAG, "[MyReceiver] 用户收到到RICH PUSH CALLBACK: " + bundle.getString(JPushInterface.EXTRA_EXTRA));//在这里根据 JPushInterface.EXTRA_EXTRA 的内容处理代码,比如打开新的Activity, 打开一个网页等..} else if(JPushInterface.ACTION_CONNECTION_CHANGE.equals(intent.getAction())) {boolean connected = intent.getBooleanExtra(JPushInterface.EXTRA_CONNECTION_CHANGE, false);Log.w(TAG, "[MyReceiver]" + intent.getAction() +" connected state change to "+connected);} else {Log.d(TAG, "[MyReceiver] Unhandled intent - " + intent.getAction());}}public static String messg(){ String aa = msg;return aa;}// 打印所有的 intent extra 数据private static String printBundle(Bundle bundle) {StringBuilder sb = new StringBuilder();for (String key : bundle.keySet()) {if (key.equals(JPushInterface.EXTRA_NOTIFICATION_ID)) {sb.append("\nkey:" + key + ", value:" + bundle.getInt(key)); }else if(key.equals(JPushInterface.EXTRA_CONNECTION_CHANGE)){sb.append("\nkey:" + key + ", value:" + bundle.getBoolean(key));} else if (key.equals(JPushInterface.EXTRA_EXTRA)) {if (bundle.getString(JPushInterface.EXTRA_EXTRA).isEmpty()) {Log.i(TAG, "This message has no Extra data");continue;}try {JSONObject json = new JSONObject(bundle.getString(JPushInterface.EXTRA_EXTRA));Iterator<String> it = json.keys();while (it.hasNext()) {String myKey = it.next().toString();sb.append("\nkey:" + key + ", value: [" +myKey + " - " +json.optString(myKey) + "]"); }} catch (JSONException e) {Log.e(TAG, "Get message extra JSON error!");}} else {sb.append("\nkey:" + key + ", value:" + bundle.getString(key));System.out.println("nsc3:"+ bundle.getString(key)+":"+key);if(key.equals("cn.jpush.android.ALERT")){msg = bundle.getString(key);System.out.println("nsc1:"+ bundle.getString(key)+":"+key);Toast.makeText(MainActivity.macActivity, bundle.getString(key), Toast.LENGTH_SHORT).show();} }}return sb.toString();}}
详细代码自己下载。http://download.csdn.net/detail/u011324501/9436135
这篇关于Android push 极光通信的文章就介绍到这儿,希望我们推荐的文章对编程师们有所帮助!


