本文主要是介绍驱动开发之platform总线,希望对大家解决编程问题提供一定的参考价值,需要的开发者们随着小编来一起学习吧!
1.前言
在前面的实验以及提出的各种问题中,为了提高移植性,降低模块耦合度,提让模块高内聚,分离device与driver是一个必然的趋势了。为了解决这个问题,心心念念的platform总线出来。
linux从2.6起就加入了一套新的驱动管理和注册的机制platform平台总线,是一条虚拟的总线,并不是一个物理的总线。
platform平台总线连接了平台设备(Platform Devices)和平台驱动(Platform Drivers)。平台设备是通过结构体platform_device来表示的,包含了设备的名称、资源(如内存地址、中断号等)和设备特定的属性。而平台驱动则是通过结构体platform_driver来实现,定义了与设备交互的函数指针,如探测、移除、打开、关闭、读写等操作。
2.platform总线工作原理
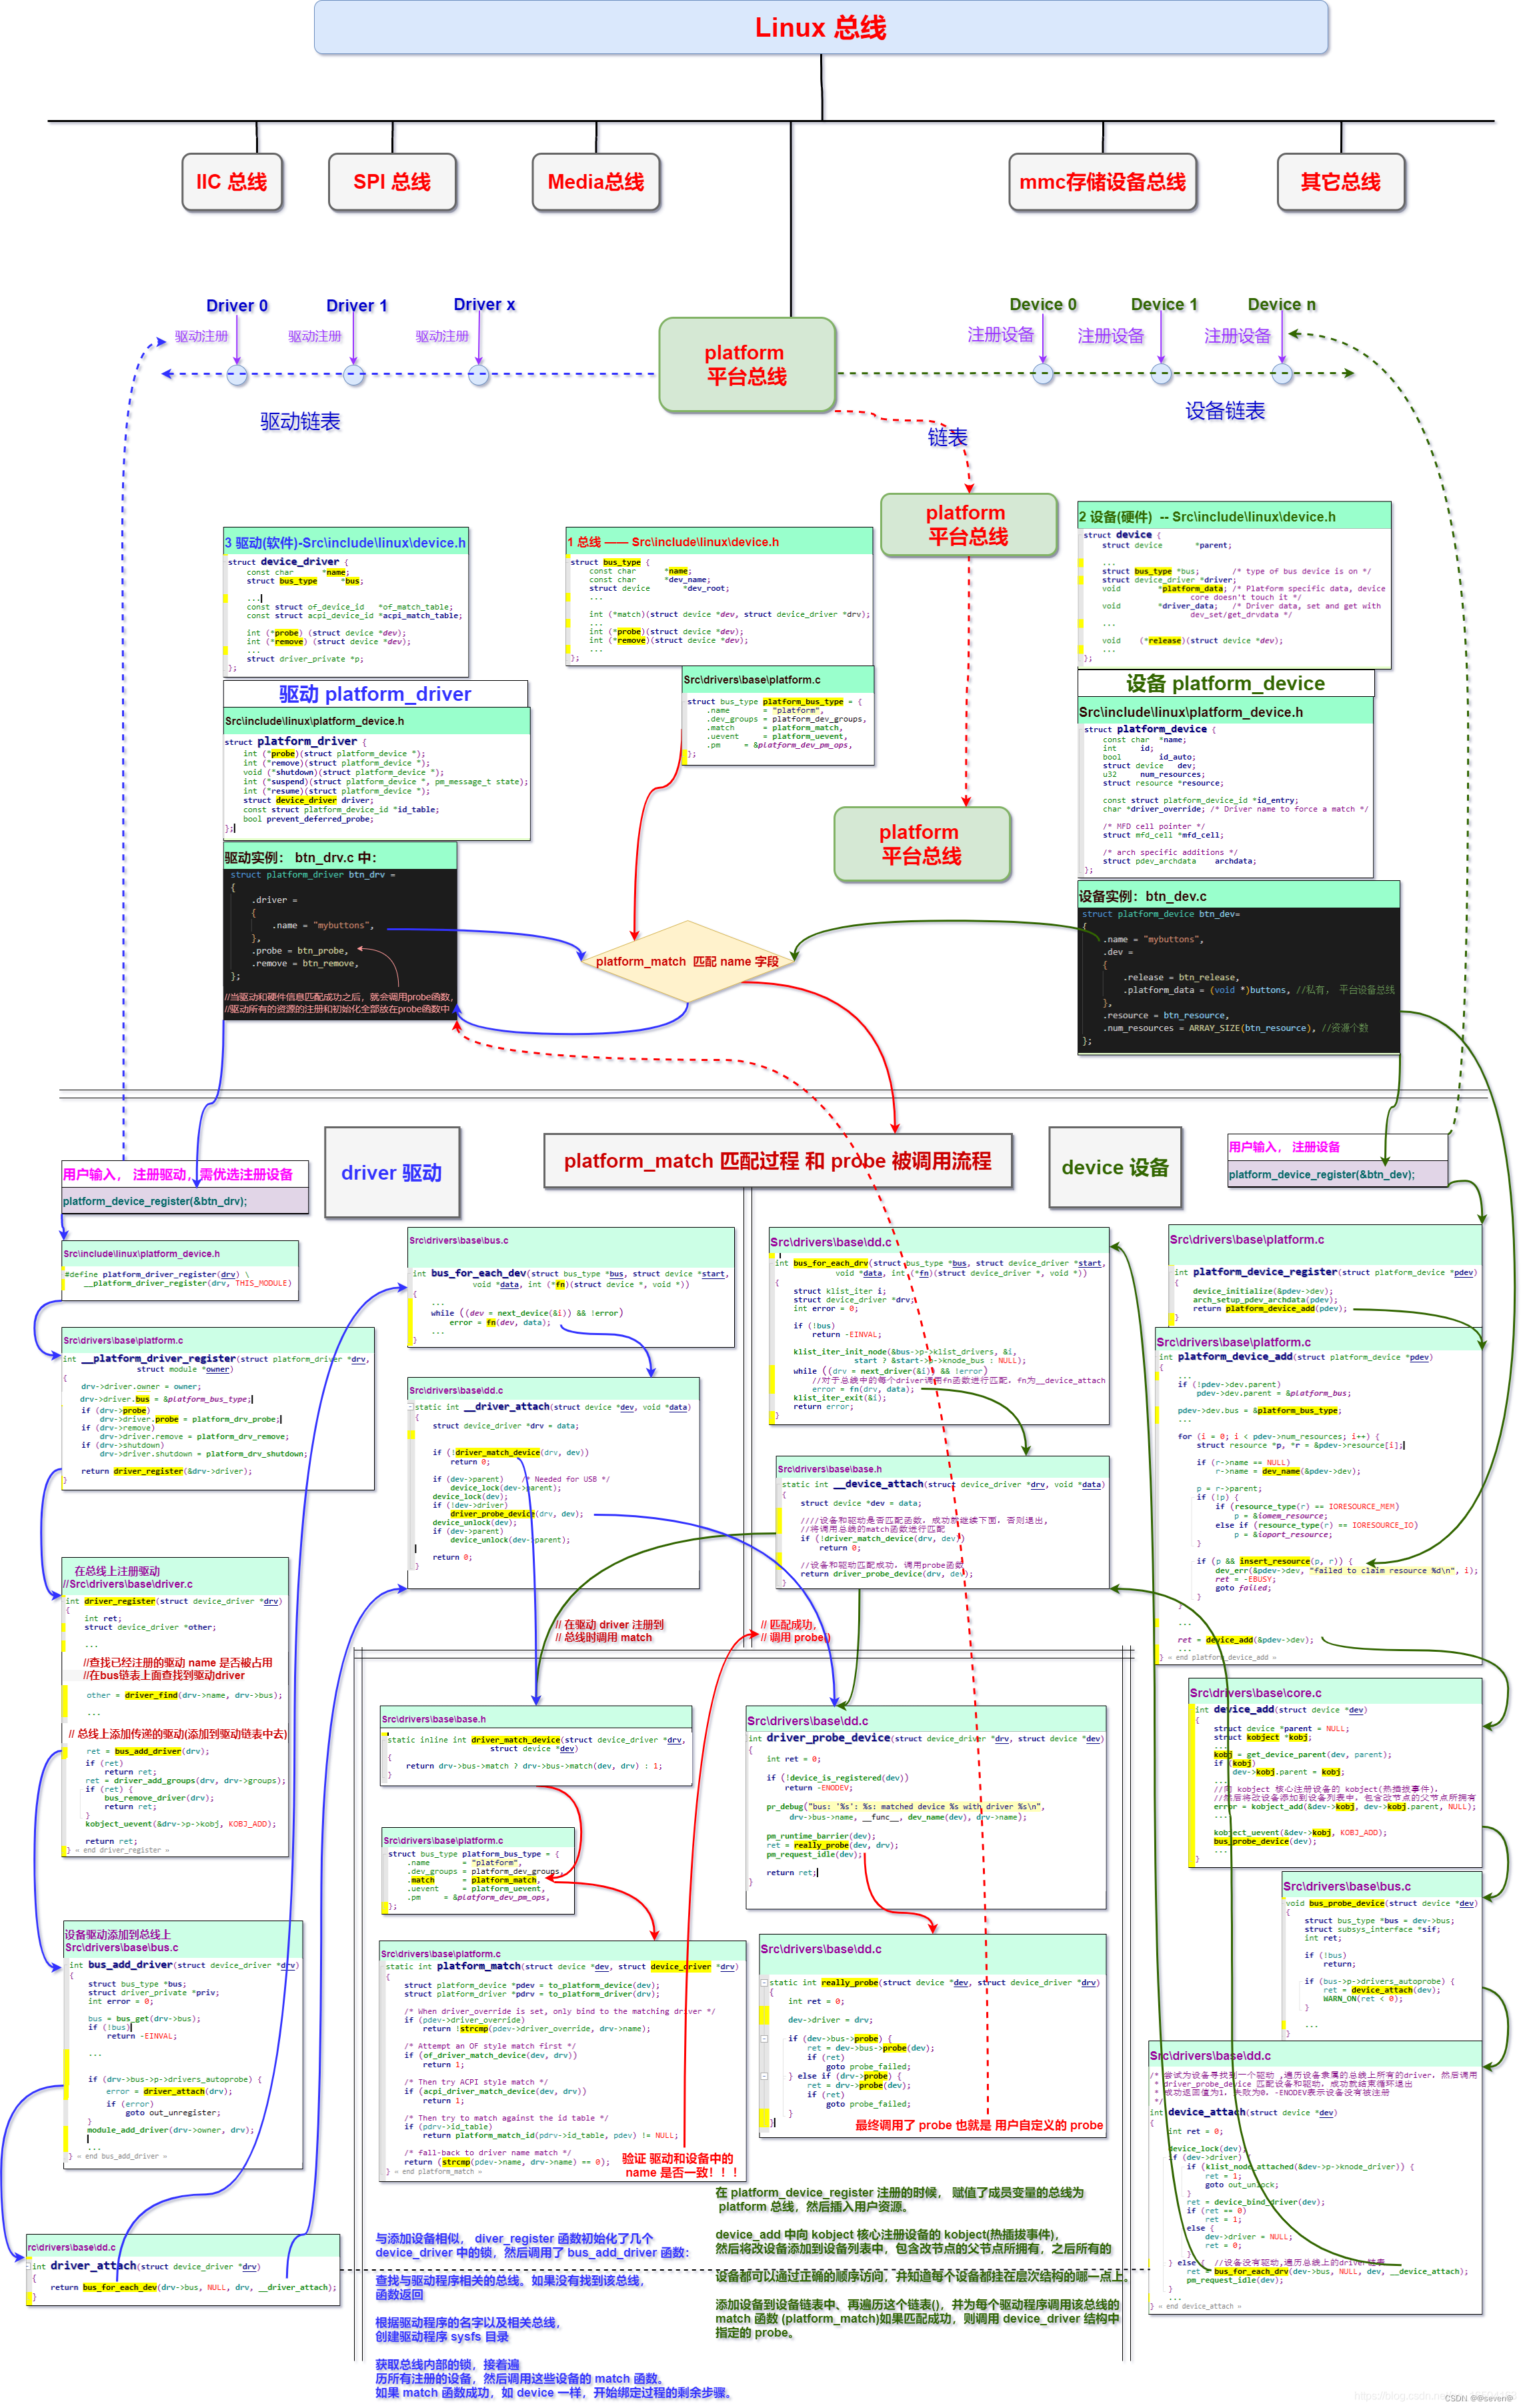
device与driver的注册无先后顺序,不管是device注册还是driver注册,都会触发platrom总线的检测函数,检测另一端是否已经注册,完成校验,匹配。其他匹配过程,可以看一下下面这个图,一个大佬画得,很清晰明了(链接:参考第一个)
2.1.platform 总线介绍
2.1.1.总线结构体
此结构体定义在文件 include/linux/device.h
struct bus_type {const char *name; /* 总线名字 */const char *dev_name; struct device *dev_root;struct device_attribute *dev_attrs;const struct attribute_group **bus_groups; /* 总线属性 */const struct attribute_group **dev_groups; /* 设备属性 */const struct attribute_group **drv_groups; /* 驱动属性 */int (*match)(struct device *dev, struct device_driver *drv);int (*uevent)(struct device *dev, struct kobj_uevent_env *env);int (*probe)(struct device *dev);int (*remove)(struct device *dev);void (*shutdown)(struct device *dev);int (*online)(struct device *dev);int (*offline)(struct device *dev);int (*suspend)(struct device *dev, pm_message_t state);int (*resume)(struct device *dev);const struct dev_pm_ops *pm;const struct iommu_ops *iommu_ops;struct subsys_private *p;struct lock_class_key lock_key;};match 函数,就是完成设备和驱动之间匹配的,总线就是使用 match 函数来根据注册的设备来查找对应的驱 动,或者根据注册的驱动来查找相应的设备,因此每一条总线都必须实现此函数match 函数有 两个参数:dev 和 drv,这两个参数分别为 device 和 device_driver 类型,也就是设备和驱动。
2.1.2.bus实例platform 总线
platform 总线是 bus_type 的一个具体实例,定义在文件 drivers/base/platform.c,platform 总 线定义如下:
struct bus_type platform_bus_type = {
.name = "platform",
.dev_groups = platform_dev_groups,
.match = platform_match,
.uevent = platform_uevent,
.pm = &platform_dev_pm_ops,
};
这些函数实现都在drivers/base/platform.c内部,不需要我们去实现,但是作为学习可以看看。
2.1.3.platform 总线的match函数
目前支持的匹配规则有五种,如代码注释所示:
static int platform_match(struct device *dev,struct device_driver *drv)
{struct platform_device *pdev = to_platform_device(dev);struct platform_driver *pdrv = to_platform_driver(drv);/*When driver_override is set,only bind to the matching driver. 当device设置driver_override时,只绑定到匹配的驱动程序 */if (pdev->driver_override)return !strcmp(pdev->driver_override, drv->name);/* Attempt an OF style match first 第一种匹配方式, OF 类型的匹配,也就是设备树采用的匹配方式 */if (of_driver_match_device(dev, drv))return 1;/* Then try ACPI style match 第二种匹配方式,ACPI 匹配方式 */if (acpi_driver_match_device(dev, drv))return 1;/* Then try to match against the id table . 第三种匹配方式id_table 匹配,每个 platform_driver 结构体有一个 id_table成员变量,保存了很多 id 信息。这些 id 信息存放着这个 platformd 驱动所支持的驱动类型*/if (pdrv->id_table)return platform_match_id(pdrv->id_table, pdev) != NULL;/* fall-back to driver name match 第四种匹配方式,如果第三种匹配方式的 id_table 不存在的话就直接比较驱动和设备的 name 字段,看看是不是相等,如果相等的话就匹配成功*/return (strcmp(pdev->name, drv->name) == 0);}
3.platform 总线的使用
使用platform总线是很简单的,只需要实现的结构体的函数指针定义的函数,然后通过相应的接口注册进去即可。(使用很简单,如果使用很难,这个东西就不会那么出名了,懂的都懂)
3.1.platform 驱动
struct platform_driver {int (*probe)(struct platform_device *);int (*remove)(struct platform_device *);void (*shutdown)(struct platform_device *);int (*suspend)(struct platform_device *, pm_message_t state);int (*resume)(struct platform_device *);struct device_driver driver;const struct platform_device_id *id_table;bool prevent_deferred_probe;
};
probe 函数,当驱动与设备匹配成功以后 probe 函数就会执行。
remove函数,当platform_driver_unregister(&led_driver);函数调用时,会调用bus_remove_driver函数,该函数里面会再调用driver_detach函数,最后一层一层下去调用remove函数,完成资源释放, 或者在dev释放的时候,也会触发remove函数进行资源释放。测试实验见第4节。
probe ,remove函数一般驱动的提供者会编写,如果自己要编写一个全新的驱动,那么 probe 就需要自行实现。
driver 成员,为 device_driver 结构体变量,Linux 内核里面大量使用到了面向对象 的思维,device_driver 相当于基类,提供了最基础的驱动框架。plaform_driver 继承了这个基类, 然后在此基础上又添加了一些特有的成员变量。
id_table 表,也就是我们上一小节讲解 platform 总线匹配驱动和设备的时候采用的 第四种方法,id_table 是个表( 也就是数组) ,每个元素的类型为 platform_device_id:
struct platform_device_id {char name[PLATFORM_NAME_SIZE];kernel_ulong_t driver_data;
};
3.1.1.struct device_driver结构体
struct device_driver {
const char *name;
struct bus_type *bus;struct module *owner;
const char *mod_name; /* used for built-in modules */bool suppress_bind_attrs; /* disables bind/unbind via sysfs */const struct of_device_id *of_match_table;const struct acpi_device_id *acpi_match_table;int (*probe) (struct device *dev);int (*remove) (struct device *dev);void (*shutdown) (struct device *dev);int (*suspend) (struct device *dev, pm_message_t state);int (*resume) (struct device *dev);const struct attribute_group **groups;const struct dev_pm_ops *pm;struct driver_private *p;
};
of_match_table 就是采用设备树的时候驱动使用的匹配表,同样是数组,每个匹 配项都为 of_device_id 结构体类型,此结构体定义在文件 include/linux/mod_devicetable.h 中,内容如下:
struct of_device_id {char name[32];char type[32];char compatible[128];const void *data;
};
compatible 非常重要,因为对于设备树而言,就是通过设备节点的 compatible 属 性值和 of_match_table 中每个项目的 compatible 成员变量进行比较,如果有相等的就表示设备 和此驱动匹配成功。这是设备树匹配方法
struct device_driver结构体里面的name就是最后一种匹配方法了。
虽然有四种匹配方法,但是只要有一种方法存在,而且匹配失败了,剩下的匹配方法就不能进行,就认为无法匹配了,请注意!!!!
3.2.platform 设备
struct platform_device {
const char *name;
int id;
bool id_auto;
struct device dev;
u32 num_resources;
struct resource *resource;const struct platform_device_id *id_entry;
char *driver_override; /* Driver name to force a match 强制匹配的驱动程序名 *//* MFD cell pointer */
struct mfd_cell *mfd_cell;/* arch specific additions */
struct pdev_archdata archdata;
};struct resource {
resource_size_t start;
resource_size_t end;
const char *name;
unsigned long flags;
struct resource *parent, *sibling, *child;
};#define IORESOURCE_BITS 0x000000ff /* Bus-specific bits */#define IORESOURCE_TYPE_BITS 0x00001f00 /* Resource type */
#define IORESOURCE_IO 0x00000100 /* PCI/ISA I/O ports */
#define IORESOURCE_MEM 0x00000200
#define IORESOURCE_REG 0x00000300 /* Register offsets */
#define IORESOURCE_IRQ 0x00000400
#define IORESOURCE_DMA 0x00000800
#define IORESOURCE_BUS 0x00001000一般是IORESOURCE_MEM与IORESOURCE_IRQ使用的比较多。
3.3.驱动注册接口
3.4.设备注册和注销接口
3.5.小结
4.测试实验
例子来源:韦东山老师的例子:
4.1.driver部分
#include <linux/module.h>
#include <linux/fs.h>
#include <linux/errno.h>
#include <linux/miscdevice.h>
#include <linux/kernel.h>
#include <linux/major.h>
#include <linux/mutex.h>
#include <linux/proc_fs.h>
#include <linux/seq_file.h>
#include <linux/stat.h>
#include <linux/init.h>
#include <linux/device.h>
#include <linux/tty.h>
#include <linux/kmod.h>
#include <linux/gfp.h>
#include <linux/platform_device.h>static int hello_probe(struct platform_device *pdev)
{int i = 0;printk("%s %s %d\n", __FILE__, __FUNCTION__, __LINE__);struct resource *source[2];for (i = 0; i < 2; i++)
{source[i] = platform_get_resource(pdev, IORESOURCE_MEM, i);if (!source[i]) {dev_err(&pdev->dev, "No MEM resource for always on\n");continue;}printk(" MEM resource i:%d, start:%x, end:%x \r\n", i, source[i]->start, source[i]->end);
}for (i = 0; i < 2; i++)
{source[i] = platform_get_resource(pdev, IORESOURCE_IRQ, i);if (!source[i]) {dev_err(&pdev->dev, "No IRQ resource for always on\n");continue;}printk(" IRQ resource i:%d, start:%x, end:%x \r\n", i, source[i]->start, source[i]->end);
}return 0;
}static int hello_remove(struct platform_device *pdev)
{printk("%s %s %d\n", __FILE__, __FUNCTION__, __LINE__);return 0;
}static struct platform_driver hello_driver =
{.probe      = hello_probe,.remove     = hello_remove,.driver     = {.name   = "100ask_led",},
};static int __init hello_drv_init(void)
{int err;printk("%s %s %d\n", __FILE__, __FUNCTION__, __LINE__);err = platform_driver_register(&hello_driver); return err;
}static void __exit hello_drv_exit(void)
{printk("%s %s %d\n", __FILE__, __FUNCTION__, __LINE__);platform_driver_unregister(&hello_driver);
}module_init(hello_drv_init);
module_exit(hello_drv_exit);MODULE_LICENSE("GPL");
4.2.deivce部分
#include <linux/module.h>
#include <linux/fs.h>
#include <linux/errno.h>
#include <linux/miscdevice.h>
#include <linux/kernel.h>
#include <linux/major.h>
#include <linux/mutex.h>
#include <linux/proc_fs.h>
#include <linux/seq_file.h>
#include <linux/stat.h>
#include <linux/init.h>
#include <linux/device.h>
#include <linux/tty.h>
#include <linux/kmod.h>
#include <linux/gfp.h>
#include <linux/platform_device.h>static struct resource resources[] = {[0] ={.start = (3<<8)|(1),.flags = IORESOURCE_IRQ,},[1] = {.start = 0x1000,.end = 0x1010,.flags = IORESOURCE_MEM,},
};static void hello_dev_release(struct device *dev)
{printk("%s %s %d\n", __FILE__, __FUNCTION__, __LINE__);
}static struct platform_device hello_dev =
{.name = "100ask_led",.dev = {.release = hello_dev_release,},.num_resources = ARRAY_SIZE(resources),.resource = resources,};static int __init hello_dev_init(void)
{int err;printk("%s %s %d\n", __FILE__, __FUNCTION__, __LINE__);err = platform_device_register(&hello_dev);   return err;
}static void __exit hello_dev_exit(void)
{printk("%s %s %d\n", __FILE__, __FUNCTION__, __LINE__);platform_device_unregister(&hello_dev);
}module_init(hello_dev_init);
module_exit(hello_dev_exit);MODULE_LICENSE("GPL");
4.3.测试结果
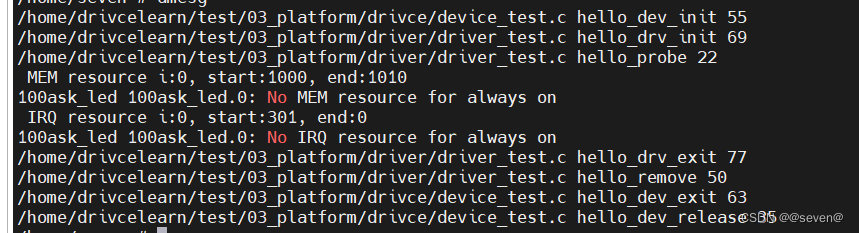
(1)先加载drv,再加载dev.然后卸载dev,再卸载drv.结果如下:

可以发现,dev与drv匹配上之后,会触发drv的probe函数。当dev卸载的时候,也会触发drv的remove函数(前提drv没有被释放)。dev里面的release函数是在dev的platform_device_unregister函数调用之后触发的,与drv没关系。
数据获取也正常,当然数据是随便造的,这是普通设备的数据获取,设备树的数据是不一样的,等设备树章节,再介绍,获取数据,以及设备树下的匹配规则。
(2)先加载dev,再加载drv,然后卸载drv,再卸载dev,结果如下:
可以发现,dev与drv匹配上之后,会触发drv的probe函数。当drv卸载的时候,platform_driver_unregister函数也会触发drv的remove函数,原理可见3.1小节。
4.4.通过id_table进行匹配
static const struct platform_device_id led_id_table[] = {{"hellodevice1",   1},{"hellodevice2", 2},{"100ask_led", 3},{ },
};static struct platform_driver hello_driver =
{.probe      = hello_probe,.remove     = hello_remove,.driver     = {.name   = "100ask_led1",},.id_table = led_id_table,
};4.5.driver_override强制匹配
static struct platform_device hello_dev =
{.name = "100ask_led1",.dev ={.release = hello_dev_release,},.num_resources = ARRAY_SIZE(resources),.resource = resources,.driver_override = "100ask_led1",
};
强制匹配,只需要修改dev里面的参数,这个名字必须得与platform_driver结构体下面的.driver成员里面的name匹配上,才可以触发probe函数。
ok,目前platform总线就这样了,与设备树的使用,将在下一章进行介绍。
参考:
一张图掌握 Linux platform 平台设备驱动框架!【建议收藏】-CSDN博客
手把手教Linux驱动10-platform总线详解_linux驱动中platform总线驱动的ppt-CSDN博客
Linux驱动开发(二)---驱动与设备的分离设计_linux driver device 分离-CSDN博客
这篇关于驱动开发之platform总线的文章就介绍到这儿,希望我们推荐的文章对编程师们有所帮助!


