本文主要是介绍Oauth2与Spring Security框架的认证授权管理,希望对大家解决编程问题提供一定的参考价值,需要的开发者们随着小编来一起学习吧!
又到了一年一度的1024程序员节,需要守住csdn的1024勋章,准备总结一点关于授权相关的知识点!
OAuth是一种用来规范令牌(Token)发放的授权机制,目前最新版本为2.0,其主要包含了四种授权模式:授权码模式、简化模式、密码模式和客户端模式。Spring Cloud OAuth对这四种授权模式进行了实现
oauth2.0 用于rest/apis的代理授权框架(delegated authorization framework),基于令牌token的授权,在无需暴露用户密码的情况下,使应用能获取对用户数据的有限访问权限。
是事实上的标准安全框架,支持多种使用场景,包括服务器端webapp,原生app,浏览器单页SPA,服务器与服务器之间
oauth2.0的协议框架太宽泛,造成各种实现的兼容性和互操作性差,和1.0不兼容,oauth2.0不是一个认证协议,没有任何关于用户的信息

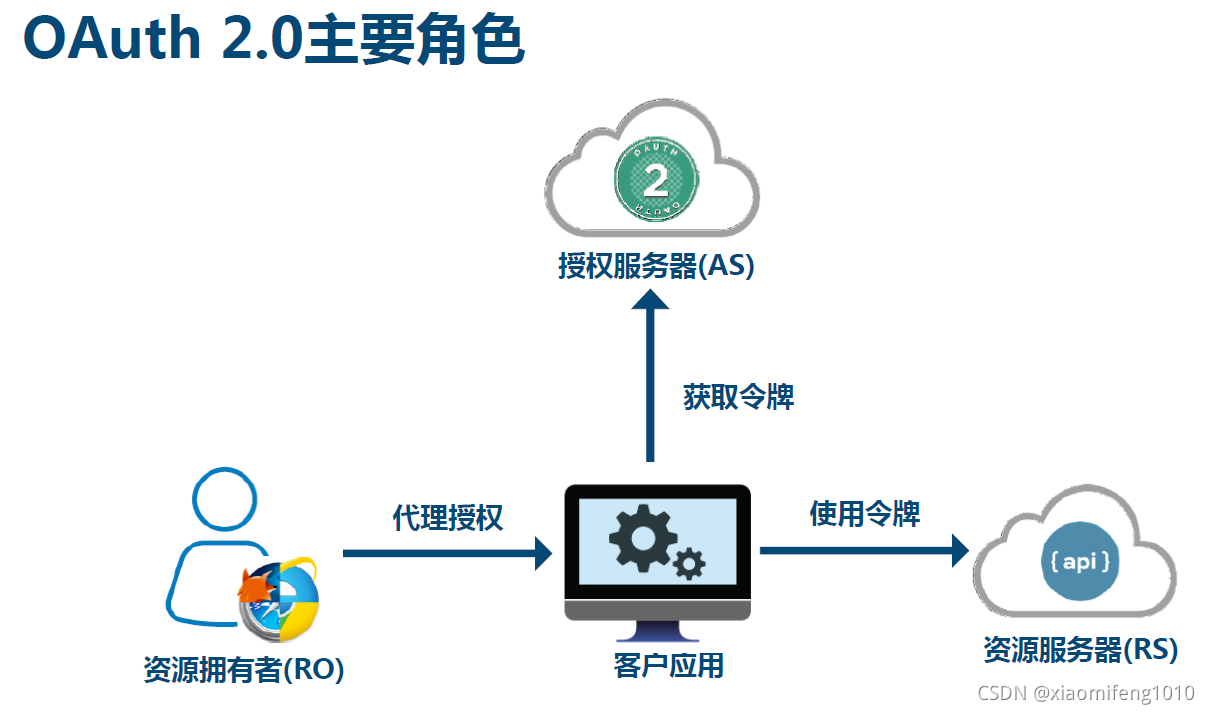
第一种授权码模式;流程如下所示

第二种 密码模式(项目中常用的一种模式)
在密码模式中,用户向客户端提供用户名和密码,客户端通过用户名和密码到认证服务器获取令牌。流程如下所示:
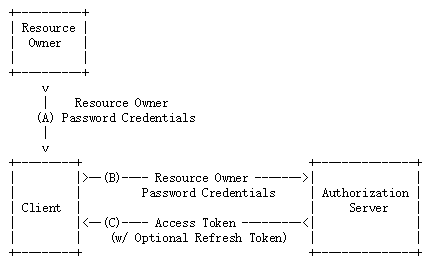
- Resource Owner,资源所有者,即当前正在使用系统的用户;
- Client,客户端,比如浏览器,App等;
- Authorization server,认证服务器,提供认证服务,并发放访问令牌。
如上图所示,密码模式包含了三个步骤:
- 用户向客户端提供用户名和密码;
- 客户端向认证服务器换取令牌;
- 认证服务器发放令牌。
其中第2步客户端发出的HTTP请求,包含以下参数:
- grant_type:授权类型,此处的值固定为password,必选项。
- username:用户名,必选项。
- password:密码,必选项。
- scope:权限范围,可选项。
第三种简化模式:

第四种:客户端模式

项目中用的较多的是第二种密码模式,项目中前端系统通过用户名和密码来登录系统,所以着重总结一下密码模式,流程图见模式二上图
使用spring security作为安全框架,首先引入spring security相关依赖
<dependency><groupId>org.springframework.boot</groupId><artifactId>spring-boot-starter-web</artifactId></dependency><dependency><groupId>org.springframework.cloud</groupId><artifactId>spring-cloud-starter-oauth2</artifactId></dependency><dependency><groupId>org.springframework.cloud</groupId><artifactId>spring-cloud-starter-security</artifactId></dependency><dependency><groupId>org.springframework.boot</groupId><artifactId>spring-boot-starter-data-redis</artifactId></dependency>需要先定义一个安全配置类
package com.xiaomifeng1010.rbacboot.auth.configure;import com.xiaomifeng1010.rbacboot.auth.filter.ValidateCodeFilter;
import com.xiaomifeng1010.rbacboot.auth.service.RbacbootUserDetailService;
import org.springframework.beans.factory.annotation.Autowired;
import org.springframework.context.annotation.Bean;
import org.springframework.context.annotation.Configuration;
import org.springframework.core.annotation.Order;
import org.springframework.security.authentication.AuthenticationManager;
import org.springframework.security.config.annotation.authentication.builders.AuthenticationManagerBuilder;
import org.springframework.security.config.annotation.web.builders.HttpSecurity;
import org.springframework.security.config.annotation.web.configuration.EnableWebSecurity;
import org.springframework.security.config.annotation.web.configuration.WebSecurityConfigurerAdapter;
import org.springframework.security.crypto.bcrypt.BCryptPasswordEncoder;
import org.springframework.security.crypto.password.PasswordEncoder;
import org.springframework.security.web.authentication.UsernamePasswordAuthenticationFilter;import javax.annotation.Resource;/*** @author xiaomifeng1010* @version 1.0* @date: 2020/1/19 18:29*/
@Configuration
@EnableWebSecurity
@Order(2)
public class SecurityConfigure extends WebSecurityConfigurerAdapter {@Autowiredprivate RbacbootUserDetailService userDetailService;@Autowiredprivate ValidateCodeFilter validateCodeFilter;//    因为模块入口中标注了@RbacbootApplication,所以可以直接注入PasswordEncoder@Resourceprivate PasswordEncoder passwordEncoder;//    注册PasswordEncoder到ioc容器转移到common模块的RbacbootServerProtectConfigure类中处理了//    @Bean
//    public PasswordEncoder passwordEncoder(){
//        return new BCryptPasswordEncoder();
//    }@Bean@Overridepublic AuthenticationManager authenticationManagerBean() throws Exception {return super.authenticationManagerBean();}@Overrideprotected void configure(HttpSecurity http) throws Exception {
//        通过http.addFilterBefore(validateCodeFilter, UsernamePasswordAuthenticationFilter.class)代码,
// 将ValidateCodeFilter过滤器添加到了UsernamePasswordAuthenticationFilter过滤器前http.addFilterBefore(validateCodeFilter, UsernamePasswordAuthenticationFilter.class).requestMatchers().antMatchers("/oauth/**").and().authorizeRequests().antMatchers("/oauth/**").authenticated().and().csrf().disable();super.configure(http);}@Overrideprotected void configure(AuthenticationManagerBuilder auth) throws Exception {auth.userDetailsService(userDetailService).passwordEncoder(passwordEncoder);super.configure(auth);}
}该类继承了WebSecurityConfigurerAdapter适配器,重写了几个方法,并且使用@EnableWebSecurity注解标注,开启了和Web相关的安全配置。
上面代码中,我们首先注入了RbacbootUserDetailService,然后我们定义了一个PasswordEncoder类型的Bean,该类是一个接口,定义了几个和密码加密校验相关的方法,这里我们使用的是Spring Security内部实现好的BCryptPasswordEncoder。BCryptPasswordEncoder的特点就是,对于一个相同的密码,每次加密出来的加密串都不同:
public static void main(String[] args) {String password = "123456";PasswordEncoder encoder = new BCryptPasswordEncoder();System.out.println(encoder.encode(password));System.out.println(encoder.encode(password));
}
运行该main方法,可以看到两次输出的结果并不一样:
$2a$10$TgKIGaJrL8LBFT8bEj8gH.3ctyo1PpSTw4fs4o6RuMOE4R665HdpS$2a$10$ZEcCOMVVIV5SfoXPXih92uGJfVeaugMr/PydhYnLvsCroS9xWjOIq当然,你可以自己实现PasswordEncoder接口,这里为了方便就直接使用BCryptPasswordEncoder了。
接着我们注册了一个authenticationManagerBean,因为密码模式需要使用到这个Bean。
在SecurityConfigure类中,我们还重写了WebSecurityConfigurerAdapter类的configure(HttpSecurity http)方法,其中requestMatchers().antMatchers("/oauth/**")的含义是:FebsSecurityConfigure安全配置类只对/oauth/开头的请求有效。
最后我们重写了configure(AuthenticationManagerBuilder auth)方法,指定了userDetailsService和passwordEncoder。
虽然我们现在正在搭建的是一个认证服务器,但是认证服务器本身也可以对外提供REST服务,比如通过Token获取当前登录用户信息,注销当前Token等,所以它也是一台资源服务器。于是我们需要定义一个资源服务器的配置类,在configure包下新建ResourceServerConfigure类:
package com.xiaomifeng1010.rbacboot.auth.configure;import com.xiaomifeng1010.rbacboot.auth.properties.RbacbootAuthProperties;
import com.xiaomifeng1010.rbacboot.common.handler.RbacbootAccessDeniedHandler;
import com.xiaomifeng1010.rbacboot.common.handler.RbacbootAuthExceptionEntryPoint;
import org.apache.commons.lang3.StringUtils;
import org.springframework.beans.factory.annotation.Autowired;
import org.springframework.context.annotation.Configuration;
import org.springframework.security.config.annotation.web.builders.HttpSecurity;
import org.springframework.security.oauth2.config.annotation.web.configuration.EnableResourceServer;
import org.springframework.security.oauth2.config.annotation.web.configuration.ResourceServerConfigurerAdapter;
import org.springframework.security.oauth2.config.annotation.web.configurers.ResourceServerSecurityConfigurer;/*** @author xiaomifeng1010* @version 1.0* @date: 2020/1/19 18:45*/
@Configuration
@EnableResourceServer
public class ResourceServerConfigure extends ResourceServerConfigurerAdapter {@Autowiredprivate RbacbootAccessDeniedHandler accessDeniedHandler;@Autowiredprivate RbacbootAuthExceptionEntryPoint exceptionEntryPoint;@Autowiredprivate RbacbootAuthProperties properties;@Overridepublic void configure(HttpSecurity http) throws Exception {String[] annoUrl = StringUtils.splitByWholeSeparatorPreserveAllTokens(properties.getAnonUrl(), ",");
//        在configure(HttpSecurity http)方法里,我们通过.antMatchers(anonUrls).permitAll()配置了免认证资源,
// anonUrls为免认证资源数组,是从FebsAuthProperties配置中读取出来的值经过逗号分隔后的结果http.csrf().disable().requestMatchers().antMatchers("/**").and().authorizeRequests().antMatchers(annoUrl).permitAll().antMatchers("/**").authenticated().and().httpBasic();}@Overridepublic void configure(ResourceServerSecurityConfigurer resources) throws Exception {resources.authenticationEntryPoint(exceptionEntryPoint).accessDeniedHandler(accessDeniedHandler);}
}
ResourceServerConfigure继承了ResourceServerConfigurerAdapter,并重写了configure(HttpSecurity http)方法,通过requestMatchers().antMatchers("/**")的配置表明该安全配置对所有请求都生效。类上的@EnableResourceServer用于开启资源服务器相关配置。
相信到这里你肯定会有点困惑,貌似SecurityConfigure和ResourceServerConfigure所做的工作是类似的,SecurityConfigure对/oauth/开头的请求生效,而ResourceServerConfigure对所有请求都生效,那么当一个请求进来时,到底哪个安全配置先生效呢?其实并没有哪个配置先生效这么一说,当在Spring Security中定义了多个过滤器链的时候,根据其优先级,只有优先级较高的过滤器链会先进行匹配。
那么SecurityConfigure和ResourceServerConfigure的优先级是多少?首先我们查看
SecurityConfigure继承的类WebSecurityConfigurerAdapter的源码

可以看到类上使用了@Order(100)标注,说明其顺序是100。
再来看看ResourceServerConfigure类上@EnableResourceServer注解源码:

该注解引入了ResourceServerConfiguration配置类,查看ResourceServerConfiguration源码:

所以ResourceServerConfigure的顺序是3。在Spring中,数字越小,优先级越高,也就是说ResourceServerConfigure的优先级要高于SecurityConfigure,这也就意味着所有请求都会被ResourceServerConfigure过滤器链处理,包括/oauth/开头的请求。这显然不是我们要的效果,我们原本是希望以/oauth/开头的请求由SecurityConfigure过滤器链处理,剩下的其他请求由ResourceServerConfigure过滤器链处理。
为了解决上面的问题,我们可以手动指定这两个类的优先级,让SecurityConfigure的优先级高于ResourceServerConfigure。在SecurityConfigure类上使用Order(2)注解标注即可:
总结下SecurityConfigure和ResourceServerConfigure的区别吧:
SecurityConfigure用于处理/oauth开头的请求,Spring Cloud OAuth内部定义的获取令牌,刷新令牌的请求地址都是以/oauth/开头的,也就是说SecurityConfigure用于处理和令牌相关的请求;ResourceServerConfigure用于处理非/oauth/开头的请求,其主要用于资源的保护,客户端只能通过OAuth2协议发放的令牌来从资源服务器中获取受保护的资源。
接着我们定义一个和授权服务器相关的安全配置类。在configure包下新建AuthorizationServerConfigure类
package com.xiaomifeng1010.rbacboot.auth.configure;import com.xiaomifeng1010.rbacboot.auth.properties.RbacbootAuthProperties;
import com.xiaomifeng1010.rbacboot.auth.properties.RbacbootClientsProperties;
import com.xiaomifeng1010.rbacboot.auth.service.RbacbootUserDetailService;
import com.xiaomifeng1010.rbacboot.auth.translator.RbacbootWebResponseExceptionTranslator;
import org.apache.commons.lang3.ArrayUtils;
import org.apache.commons.lang3.StringUtils;
import org.springframework.beans.factory.annotation.Autowired;
import org.springframework.context.annotation.Bean;
import org.springframework.context.annotation.Configuration;
import org.springframework.context.annotation.Primary;
import org.springframework.data.redis.connection.RedisConnectionFactory;
import org.springframework.security.authentication.AuthenticationManager;
import org.springframework.security.crypto.password.PasswordEncoder;
import org.springframework.security.oauth2.config.annotation.builders.InMemoryClientDetailsServiceBuilder;
import org.springframework.security.oauth2.config.annotation.configurers.ClientDetailsServiceConfigurer;
import org.springframework.security.oauth2.config.annotation.web.configuration.AuthorizationServerConfigurerAdapter;
import org.springframework.security.oauth2.config.annotation.web.configuration.EnableAuthorizationServer;
import org.springframework.security.oauth2.config.annotation.web.configurers.AuthorizationServerEndpointsConfigurer;
import org.springframework.security.oauth2.provider.token.DefaultTokenServices;
import org.springframework.security.oauth2.provider.token.TokenStore;
import org.springframework.security.oauth2.provider.token.store.redis.RedisTokenStore;import javax.annotation.Resource;/*** @author xiaomifeng1010* @version 1.0* @date: 2020/1/19 18:52*/
@Configuration
@EnableAuthorizationServer
public class AuthorizationServerConfigure extends AuthorizationServerConfigurerAdapter {@Autowiredprivate AuthenticationManager authenticationManager;@Autowiredprivate RedisConnectionFactory redisConnectionFactory;@Autowiredprivate RbacbootUserDetailService rbacbootUserDetailService;@Resourceprivate PasswordEncoder passwordEncoder;@Autowiredprivate RbacbootAuthProperties rbacbootAuthProperties;@Autowiredprivate RbacbootWebResponseExceptionTranslator exceptionTranslator;@Overridepublic void configure(ClientDetailsServiceConfigurer clients) throws Exception {RbacbootClientsProperties[] clientsArray = rbacbootAuthProperties.getClients();InMemoryClientDetailsServiceBuilder builder = clients.inMemory();if (ArrayUtils.isNotEmpty(clientsArray)) {for (RbacbootClientsProperties client : clientsArray) {if (StringUtils.isBlank(client.getClient())) {throw new Exception("client不能为空");}if (StringUtils.isBlank(client.getSecret())) {throw new Exception("secret不能为空");}String[] grantType = StringUtils.splitByWholeSeparatorPreserveAllTokens(client.getGrantType(), ",");builder.withClient(client.getClient()).secret(passwordEncoder.encode(client.getSecret())).authorizedGrantTypes(grantType).scopes(client.getScope());}}/* clients.inMemory().withClient("rbacboot").secret(passwordEncoder.encode("123456")).authorizedGrantTypes("password","refresh_token").scopes("all");*/}@Overridepublic void configure(AuthorizationServerEndpointsConfigurer endpoints) throws Exception {endpoints.tokenStore(tokenStore()).userDetailsService(rbacbootUserDetailService).authenticationManager(authenticationManager).tokenServices(defaultTokenServices()).exceptionTranslator(exceptionTranslator);}@Beanpublic TokenStore tokenStore() {return new RedisTokenStore(redisConnectionFactory);}@Bean@Primarypublic DefaultTokenServices defaultTokenServices() {DefaultTokenServices tokenServices = new DefaultTokenServices();tokenServices.setTokenStore(tokenStore());tokenServices.setSupportRefreshToken(true);
//        tokenServices.setAccessTokenValiditySeconds(60*60*24);
//        tokenServices.setRefreshTokenValiditySeconds(60*60*24*7);tokenServices.setAccessTokenValiditySeconds(rbacbootAuthProperties.getAccessTokenValiditySeconds());tokenServices.setRefreshTokenValiditySeconds(rbacbootAuthProperties.getRefreshTokenValiditySeconds());return tokenServices;}
}
AuthorizationServerConfigure继承AuthorizationServerConfigurerAdapter适配器,使用@EnableAuthorizationServer注解标注,开启授权服务器相关配置。
上面代码中,我们注入了在SecurityConfigure配置类中注册的BeanAuthenticationManager和PasswordEncoder。此外,
在rbac-auth中采用的是Redis默认配置,所以你会发现我们并没有在配置类application.yml中编写和Redis有关的配置,但是为了更为直观,建议还是在application.yml中添加如下配置:
server:port: 8101spring:application:name: rbacboot-authsecurity:user:name: adminpassword: adminredis:database: 0host: 127.0.0.1port: 6379
#    jedis:
#      将jedis替换成lettucelettuce:pool:min-idle: 8max-idle: 500max-active: 2000max-wait: 10000timeout: 5000
#   这里数据库连接池使用的是Hikari,Spring Boot2.0后官方推荐使用该连接池,特点是响应速度快。
#  这里只配置了一个名称为base的数据源,如果要继续添加数据源的话只需要在spring.datasource.dynamic.datasource
#  下继续添加即可datasource:dynamic:hikari:connection-timeout: 30000max-lifetime: 1800000max-pool-size: 15min-idle: 5connection-test-query: select 1pool-name: RbacbootHakariCPprimary: basedatasource:base:username: rootpassword: 123456driver-class-name: com.mysql.cj.jdbc.Driverurl: jdbc:mysql://localhost:3306/rbacboot_cloud_base?useUnicode=true&characterEncoding=UTF-8&useJDBCCompliantTimezoneShift=true&useLegacyDatetimeCode=false&serverTimezone=GMT%2b8cloud:nacos:discovery:server-addr: ${nacos.url}:8001
# 注册中心改为nacos了,所以重新配置nacos
#eureka:
#  instance:
#    lease-renewal-interval-in-seconds: 20
#  client:
#    fetch-registry: true
#    register-with-eureka: true
#    instance-info-replication-interval-seconds: 30
#    registry-fetch-interval-seconds: 30
#    serviceUrl:
#      defaultZone: http://${spring.security.user.name}:${spring.security.user.password}@localhost:8001/registry/eureka/#mybatis-plus.type-aliases-package,指定别名扫描路径,这个路径后续在febs-common模块里定义,该路径下的实体类将自动配置别名,
#  默认为类名首字母小写。配置别名后,便可以直接在MyBatis XML文件里使用了;
mybatis-plus:type-aliases-package: com.xiaomifeng1010.rbacboot.entity.system
#  mybatis-plus.mapper-locations指定MyBatis XML文件路径;mapper-locations: classpath:mapper/*.xmlconfiguration:
#    mybatis-plus.configuration.jdbc-type-for-null,指定为null,否则再插入空值时会报“无效的列类型”错误;jdbc-type-for-null: null
# mybatis-plus.configuration.global-config.banner设置为false关闭MyBatis Plus Banner打印global-config:banner: falseAuthorizationServerConfigure中,tokenStore使用的是RedisTokenStore,认证服务器生成的令牌将被存储到Redis中。
defaultTokenServices指定了令牌的基本配置,比如令牌有效时间为60 * 60 * 24秒,刷新令牌有效时间为60 * 60 * 24 * 7秒,setSupportRefreshToken设置为true表示开启刷新令牌的支持。
AuthorizationServerConfigure配置类中重点需要介绍的是configure(ClientDetailsServiceConfigurer clients)方法。该方法主要配置了:
- 客户端从认证服务器获取令牌的时候,必须使用client_id为rbacboot,client_secret为123456的标识来获取;
- 该client_id支持password模式获取令牌,并且可以通过refresh_token来获取新的令牌;
- 在获取client_id为rbacboot的令牌的时候,scope只能指定为all,否则将获取失败;
如果需要指定多个client,可以继续使用withClient配置。
在定义好这三个配置类后,我们还需要定义一个用于校验用户名密码的类,也就是上面提到的UserDetailService。在项目路径下新增service包,然后在service包下RbacbootUserDetailService
类,代码如下所示:
package com.xiaomifeng1010.rbacboot.auth.service;import com.xiaomifeng1010.rbacboot.auth.manager.UserManager;
import com.xiaomifeng1010.rbacboot.common.entity.AuthUser;
import com.xiaomifeng1010.rbacboot.common.entity.system.SystemUser;
import org.apache.commons.lang3.StringUtils;
import org.springframework.beans.BeanUtils;
import org.springframework.beans.factory.annotation.Autowired;
import org.springframework.security.core.authority.AuthorityUtils;
import org.springframework.security.core.userdetails.User;
import org.springframework.security.core.userdetails.UserDetails;
import org.springframework.security.core.userdetails.UserDetailsService;
import org.springframework.security.core.userdetails.UsernameNotFoundException;
import org.springframework.security.crypto.password.PasswordEncoder;
import org.springframework.stereotype.Service;import javax.annotation.Resource;/*** @author xiaomifeng1010* @version 1.0* @date: 2020/1/19 19:14*/@Service
public class RbacbootUserDetailService implements UserDetailsService {@Resourceprivate PasswordEncoder passwordEncoder;@Autowiredprivate UserManager userManager;//    @Override
//    public UserDetails loadUserByUsername(String username) throws UsernameNotFoundException {
//        AuthUser authUser=new AuthUser();
//        authUser.setUsername(username);
//        authUser.setPassword(passwordEncoder.encode("123456"));
//
//        return new User(username,authUser.getPassword(),authUser.isEnabled(),authUser.isAccountNonExpired(),
//                authUser.isCredentialsNonExpired(),authUser.isAccountNonLocked(),
//                AuthorityUtils.commaSeparatedStringToAuthorityList("user:add"));
//
//
//    }//    因为之前的获取用户逻辑是我们模拟的,现在将它改造为通过查询数据库的方式获取@Overridepublic UserDetails loadUserByUsername(String username) throws UsernameNotFoundException {SystemUser systemUser = userManager.findByName(username);if (systemUser != null) {String permissions = userManager.findUserPermissions(username);boolean notLocked = false;if (StringUtils.equals(SystemUser.STATUS_VALID, systemUser.getStatus())) {notLocked = true;}AuthUser authUser = new AuthUser(systemUser.getUsername(), systemUser.getPassword(), true, true, true, notLocked,AuthorityUtils.commaSeparatedStringToAuthorityList(permissions));
//                两个实体类值的拷贝Spring给我们提供了相应的工具类,可以简化BeanUtils.copyProperties(systemUser, authUser);return authUser;
//                return transSystemUserToAuthUser(authUser,systemUser);} else {throw new UsernameNotFoundException("");}}//    private AuthUser transSystemUserToAuthUser(AuthUser authUser,SystemUser systemUser){
//        authUser.setAvatar(systemUser.getAvatar());
//        authUser.setDeptId(systemUser.getDeptId());
//        authUser.setDeptName(systemUser.getDeptName());
//        authUser.setEmail(systemUser.getEmail());
//        authUser.setMobile(systemUser.getMobile());
//        authUser.setRoleId(systemUser.getRoleId());
//        authUser.setRoleName(systemUser.getRoleName());
//        authUser.setSex(systemUser.getSex());
//        authUser.setUserId(systemUser.getUserId());
//        authUser.setLastLoginTime(systemUser.getLastLoginTime());
//        authUser.setDescription(systemUser.getDescription());
//        authUser.setStatus(systemUser.getStatus());
//        return authUser;
//    }
}
RbacbootUserDetailService 实现了UserDetailsService接口的loadUserByUsername方法。loadUserByUsername方法返回一个UserDetails对象,该对象也是一个接口,包含一些用于描述用户信息的方法,源码如下:

/** Copyright 2004, 2005, 2006 Acegi Technology Pty Limited** Licensed under the Apache License, Version 2.0 (the "License");* you may not use this file except in compliance with the License.* You may obtain a copy of the License at**      https://www.apache.org/licenses/LICENSE-2.0** Unless required by applicable law or agreed to in writing, software* distributed under the License is distributed on an "AS IS" BASIS,* WITHOUT WARRANTIES OR CONDITIONS OF ANY KIND, either express or implied.* See the License for the specific language governing permissions and* limitations under the License.*/package org.springframework.security.core.userdetails;import org.springframework.security.core.Authentication;
import org.springframework.security.core.GrantedAuthority;import java.io.Serializable;
import java.util.Collection;/*** Provides core user information.** <p>* Implementations are not used directly by Spring Security for security purposes. They* simply store user information which is later encapsulated into {@link Authentication}* objects. This allows non-security related user information (such as email addresses,* telephone numbers etc) to be stored in a convenient location.* <p>* Concrete implementations must take particular care to ensure the non-null contract* detailed for each method is enforced. See* {@link org.springframework.security.core.userdetails.User} for a reference* implementation (which you might like to extend or use in your code).** @see UserDetailsService* @see UserCache** @author Ben Alex*/
public interface UserDetails extends Serializable {// ~ Methods// ========================================================================================================/*** Returns the authorities granted to the user. Cannot return <code>null</code>.** @return the authorities, sorted by natural key (never <code>null</code>)*/Collection<? extends GrantedAuthority> getAuthorities();/*** Returns the password used to authenticate the user.** @return the password*/String getPassword();/*** Returns the username used to authenticate the user. Cannot return <code>null</code>.** @return the username (never <code>null</code>)*/String getUsername();/*** Indicates whether the user's account has expired. An expired account cannot be* authenticated.** @return <code>true</code> if the user's account is valid (ie non-expired),* <code>false</code> if no longer valid (ie expired)*/boolean isAccountNonExpired();/*** Indicates whether the user is locked or unlocked. A locked user cannot be* authenticated.** @return <code>true</code> if the user is not locked, <code>false</code> otherwise*/boolean isAccountNonLocked();/*** Indicates whether the user's credentials (password) has expired. Expired* credentials prevent authentication.** @return <code>true</code> if the user's credentials are valid (ie non-expired),* <code>false</code> if no longer valid (ie expired)*/boolean isCredentialsNonExpired();/*** Indicates whether the user is enabled or disabled. A disabled user cannot be* authenticated.** @return <code>true</code> if the user is enabled, <code>false</code> otherwise*/boolean isEnabled();
}
这些方法的含义如下:
-
getAuthorities获取用户包含的权限,返回权限集合,权限是一个继承了GrantedAuthority的对象; -
getPassword和getUsername用于获取密码和用户名; -
isAccountNonExpired方法返回boolean类型,用于判断账户是否未过期,未过期返回true反之返回false; -
isAccountNonLocked方法用于判断账户是否未锁定; -
isCredentialsNonExpired用于判断用户凭证是否没过期,即密码是否未过期; -
isEnabled方法用于判断用户是否可用。
实际中我们可以自定义UserDetails接口的实现类,也可以直接使用Spring Security提供的UserDetails接口实现类org.springframework.security.core.userdetails.User
RbacbootUserDetailService中AuthUser为我们自定义的用户实体类,代表我们从数据库中查询出来的用户。项目中新增entity包,然后在entity包下新增AuthUser:
package com.xiaomifeng1010.rbacboot.common.entity;import lombok.*;
import org.springframework.security.core.GrantedAuthority;
import org.springframework.security.core.userdetails.User;import java.io.Serializable;
import java.util.Collection;
import java.util.Date;/*** @author xiaomifeng1010* @version 1.0* @date: 2020/1/19 21:07*/
@Getter
@Setter
@EqualsAndHashCode(callSuper = true)
public class AuthUser extends User {private static final long serialVersionUID = 974400530132577487L;private String username;private String password;private boolean accountNonExpired = true;private boolean accountNonLocked = true;private boolean credentialsNonExpired = true;private boolean enabled = true;private Long userId;private String avatar;private String email;private String mobile;private String sex;private Long deptId;private String deptName;private String roleId;private String roleName;private Date lastLoginTime;private String description;private String status;public AuthUser(String username, String password, Collection<? extends GrantedAuthority> authorities) {super(username, password, authorities);}public AuthUser(String username, String password, boolean enabled, boolean accountNonExpired, boolean credentialsNonExpired, boolean accountNonLocked, Collection<? extends GrantedAuthority> authorities) {super(username, password, enabled, accountNonExpired, credentialsNonExpired, accountNonLocked, authorities);}
}
在UserDetailService的loadUserByUsername方法中,我们模拟了一个用户,用户名为用户输入的用户名,密码为123456(后期再改造为从数据库中获取用户),然后返回org.springframework.security.core.userdetails.User。这里使用的是User类包含7个参数的构造器,其还包含一个三个参数的构造器User(String username, String password,Collection<? extends GrantedAuthority> authorities),由于权限参数不能为空,所以这里先使用AuthorityUtils.commaSeparatedStringToAuthorityList方法模拟一个user:add权限。
最后定义一个Controller,对外提供一些REST服务。在项目路径下新增controller包,在controller包下新增SecurityController:
package com.xiaomifeng1010.rbacboot.auth.controller;import com.xiaomifeng1010.rbacboot.auth.service.ValidateCodeService;
import com.xiaomifeng1010.rbacboot.common.entity.RbacbootResponse;
import com.xiaomifeng1010.rbacboot.common.exception.RbacbootAuthException;
import com.xiaomifeng1010.rbacboot.common.exception.ValidateCodeException;
import org.apache.commons.lang3.StringUtils;
import org.springframework.beans.factory.annotation.Autowired;
import org.springframework.security.oauth2.provider.token.ConsumerTokenServices;
import org.springframework.web.bind.annotation.DeleteMapping;
import org.springframework.web.bind.annotation.GetMapping;import javax.servlet.http.HttpServletRequest;
import javax.servlet.http.HttpServletResponse;
import java.io.IOException;
import java.security.Principal;/*** @author xiaomifeng1010* @version 1.0* @date: 2020/1/19 21:19*/public class SecutityController {@Autowiredprivate ConsumerTokenServices consumerTokenServices;@Autowiredprivate ValidateCodeService validateCodeService;@GetMapping("/oauth/test")public String testOauth() {return "oauth";}@GetMapping("/user")public Principal currentUser(Principal principal) {return principal;}@DeleteMapping("signout")public RbacbootResponse signout(HttpServletRequest request) throws RbacbootAuthException {String authorization = request.getHeader("Authorization");String token = StringUtils.replace(authorization, "bearer", "");RbacbootResponse rbacbootResponse = new RbacbootResponse();if (!consumerTokenServices.revokeToken(token)) {throw new RbacbootAuthException("退出登录失败");}return rbacbootResponse.message("退出登录成功");}@GetMapping("captcha")public void captcha(HttpServletRequest request, HttpServletResponse response) throws IOException, ValidateCodeException {validateCodeService.create(request, response);}
}
其中currentUser用户获取当前登录用户,signout方法通过ConsumerTokenServices来注销当前Token。RbacbootResponse 为系统的统一相应格式,,在entity路径下新增RbacbootResponse 类
package com.xiaomifeng1010.rbacboot.common.entity;import java.io.Serializable;
import java.util.HashMap;/*** @author xiaomifeng1010* @version 1.0* @date: 2020/1/19 21:30*/public class RbacbootResponse extends HashMap<String, Object> {private static final long serialVersionUID = -912886623626023739L;public RbacbootResponse message(String message) {this.put("message", message);return this;}public RbacbootResponse data(Object data) {this.put("data", data);return this;}@Overridepublic RbacbootResponse put(String key, Object value) {super.put(key, value);return this;}public String getMessage() {return String.valueOf(get("message"));}public Object getData() {return get("data");}
}
RbacbootAuthException为自定义异常,在路径下新增exception包,然后在该包下新增RbacbootAuthException:
package com.xiaomifeng1010.rbacboot.common.exception;/*** @author xiaomifeng1010* @version 1.0* @date: 2020/1/19 21:45*/public class RbacbootAuthException extends Exception {private static final long serialVersionUID = -4028792093912869518L;public RbacbootAuthException(String message) {super(message);}
}
接着可以使用postman进行接口测试了
使用PostMan发送 localhost:8101/oauth/token POST请求,请求参数如下所示:

grant_type填password,表示密码模式,然后填写用户名和密码,根据我们定义的UserDetailService逻辑,这里用户名随便填,密码必须为123456。
除了这几个参数外,我们需要在请求头中配置Authorization信息,否则请求将返回401:
值为Basic加空格加client_id:client_secret(就是在AuthorizationServerConfigure类configure(ClientDetailsServiceConfigurer clients)方法中定义的client和secret)经过base64加密后的值(可以使用在线加密解密):

 点击Send按钮,返回:
{"access_token": "d10c0036-25b6-4c93-8376-d6c86dd91146","token_type": "bearer","refresh_token": "1b08e7ac-66d9-4f0d-ab1d-86632a29958f","expires_in": 86399,"scope": "all"
} 有效时长就是我们在AuthorizationServerConfigure的defaultTokenServices方法中定义的60 * 60 * 24秒
其实我们并没有看到rbacboot-auth模块中有和/oauth/token请求对应的方法,为什么可以直接访问?
这是因为当我们引入了spring-cloud-starter-oauth2依赖后,系统会暴露一组由/oauth开头的端点,这些端点用于处理令牌相关请求,可以通过IDEA的Mappings证实这一点:

获取受保护资源
我们已经成功获取了访问令牌access_token,接下来使用这个令牌去获取/user资源。
使用PostMan发送 localhost:8101/user GET请求,先不带令牌看看返回什么:
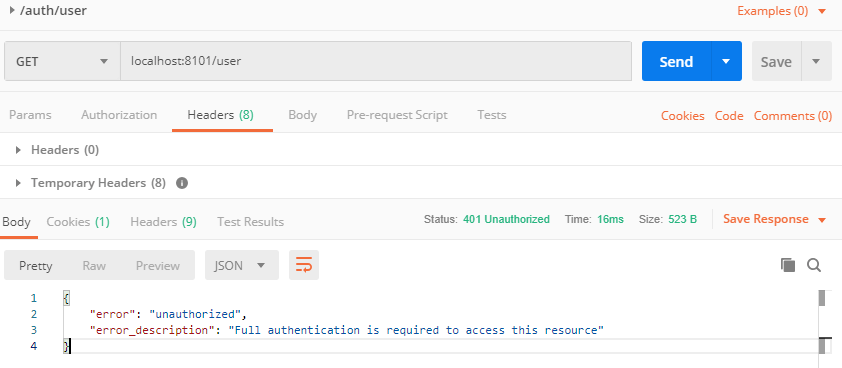
返回401异常,我们在请求头中添加如下内容:
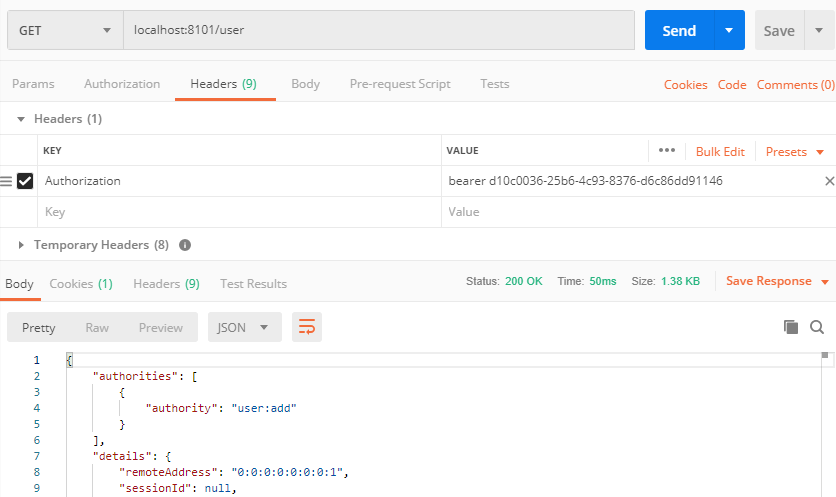
可以看到已经成功返回了数据。Authorization值的格式为token_type access_token。
接着我们使用PostMan发送 localhost:8101/oauth/test GET请求
可以看到,虽然我们在请求头中已经带上了正确的令牌,但是并没有成功获取到资源,正如前面所说的那样,/oauth/开头的请求由SecurityConfigure定义的过滤器链处理,它不受资源服务器配置管理,所以使用令牌并不能成功获取到资源。
测试注销令牌
使用PostMan发送 localhost:8101/signout DELETE请求,并在请求头中携带令牌:
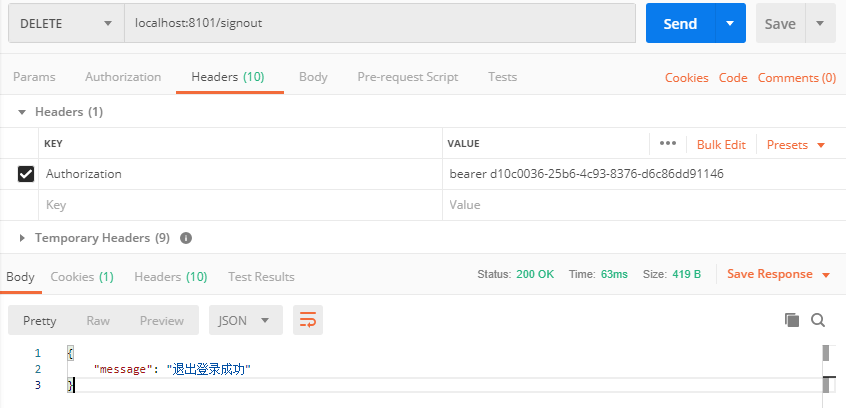
注销令牌后,原先的access_token和refresh_token都会马上失效,并且Redis也被清空:

oauth2的一些概念的理解,还可以阅读一下阮一峰网络日志---理解Oauth2.0
这篇关于Oauth2与Spring Security框架的认证授权管理的文章就介绍到这儿,希望我们推荐的文章对编程师们有所帮助!


