本文主要是介绍Qt 之自定义界面(QMessageBox),希望对大家解决编程问题提供一定的参考价值,需要的开发者们随着小编来一起学习吧!
简述
通过前几节的自定义窗体的学习,我们可以很容易的写出一套属于自己风格的界面框架,通用于各种窗体,比如:QWidget、QDialog、QMainWindow。
大多数窗体的实现都是采用控件堆积来完成的,只要思路清晰,再复杂的界面实现起来都游刃有余。下面我来列举一个由QMessageBox扩展的提示框-根据其源码实现思路来实现!
| 版权声明:一去、二三里,未经博主允许不得转载。
效果
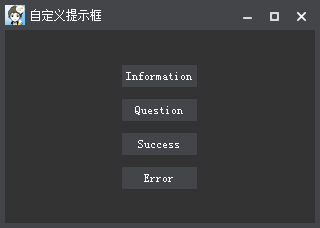
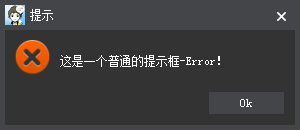
自定义提示框
实现
message_box.h
#ifndef MESSAGE_BOX
#define MESSAGE_BOX#include <QMessageBox>
#include <QDialogButtonBox>
#include <QGridLayout>
#include "custom_window.h"class QLabel;class MessageBox : public CustomWindow
{Q_OBJECTpublic:explicit MessageBox(QWidget *parent = 0, const QString &title = tr("Tip"), const QString &text = "",QMessageBox::StandardButtons buttons = QMessageBox::Ok, QMessageBox::StandardButton defaultButton = QMessageBox::Ok);~MessageBox();QAbstractButton *clickedButton() const;QMessageBox::StandardButton standardButton(QAbstractButton *button) const;// 设置默认按钮void setDefaultButton(QPushButton *button);void setDefaultButton(QMessageBox::StandardButton button);// 设置窗体标题void setTitle(const QString &title);// 设置提示信息void setText(const QString &text);// 设置窗体图标void setIcon(const QString &icon);// 添加控件-替换提示信息所在的QLabelvoid addWidget(QWidget *pWidget);protected:// 多语言翻译void changeEvent(QEvent *event);private slots:void onButtonClicked(QAbstractButton *button);private:void translateUI();int execReturnCode(QAbstractButton *button);private:QLabel *m_pIconLabel;QLabel *m_pLabel;QGridLayout *m_pGridLayout;QDialogButtonBox *m_pButtonBox;QAbstractButton *m_pClickedButton;QAbstractButton *m_pDefaultButton;
};
message_box.cpp
#include <QLabel>
#include <QPushButton>
#include <QMessageBox>
#include <QCheckBox>
#include <QHBoxLayout>
#include <QEvent>
#include <QApplication>
#include "message_box.h"MessageBox::MessageBox(QWidget *parent, const QString &title, const QString &text,QMessageBox::StandardButtons buttons, QMessageBox::StandardButton defaultButton): CustomWindow(parent)
{setWindowIcon(QIcon(":/Images/logo"));setWindowTitle(title);setMinimumSize(300, 130);setMinimizeVisible(false);setMaximizeVisible(false);setWidgetResizable(false);m_pButtonBox = new QDialogButtonBox(this);m_pButtonBox->setStandardButtons(QDialogButtonBox::StandardButtons(int(buttons)));setDefaultButton(defaultButton);QPushButton *pYesButton = m_pButtonBox->button(QDialogButtonBox::Yes);if (pYesButton != NULL){pYesButton->setObjectName("blueButton");pYesButton->setStyle(QApplication::style());}m_pIconLabel = new QLabel(this);m_pLabel = new QLabel(this);QPixmap pixmap(":/Images/information");m_pIconLabel->setPixmap(pixmap);m_pIconLabel->setFixedSize(35, 35);m_pIconLabel->setScaledContents(true);m_pLabel->setAlignment(Qt::AlignLeft | Qt::AlignVCenter);m_pLabel->setObjectName("whiteLabel");m_pLabel->setOpenExternalLinks(true);m_pLabel->setText(text);m_pGridLayout = new QGridLayout();m_pGridLayout->addWidget(m_pIconLabel, 0, 0, 2, 1, Qt::AlignTop);m_pGridLayout->addWidget(m_pLabel, 0, 1, 2, 1);m_pGridLayout->addWidget(m_pButtonBox, m_pGridLayout->rowCount(), 0, 1, m_pGridLayout->columnCount());m_pGridLayout->setSizeConstraint(QLayout::SetNoConstraint);m_pGridLayout->setHorizontalSpacing(10);m_pGridLayout->setVerticalSpacing(10);m_pGridLayout->setContentsMargins(10, 10, 10, 10);m_pLayout->addLayout(m_pGridLayout);translateUI();connect(m_pButtonBox, SIGNAL(clicked(QAbstractButton*)), this, SLOT(onButtonClicked(QAbstractButton*)));
}MessageBox::~MessageBox()
{}void MessageBox::changeEvent(QEvent *event)
{switch (event->type()){case QEvent::LanguageChange:translateUI();break;default:CustomWindow::changeEvent(event);}
}void MessageBox::translateUI()
{QPushButton *pYesButton = m_pButtonBox->button(QDialogButtonBox::Yes);if (pYesButton != NULL)pYesButton->setText(tr("Yes"));QPushButton *pNoButton = m_pButtonBox->button(QDialogButtonBox::No);if (pNoButton != NULL)pNoButton->setText(tr("No"));QPushButton *pOkButton = m_pButtonBox->button(QDialogButtonBox::Ok);if (pOkButton != NULL)pOkButton->setText(tr("Ok"));QPushButton *pCancelButton = m_pButtonBox->button(QDialogButtonBox::Cancel);if (pCancelButton != NULL)pCancelButton->setText(tr("Cancel"));
}QMessageBox::StandardButton MessageBox::standardButton(QAbstractButton *button) const
{return (QMessageBox::StandardButton)m_pButtonBox->standardButton(button);
}QAbstractButton *MessageBox::clickedButton() const
{return m_pClickedButton;
}int MessageBox::execReturnCode(QAbstractButton *button)
{int nResult = m_pButtonBox->standardButton(button);return nResult;
}void MessageBox::onButtonClicked(QAbstractButton *button)
{m_pClickedButton = button;done(execReturnCode(button));
}void MessageBox::setDefaultButton(QPushButton *button)
{if (!m_pButtonBox->buttons().contains(button))return;m_pDefaultButton = button;button->setDefault(true);button->setFocus();
}void MessageBox::setDefaultButton(QMessageBox::StandardButton button)
{setDefaultButton(m_pButtonBox->button(QDialogButtonBox::StandardButton(button)));
}void MessageBox::setTitle(const QString &title)
{setWindowTitle(title);
}void MessageBox::setText(const QString &text)
{m_pLabel->setText(text);
}void MessageBox::setIcon(const QString &icon)
{m_pIconLabel->setPixmap(QPixmap(icon));
}void MessageBox::addWidget(QWidget *pWidget)
{m_pLabel->hide();m_pGridLayout->addWidget(pWidget, 0, 1, 2, 1);
}
接口说明
- CustomWindow
主要对界面的无边框可拖动进行了封装
- MessageBox
整体界面布局及事件处理参考了QMessageBox源码,接口包含:设置标题、提示信息、默认按钮及事件触发等操作。
二次封装
针对于各种提示框,我们可以再次进行封装,将常用的提取出来,作为全局函数来使用。
QMessageBox::StandardButton showInformation(QWidget *parent, const QString &title,const QString &text, QMessageBox::StandardButtons buttons,QMessageBox::StandardButton defaultButton)
{MessageBox msgBox(parent, title, text, buttons, defaultButton);msgBox.setIcon(":/Images/information");if (msgBox.exec() == -1)return QMessageBox::Cancel;return msgBox.standardButton(msgBox.clickedButton());
}QMessageBox::StandardButton showError(QWidget *parent, const QString &title,const QString &text, QMessageBox::StandardButtons buttons,QMessageBox::StandardButton defaultButton)
{MessageBox msgBox(parent, title, text, buttons, defaultButton);msgBox.setIcon(":/Images/error");if (msgBox.exec() == -1)return QMessageBox::Cancel;return msgBox.standardButton(msgBox.clickedButton());
}QMessageBox::StandardButton showSuccess(QWidget *parent, const QString &title,const QString &text, QMessageBox::StandardButtons buttons,QMessageBox::StandardButton defaultButton)
{MessageBox msgBox(parent, title, text, buttons, defaultButton);msgBox.setIcon(":/Images/success");if (msgBox.exec() == -1)return QMessageBox::Cancel;return msgBox.standardButton(msgBox.clickedButton());
}QMessageBox::StandardButton showQuestion(QWidget *parent, const QString &title,const QString &text, QMessageBox::StandardButtons buttons,QMessageBox::StandardButton defaultButton)
{MessageBox msgBox(parent, title, text, buttons, defaultButton);msgBox.setIcon(":/Images/question");if (msgBox.exec() == -1)return QMessageBox::Cancel;return msgBox.standardButton(msgBox.clickedButton());
}QMessageBox::StandardButton showWarning(QWidget *parent, const QString &title,const QString &text, QMessageBox::StandardButtons buttons,QMessageBox::StandardButton defaultButton)
{MessageBox msgBox(parent, title, text, buttons, defaultButton);msgBox.setIcon(":/images/warning");if (msgBox.exec() == -1)return QMessageBox::Cancel;return msgBox.standardButton(msgBox.clickedButton());
}QMessageBox::StandardButton showCritical(QWidget *parent, const QString &title,const QString &text, QMessageBox::StandardButtons buttons,QMessageBox::StandardButton defaultButton)
{MessageBox msgBox(parent, title, text, buttons, defaultButton);msgBox.setIcon(":/Images/warning");if (msgBox.exec() == -1)return QMessageBox::Cancel;return msgBox.standardButton(msgBox.clickedButton());
}QMessageBox::StandardButton showCheckBoxQuestion(QWidget *parent, const QString &title,const QString &text, QMessageBox::StandardButtons buttons,QMessageBox::StandardButton defaultButton)
{MessageBox msgBox(parent, title, text, buttons, defaultButton);msgBox.setIcon(":/Images/question");QCheckBox *pCheckBox = new QCheckBox(&msgBox);pCheckBox->setText(text);msgBox.addWidget(pCheckBox);if (msgBox.exec() == -1)return QMessageBox::Cancel;QMessageBox::StandardButton standardButton = msgBox.standardButton(msgBox.clickedButton());if (standardButton == QMessageBox::Yes){return pCheckBox->isChecked() ? QMessageBox::Yes : QMessageBox::No;}return QMessageBox::Cancel;
}
使用方式
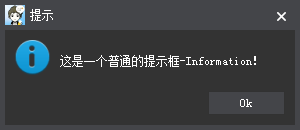
showInformation(this, QStringLiteral("提示"), QStringLiteral("这是一个普通的提示框-Information!"));
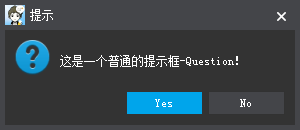
showQuestion(this, QStringLiteral("提示"), QStringLiteral("这是一个普通的提示框-Question!"));
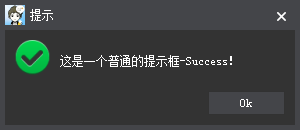
showSuccess(this, QStringLiteral("提示"), QStringLiteral("这是一个普通的提示框-Success!"));
showError(this, QStringLiteral("提示"), QStringLiteral("这是一个普通的提示框-Error!"));
源码学习
其实Qt中有很多自带的比较好的效果,里面用了很好的实现方式,建议安装的时候把源码download下来,随时可以研究并学习。例如:D:\Qt\Qt5.5.1\5.5\Src\qtbase\src\widgets\dialogs下面包含了所有关于dialog的实现-QProgressDialog、QMessageBox、QFileDialog。。。
这篇关于Qt 之自定义界面(QMessageBox)的文章就介绍到这儿,希望我们推荐的文章对编程师们有所帮助!


