本文主要是介绍嵌入式学习-驱动开发前奏-lesson3-linux内核链表,希望对大家解决编程问题提供一定的参考价值,需要的开发者们随着小编来一起学习吧!
1)链表简介
链表是一种常用的数据结构,它通过指针将一系列数据节点连接成一条数据链。相对于数组,链表具有更好的动态性,建立链表时无需预先知道数据总量,可以随机分配空间,可以高效地在链表中的任意位置实时插入或删除数据。链表的开销主要是访问的顺序性和组织链的空间损失。
2)链表的分类和组成
链表的最基本组成元素,节点每一个节点都是由数据域和指针域组成。
根据其不同,可以将链表分为单向链表、双向链表、双向循环链表。
注意:linux内核链表属于双向循环链表。
3)链表对比
传统链表与Linux内核链表有一定的区别。
传统链表,指针域的指针是指向节点的开始
而内核链表,并没有指向节点的开始,而是指向指针域,至于再指向指针域后,如何获取数据域的数据,在后面的list_entry函数中会有详细的说明。
4)linux内核链表结构
如下:
struct list_head
{struct list_head *next, *prev;
};
list_head结构包含两个指向list_head结构的指针prev和next,由此可见,内核的链表具备双链表功能,实际上,通常它都组织成双向循环链表。
以下是内核链表中相关的函数:
- INIT_LIST_HEAD:创建链表
- list_add:在链表头插入节点
- list_add_tail:在链表尾插入节点
- list_del:删除节点
- list_entry:取出节点(访问节点里面的内容)
- list_for_each:遍历链表
理解:以上所有的函数需要内核的支持,已经在内核中定义好了
- 1.INIT_LIST_HEAD
static inline void INIT_LIST_HEAD(struct list_head *list)
{list->next = list;list->prev = list;
}
让其前向指针和后项指针都指向自己,这样就创建了一个空的链表
-2. list_add
在链表头插入节点,其函数原型为:
/*** list_add - add a new entry* @new: new entry to be added* @head: list head to add it after** Insert a new entry after the specified head.* This is good for implementing stacks.*/
static inline void list_add(struct list_head *new, struct list_head *head)
{__list_add(new, head, head->next);
}
上面struct list_head *new 为要加进链表的数据结构,struct list_head *head为链表头,
这个函数的作用就是在链表头和链表头的下一个数据结构之间插入一个新的链表。
__list_add函数的原型为:
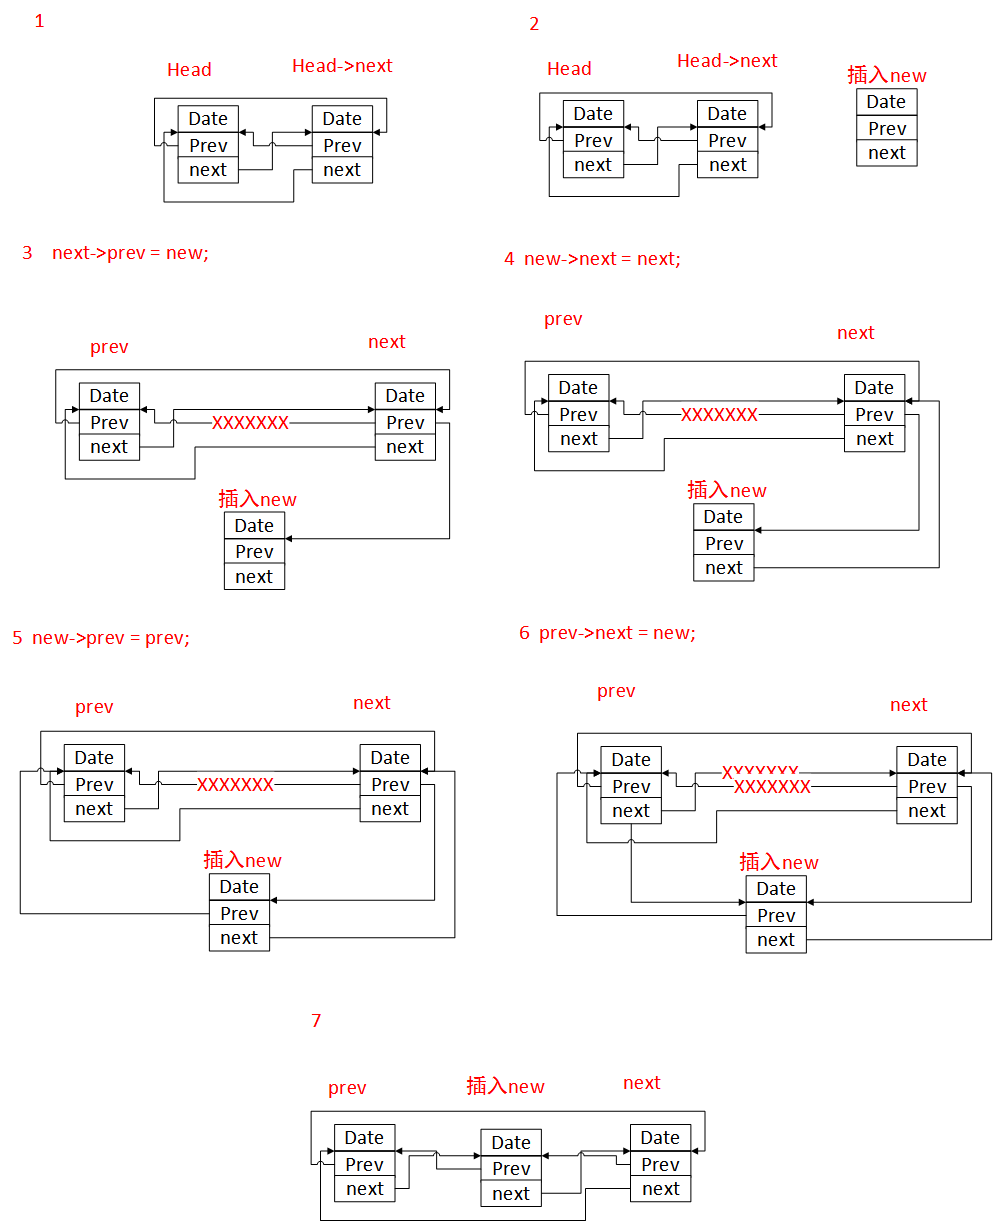
/** Insert a new entry between two known consecutive entries.** This is only for internal list manipulation where we know* the prev/next entries already!*/
#ifndef CONFIG_DEBUG_LIST
static inline void __list_add(struct list_head *new,struct list_head *prev, struct list_head *next)
{next->prev = new;new->next = next;new->prev = prev;prev->next = new;
}
#else
将上面的每一步画成图,如下所示:
- 3.list_add_tail
在链表尾插入节点,其原型如下所示:
/*** list_add_tail - add a new entry* @new: new entry to be added* @head: list head to add it before** Insert a new entry before the specified head.* This is useful for implementing queues.*/
static inline void list_add_tail(struct list_head *new, struct list_head *head)
{__list_add(new, head->prev, head);
}
和上面的list_add函数有些类似,同样是再次调用__list_add函数,但是参数的顺序不同,在结点指针head所指向结点的前面插入new所指向的结点。当head指向头节点时,也相当于在尾结点后面增加一个new所指向的结点
- 4.list_del
删除节点,其原型如下:(注意:不同的cpu,其内核代码可能有所不同)
/*** list_del - deletes entry from list.* @entry: the element to delete from the list.* Note: list_empty() on entry does not return true after this, the entry is* in an undefined state.*/
#ifndef CONFIG_DEBUG_LIST
static inline void list_del(struct list_head *entry)
{__list_del(entry->prev, entry->next);entry->next = (void *)0xDEADBEEF;entry->prev = (void *)0xBEEFDEAD;
}
#else
__list_del的原型为:
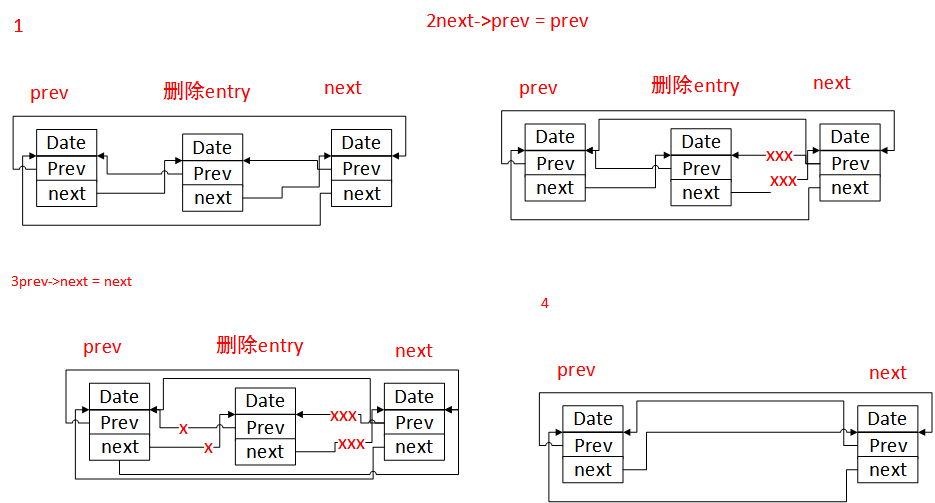
/** Delete a list entry by making the prev/next entries* point to each other.** This is only for internal list manipulation where we know* the prev/next entries already!*/
static inline void __list_del(struct list_head *prev, struct list_head *next)
{next->prev = prev;prev->next = next;
}
画图如下:
- 5list_entry
取出节点里面的内容
/*** list_entry - get the struct for this entry* @ptr:    the &struct list_head pointer.* @type:   the type of the struct this is embedded in.* @member: the name of the list_struct within the struct.*/
#define list_entry(ptr, type, member) \container_of(ptr, type, member)#define offsetof(TYPE, MEMBER) ((size_t) &((TYPE *)0)->MEMBER)
/*** container_of - cast a member of a structure out to the containing structure* @ptr:    the pointer to the member.* @type:   the type of the container struct this is embedded in.* @member: the name of the member within the struct.*  */
#define container_of(ptr, type, member) ({ \const typeof(((type *)0)->member)*__mptr = (ptr); \(type *)((char *)__mptr - offsetof(type, member)); })- 6list_for_each
遍历链表其源代码为:
/*** list_for_each    -   iterate over a list* @pos:    the &struct list_head to use as a loop cursor.* @head:   the head for your list.*/
#define list_for_each(pos, head) \for (pos = (head)->next; prefetch(pos->next), pos != (head); \pos = pos->next)
4)内核链表编程实验
mylist.c
#include<linux/module.h>
#include<linux/init.h>
#include<linux/list.h>struct score
{int num;int english;int math;struct list_head list; /*节点*/
};struct list_head score_head; /*链表头*/
struct score stu1,stu2,stu3;
struct list_head *pos; //指针 相当于光标
struct score *tmp;int mylist_init()
{/*创建链表*/INIT_LIST_HEAD(&score_head);stu1.num = 1;stu1.english = 90;stu1.math = 98;list_add_tail(&(stu1.list),&score_head); /*在链表尾插入节点*/stu2.num = 2;stu2.english = 92;stu2.math = 91;list_add_tail(&(stu2.list),&score_head);stu3.num = 3;stu3.english = 94;stu3.math = 95;list_add_tail(&(stu3.list),&score_head);/*遍历链表*/list_for_each(pos,&score_head){tmp = list_entry(pos,struct score,list);/*取出节点*/printk(KERN_WARNING"NO %d, english is %d, math is %d\n",tmp->num,tmp->english,tmp->math);   }return 0;
}void mylist_exit()
{/*删除节点*/list_del(&(stu1.list));list_del(&(stu2.list));
}module_init(mylist_init);
module_exit(mylist_exit);
MODULE_LICENSE("GPL");
根据上面的程序,将其编译,运行,便可以看到结果,这里就不再贴图了。
菜鸟一枚,如有错误,多多指教。。。
这篇关于嵌入式学习-驱动开发前奏-lesson3-linux内核链表的文章就介绍到这儿,希望我们推荐的文章对编程师们有所帮助!


