本文主要是介绍Java多线程之CountDownLatch同步器的使用(六),希望对大家解决编程问题提供一定的参考价值,需要的开发者们随着小编来一起学习吧!
3-4、CountDownLatch:同步器
在JKD1.5+环境中,Doug Lea和他的团队为我们提供了可以很好实现这个要求的工具类:CountDownLatch和CyclicBarrier。我们首先介绍CountDownLatch的基本使用方式:
3-4-1、CountDownLatch基本使用
CountDownLatch是一个同步计数器,能够保证在其他线程完成某一个业务操作前,当前线程一直处于等待/阻塞状态。具体来说,这个计数器将会从给定的某一个数值count开始,通过countDown()方法的调用进行倒数。当执行某一次countDown()操作后,计数器的count数值等于0,所有调用了await()方法的线程,就解除等待/阻塞状态继续执行。我们来看一段简单的示例代码:
package test.thread.countDownLatch;import java.util.concurrent.CountDownLatch;import org.apache.commons.logging.Log;
import org.apache.commons.logging.LogFactory;
import org.apache.log4j.BasicConfigurator;public class TestCountDownLatch {/*** 日志*/private static Log LOGGER = LogFactory.getLog(TestCountDownLatch.class);static {BasicConfigurator.configure();}public static void main(String[] args) throws Throwable {final CountDownLatch countDownLatch = new CountDownLatch(5);for(int index = 0 ; index < 5 ; index++) {Thread childThread = new Thread() {@Overridepublic void run() {synchronized (this) {try {this.wait(1000);} catch (InterruptedException e) {TestCountDownLatch.LOGGER.error(e.getMessage(), e);}}long threadid = Thread.currentThread().getId();TestCountDownLatch.LOGGER.info("子线程(" + threadid + ")执行完成!");countDownLatch.countDown();}};childThread.start();}countDownLatch.await();TestCountDownLatch.LOGGER.info("所有子线程的处理都完了,主线程继续执行...");}
}
- 1
- 2
- 3
- 4
- 5
- 6
- 7
- 8
- 9
- 10
- 11
- 12
- 13
- 14
- 15
- 16
- 17
- 18
- 19
- 20
- 21
- 22
- 23
- 24
- 25
- 26
- 27
- 28
- 29
- 30
- 31
- 32
- 33
- 34
- 35
- 36
- 37
- 38
- 39
- 40
- 41
- 42
- 43
- 44
- 45
- 46
- 47
- 48
- 49
- 50
- 51
以下是可能的执行结果(因为每次执行的效果可能有所区别):
1 [Thread-3] INFO test.thread.countDownLatch.TestCountDownLatch  - 子线程(12)执行完成!
1 [Thread-4] INFO test.thread.countDownLatch.TestCountDownLatch  - 子线程(13)执行完成!
1 [Thread-1] INFO test.thread.countDownLatch.TestCountDownLatch  - 子线程(10)执行完成!
1 [Thread-2] INFO test.thread.countDownLatch.TestCountDownLatch  - 子线程(11)执行完成!
1 [Thread-0] INFO test.thread.countDownLatch.TestCountDownLatch  - 子线程(9)执行完成!
9 [main] INFO test.thread.countDownLatch.TestCountDownLatch  - 所有子线程的处理都完了,主线程继续执行...
以上代码片段和执行结果说明了CountDownLatch的最简单使用,CountDownLatch同步计数器从5开始计数,分别对应5个子线程的业务完成情况。每当一个子线程业务完成后,CountDownLatch同步计数器就countDown一次。直到count等于0时,这时主线程上面的await()方法解除等待/阻塞状态,继续执行。这里要注意一下:
-
不是说只能有一次await方法的调用,而是同一时间可以有多个线程调用了await方法。只要在count还不等于0时,某个线程调用了await方法,它都会进入等待/阻塞状态。
-
在调用await时,如果CountDownLatch同步计数器的count已经等于0了,则await方法不会进入等待/阻塞状态。
-
await调用和countDown调用不是说必须处于不同线程。同一线程中,您可以先调用countDown然后再调用await进入等待/阻塞。CountDownLatch同步计数器会始终遵循上两条工作原则。
-
在使用CountDownLatch同步计数器时,您无需考虑脏数据的问题。CountDownLatch同步计数器是线程安全的。
3-4-2、CountDownLatch在“100米赛跑”中的应用
很明显CountDownLatch在“100米赛跑”中的使用目标是:“等待这组所有的选手全部上跑道”,然后一起开始跑步。所以,CountDownLatch的计数器,需要在选手获得“跑道”资源后,马上countDown一次。之后,获得“跑道”资源的选手要立刻调用await进入等待状态,等待其他选手也获得跑道资源。我们给这整个处理逻辑去一个名字叫做:“发令枪”,代码片段如下:
......
/*** 选手所关注的发令枪*/
private CountDownLatch startingGun;
......public Result call() throws Exception {......try {this.runway.acquire();if(this.startingGun != null) {this.startingGun.countDown();System.out.println("选手" + name + "[" + number + "],已登上跑道,等待发令!");this.startingGun.await();System.out.println("选手" + name + "[" + number + "],跑!");}return this.result = this.doRun();} catch(Exception e) {e.printStackTrace(System.out);} finally {this.runway.release();System.out.println("选手" + name + "[" + number + "],比赛正常完成!");}......
}
......
- 1
- 2
- 3
- 4
- 5
- 6
- 7
- 8
- 9
- 10
- 11
- 12
- 13
- 14
- 15
- 16
- 17
- 18
- 19
- 20
- 21
- 22
- 23
- 24
- 25
- 26
- 27
- 28
- 29
- 30
- 31
- 32
- 33
- 34
- 35
- 36
那么如何进行分组呢?我们可以让一组选手,关注同一把“发令枪”(有多少把发令枪,就有多少个组、就有多少个CountDownLatch对象)。如下图所示:
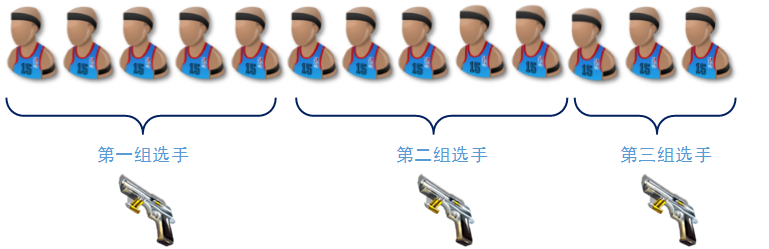
另外,分组时一定要考虑一个问题:由于报名人数不一定是5的整数倍,所以最后一组不一定有5个人。考虑到实现的代码片段如下:
......
CountDownLatch startingGun = null;
......
for (int index = 0 ; index < this.signupPlayers.size() ; index++) {if(index % runwayCount == 0) {startingGun = this.signupPlayers.size() - index > runwayCount?new CountDownLatch(runwayCount):new CountDownLatch(this.signupPlayers.size() - index);}Player player = this.signupPlayers.get(index);player.setStartingGun(startingGun);Future<Result> future = refereeService.submit(player);new FutureThread(future, player, this.preliminaries).start();
}
......
- 1
- 2
- 3
- 4
- 5
- 6
- 7
- 8
- 9
- 10
- 11
- 12
- 13
- 14
- 15
- 16
- 17
- 18
- 19
- 20
- 21
- 22
- 23
- 24
- 25
- 26
- 27
- 28
- 29
这样我们就完成了对第一次“100米赛跑”实现代码的优化:增加了选手分组控制功能。以下给出相对完整的代码。注意,由于Result类没有做任何更改,所以就不需要赘述了。
- Player选手类的的更改,主要是加入了“关注的发令枪”的关注
public class Player implements Callable<Result> , Comparable<Player>{....../*** 跑道*/private Semaphore runway;/*** 选手所关注的发令枪*/private CountDownLatch startingGun;....../*** @param startingGun the startingGun to set*/public void setStartingGun(CountDownLatch startingGun) {this.startingGun = startingGun;}/*** @return the startingGun*/public CountDownLatch getStartingGun() {return startingGun;}......@Overridepublic Result call() throws Exception {this.result = null;try {this.runway.acquire();if(this.startingGun != null) {this.startingGun.countDown();System.out.println("选手" + name + "[" + number + "],已登上跑道,等待发令枪!");this.startingGun.await();System.out.println("选手" + name + "[" + number + "],跑!");}return this.result = this.doRun();} catch(Exception e) {e.printStackTrace(System.out);} finally {this.runway.release();System.out.println("选手" + name + "[" + number + "],比赛正常完成!");}this.result = new Result(Float.MAX_VALUE);return this.result;}/*** 开始跑步(跑步的处理过程没有变化)* @return* @throws Exception*/private Result doRun() throws Exception {float presentSpeed = 0f;presentSpeed = this.minSpeed * (1.0f + new Random().nextFloat());if(presentSpeed > 14f) {presentSpeed = 14f;}BigDecimal calculation = new BigDecimal(100).divide(new BigDecimal(presentSpeed) , 3, RoundingMode.HALF_UP);float presentTime = calculation.floatValue();synchronized (this) {this.wait((long)(presentTime * 1000f));}this.result = new Result(presentTime);return result;}......
}
- 1
- 2
- 3
- 4
- 5
- 6
- 7
- 8
- 9
- 10
- 11
- 12
- 13
- 14
- 15
- 16
- 17
- 18
- 19
- 20
- 21
- 22
- 23
- 24
- 25
- 26
- 27
- 28
- 29
- 30
- 31
- 32
- 33
- 34
- 35
- 36
- 37
- 38
- 39
- 40
- 41
- 42
- 43
- 44
- 45
- 46
- 47
- 48
- 49
- 50
- 51
- 52
- 53
- 54
- 55
- 56
- 57
- 58
- 59
- 60
- 61
- 62
- 63
- 64
- 65
- 66
- 67
- 68
- 69
- 70
- 71
- 72
- 73
- 74
- 75
- 76
- 77
- 78
- 79
- 80
- 81
- 82
- 83
- 84
- 85
- 86
- 87
- 88
- 89
- 90
- 91
- 92
- 93
- 94
- 95
- 96
- 97
- 98
- 99
- TwoTrack比赛主控制类,主要加入了对“选手分组”的支持
public class TwoTrack {......public void track() {Semaphore runway = new Semaphore(5);this.signupPlayers.clear();for(int index = 0 ; index < TwoTrack.PLAYERNAMES.length ; ) {Player player = new Player(TwoTrack.PLAYERNAMES[index], ++index , runway);this.signupPlayers.add(player);}int runwayCount = 5;ExecutorService refereeService = Executors.newFixedThreadPool(5);CountDownLatch startingGun = null;for (int index = 0 ; index < this.signupPlayers.size() ; index++) {if(index % runwayCount == 0) {startingGun = this.signupPlayers.size() - index > runwayCount?new CountDownLatch(runwayCount):new CountDownLatch(this.signupPlayers.size() - index);}Player player = this.signupPlayers.get(index);player.setStartingGun(startingGun);Future<Result> future = refereeService.submit(player);new FutureThread(future, player, this.preliminaries).start();}while(this.preliminaries.size() < TwoTrack.PLAYERNAMES.length) {try {synchronized (this.preliminaries) {this.preliminaries.wait();}} catch(InterruptedException e) {e.printStackTrace(System.out);}}startingGun = new CountDownLatch(5);for(int index = 0 ; index < 5 ; index++) {Player player = this.preliminaries.poll();player.setStartingGun(startingGun);Future<Result> future = refereeService.submit(player);new FutureThread(future, player, this.finals).start();}while(this.finals.size() < 5) {try {synchronized (this.finals) {this.finals.wait();}} catch(InterruptedException e) {e.printStackTrace(System.out);}}for(int index = 0 ; index < 3 ; index++) {Player player = this.finals.poll();switch (index) {case 0:System.out.println("第一名:" + player.getName() + "[" + player.getNumber() + "],成绩:" + player.getResult().getTime() + "秒");break;case 1:System.out.println("第二名:" + player.getName() + "[" + player.getNumber() + "],成绩:" + player.getResult().getTime() + "秒");break;case 2:System.out.println("第三名:" + player.getName() + "[" + player.getNumber() + "],成绩:" + player.getResult().getTime() + "秒");break;default:break;}}}......
}
- 1
- 2
- 3
- 4
- 5
- 6
- 7
- 8
- 9
- 10
- 11
- 12
- 13
- 14
- 15
- 16
- 17
- 18
- 19
- 20
- 21
- 22
- 23
- 24
- 25
- 26
- 27
- 28
- 29
- 30
- 31
- 32
- 33
- 34
- 35
- 36
- 37
- 38
- 39
- 40
- 41
- 42
- 43
- 44
- 45
- 46
- 47
- 48
- 49
- 50
- 51
- 52
- 53
- 54
- 55
- 56
- 57
- 58
- 59
- 60
- 61
- 62
- 63
- 64
- 65
- 66
- 67
- 68
- 69
- 70
- 71
- 72
- 73
- 74
- 75
- 76
- 77
- 78
- 79
- 80
- 81
- 82
- 83
- 84
- 85
- 86
- 87
- 88
- 89
- 90
- 91
- 92
- 93
- 94
- 95
- 96
- 97
- 98
- 99
- 100
- 101
- 102
- 103
- 104
- 105
- 106
- 107
- 108
- 109
- 110
- 111
- 112
- 113
- 114
- 115
3-4-3、相似工具类CyclicBarrier
在JDK1.5+中还有一个和CountDownLatch类似的同步计数工具:CyclicBarrier。不同的是CyclicBarrier的计数是循环进行的,而且也不需要向CountDownLatch那样显示的调用countDown进行减一操作。
如何理解CyclicBarrier计数器的循环工作方式呢?我们先来看看一个比较简单的示例代码:
public class TestCyclicBarrier {static {BasicConfigurator.configure();}/*** 日志*/private static Log LOGGER = LogFactory.getLog(TestCyclicBarrier.class);public static void main(String[] args) throws Throwable {final CyclicBarrier cyclicBarrier = new CyclicBarrier(3);for(int index = 0 ; index < 5 ; index++) {Thread childThread = new Thread() {@Overridepublic void run() {TestCyclicBarrier.LOGGER.info("本线程已准备好处理业务......");try {cyclicBarrier.await();} catch (InterruptedException | BrokenBarrierException e) {TestCyclicBarrier.LOGGER.error(e.getMessage() , e);} TestCyclicBarrier.LOGGER.info("开始处理业务......");}};childThread.start();}}
}
- 1
- 2
- 3
- 4
- 5
- 6
- 7
- 8
- 9
- 10
- 11
- 12
- 13
- 14
- 15
- 16
- 17
- 18
- 19
- 20
- 21
- 22
- 23
- 24
- 25
- 26
- 27
- 28
- 29
- 30
- 31
- 32
- 33
- 34
- 35
- 36
- 37
我们可以用下图表示以上代码的工作过程:
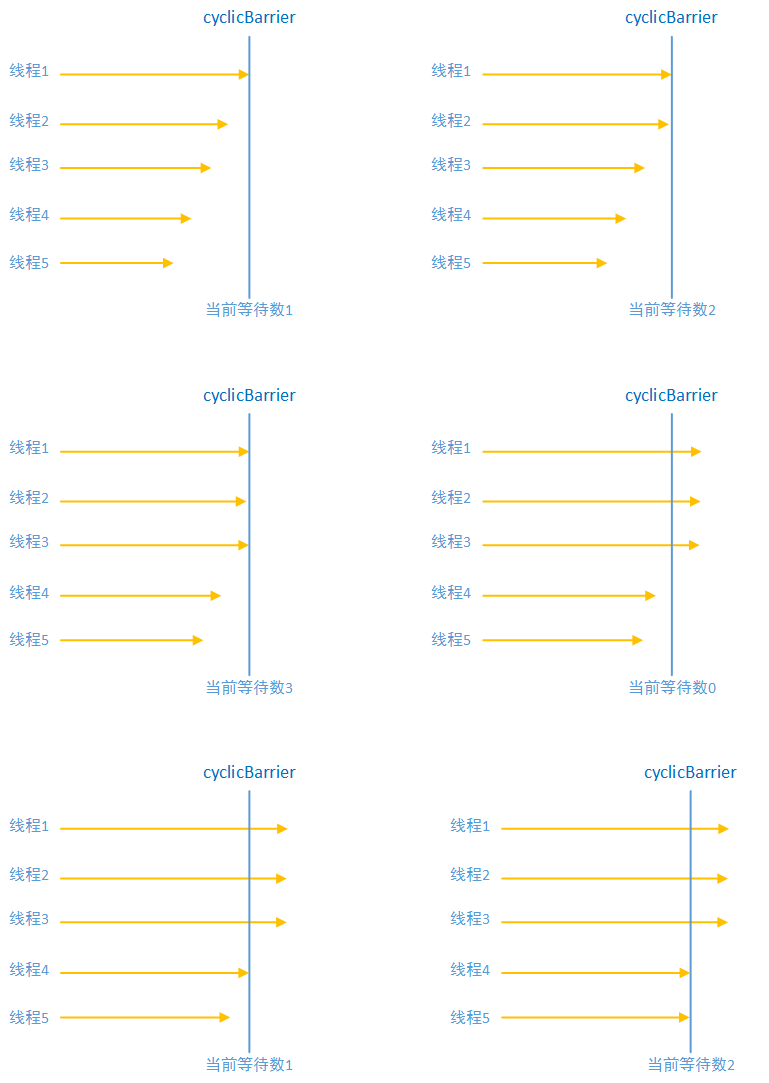
在上图中,CyclicBarrier的parties屏障设置为3,其意义是只要有通过CyclicBarrier的await方法进入阻塞等待的线程数量达到了3,则CyclicBarrier就解除这些线程的阻塞状态让他们可以继续执行。所以可以理解为CyclicBarrier的计数功能是可重复使用的,当等待的线程数量达到了设置的屏障值就放行这些线程。
3-4-4、使用CyclicBarrier改写“比赛”
下面我们将“比赛”中使用CountDownLatch实现的发令枪改写成使用CyclicBarrier来实现。改写发令枪不会使发令枪的工作职责发生任何变化,所以改写量是比较小的。另外由于这个小节中我们已经给出了很多代码了,为了节约篇幅这里只给出最小化的代码片段。
......
/*** 选手所关注的发令枪*/
private CyclicBarrier startingGun;/*** @param startingGun the startingGun to set*/
public void setStartingGun(CyclicBarrier startingGun) {this.startingGun = startingGun;
}/*** @return the startingGun*/
public CyclicBarrier getStartingGun() {return startingGun;
}
......
- 1
- 2
- 3
- 4
- 5
- 6
- 7
- 8
- 9
- 10
- 11
- 12
- 13
- 14
- 15
- 16
- 17
- 18
- 19
- 20
- Player选手类中的发令枪使用部分需要改写。使用CyclicBarrier后就不需要显示调用countDown()方法了:
......
this.runway.acquire();
if(this.startingGun != null) {System.out.println("选手" + name + "[" + number + "],已登上跑道,等待发令枪!");this.startingGun.await();System.out.println("选手" + name + "[" + number + "],跑!");
}
return this.result = this.doRun();
......
- TwoTrack主操作类中,关于发令枪的定义要进行变更:从CountDownLatch变成CyclicBarrier:
......
// 这是发令枪
CyclicBarrier startingGun = null;
......
- TwoTrack主操作类中,根据条件决定CyclicBarrier中parties屏障值的代码业务要进行调整。从之前确定CountDownLatch计数初值变化而来:
......
if(index % runwayCount == 0) {startingGun =  this.signupPlayers.size() - index > runwayCount?new CyclicBarrier(runwayCount):new CyclicBarrier(this.signupPlayers.size() - index);
}
......
这里我们就不再赘述代码的工作效果了,因为工作效果不会有任何变化。
来源:http://blog.csdn.net/yinwenjie(未经允许严禁用于商业用途!)
这篇关于Java多线程之CountDownLatch同步器的使用(六)的文章就介绍到这儿,希望我们推荐的文章对编程师们有所帮助!


