本文主要是介绍自定义 Spring Boot Starter 启动器,希望对大家解决编程问题提供一定的参考价值,需要的开发者们随着小编来一起学习吧!
前言
SpringBoot摒弃了以前Spring繁杂的配置(xml),在使用 SpringBoot 时可以很方便的引入各种官方提供的starter(如:spring-boot-starter-web、spring-boot-starter-thymeleaf等),仅需少量的配置,SpringBoot 就能够自动扫描到要加载的信息并启动相应的默认配置,做到了开箱即用、减少大量的配置项、约定优于配置。
而在日常开发中,某些场景下我们还会引入一些自己封装、复用性高、独立强的模块,但是每次引入都要为其大量配置。那么问题来了,要如何将这些模块封装成独立的开箱即用starter呢?
就跟着下面的样例代码(相关源码)一起看看吧。
自定义启动器
创建 starter 工程
创建一个spring boot 工程,pom.xml如下所示:
<?xml version="1.0" encoding="UTF-8"?>
<project xmlns="http://maven.apache.org/POM/4.0.0" xmlns:xsi="http://www.w3.org/2001/XMLSchema-instance"xsi:schemaLocation="http://maven.apache.org/POM/4.0.0 https://maven.apache.org/xsd/maven-4.0.0.xsd"><modelVersion>4.0.0</modelVersion><parent><groupId>org.springframework.boot</groupId><artifactId>spring-boot-starter-parent</artifactId><version>2.2.0.RELEASE</version><relativePath/> <!-- lookup parent from repository --></parent><groupId>com.huitian</groupId><artifactId>huitian-spring-boot-starter</artifactId><version>1.0.0-SNAPSHOT</version><name>huitian-spring-boot-starter</name><description>Spring Boot Starter 封装样例</description><properties><project.build.sourceEncoding>UTF-8</project.build.sourceEncoding><project.reporting.outputEncoding>UTF-8</project.reporting.outputEncoding><java.version>1.8</java.version><maven.test.skip>true</maven.test.skip></properties><dependencies><dependency><groupId>org.springframework.boot</groupId><artifactId>spring-boot-starter-web</artifactId><!--移除Tomcat依赖--><exclusions><exclusion><groupId>org.springframework.boot</groupId><artifactId>spring-boot-starter-tomcat</artifactId></exclusion></exclusions></dependency><dependency><groupId>org.springframework.boot</groupId><artifactId>spring-boot-starter-undertow</artifactId></dependency><dependency><groupId>org.springframework.boot</groupId><artifactId>spring-boot-autoconfigure</artifactId></dependency><dependency><groupId>org.springframework.boot</groupId><artifactId>spring-boot-autoconfigure-processor</artifactId></dependency><dependency><groupId>org.projectlombok</groupId><artifactId>lombok</artifactId><optional>true</optional></dependency></dependencies></project>
注意:必须引入spring-boot-autoconfigure与spring-boot-autoconfigure-processor来加载配置。
编写 自定义 Trigger
该启动器以定时任务功能演示业务逻辑。
package com.huitian.spring.boot.starter.trigger;import org.springframework.scheduling.Trigger;
import org.springframework.scheduling.TriggerContext;
import org.springframework.scheduling.support.CronTrigger;import java.util.Date;public class TaskTrigger implements Trigger {/*** cron 表达式*/private String cron;public TaskTrigger(String cron) {this.cron = cron;}@Overridepublic Date nextExecutionTime(TriggerContext triggerContext) {return new CronTrigger(cron).nextExecutionTime(triggerContext);}
}
编写 Propertie
用于读取配置文件的信息。
package com.huitian.spring.boot.starter.properties;import lombok.Data;
import org.springframework.boot.context.properties.ConfigurationProperties;@Data
@ConfigurationProperties(prefix = "huitian.starter")
public class HuitianStarterPropertie {/*** 任务名称*/private String taskName;/*** 任务触发 Cron 表达式*/private String taskCron;}
编写启动器的 Config
此处为注册定时任务,特实现SchedulingConfigurer接口的configureTasks方法。
package com.huitian.spring.boot.starter.config;import com.huitian.spring.boot.starter.properties.HuitianStarterPropertie;
import com.huitian.spring.boot.starter.trigger.TaskTrigger;
import lombok.extern.slf4j.Slf4j;
import org.springframework.beans.factory.annotation.Autowired;
import org.springframework.boot.context.properties.EnableConfigurationProperties;
import org.springframework.context.annotation.Configuration;
import org.springframework.scheduling.annotation.EnableScheduling;
import org.springframework.scheduling.annotation.SchedulingConfigurer;
import org.springframework.scheduling.config.ScheduledTaskRegistrar;@Slf4j
@Configuration
@EnableScheduling
@EnableConfigurationProperties(HuitianStarterPropertie.class)
public class HuitianStarterConfig implements SchedulingConfigurer {@Autowiredprivate HuitianStarterPropertie huitianStarterPropertie;@Overridepublic void configureTasks(ScheduledTaskRegistrar taskRegistrar) {// 注册定时任务taskRegistrar.addTriggerTask(() -> {// 定时任务方法...log.info("执行定时任务: [{}]", huitianStarterPropertie.getTaskName());}, new TaskTrigger(huitianStarterPropertie.getTaskCron()));}
}
编写 Controller
此处编写的Controller是为了将接口集成到引入启动器的项目中。
package com.huitian.spring.boot.starter.controller;import com.huitian.spring.boot.starter.properties.HuitianStarterPropertie;
import org.springframework.beans.factory.annotation.Autowired;
import org.springframework.web.bind.annotation.GetMapping;
import org.springframework.web.bind.annotation.RestController;@RestController
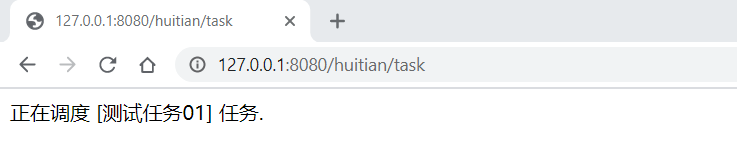
public class HuitianController {@Autowiredprivate HuitianStarterPropertie huitianStarterPropertie;@GetMapping("/task")public String hello() {return "正在调度 [" + huitianStarterPropertie.getTaskName() + "] 任务.";}}
编写 spring.factories
SpringApplication在构造方法中,会扫描引入启动器的src/main/resources/META-INF目录下的spring.factories文件,来加载配置类。
org.springframework.boot.autoconfigure.EnableAutoConfiguration=com.huitian.spring.boot.starter.config.HuitianStarterConfig
编写 spring-configuration-metadata.json (可选)
{"groups": [{"name": "huitian","type": "com.huitian.spring.boot.starter.properties.HuitianStarterPropertie","description": "启动器配置","sourceType": "com.huitian.spring.boot.starter.properties.HuitianStarterPropertie"},{"name": "huitian.starter","type": "com.huitian.spring.boot.starter.properties.HuitianStarterPropertie","description": "启动器配置","sourceType": "com.huitian.spring.boot.starter.properties.HuitianStarterPropertie"}],"properties": [{"name": "huitian.starter.taskName","type": "java.lang.String","description": "任务名称","sourceType": "com.huitian.spring.boot.starter.properties.HuitianStarterPropertie","defaultValue": ""},{"name": "huitian.starter.taskCron","type": "java.lang.String","description": "任务触发 Cron 表达式","sourceType": "com.huitian.spring.boot.starter.properties.HuitianStarterPropertie","defaultValue": ""}],"hints": []
}
编写好该文件,会在配置application配置文件的时候带有提示。

至此,启动器编写完成!
为方便其他工程引入,还需要通过maven将启动器工程安装(install)或部署(deploy)到仓库中。
测试
创建 test 工程
创建一个spring boot 工程,pom.xml如下所示:
<?xml version="1.0" encoding="UTF-8"?>
<project xmlns="http://maven.apache.org/POM/4.0.0" xmlns:xsi="http://www.w3.org/2001/XMLSchema-instance"xsi:schemaLocation="http://maven.apache.org/POM/4.0.0 https://maven.apache.org/xsd/maven-4.0.0.xsd"><modelVersion>4.0.0</modelVersion><parent><groupId>org.springframework.boot</groupId><artifactId>spring-boot-starter-parent</artifactId><version>2.2.0.RELEASE</version><relativePath/> <!-- lookup parent from repository --></parent><groupId>com.huitian</groupId><artifactId>huitian-spring-boot-starter-test</artifactId><version>1.0.0-SNAPSHOT</version><name>huitian-spring-boot-starter-test</name><description>Spring Boot Starter 封装样例测试</description><properties><project.build.sourceEncoding>UTF-8</project.build.sourceEncoding><project.reporting.outputEncoding>UTF-8</project.reporting.outputEncoding><java.version>1.8</java.version><maven.test.skip>true</maven.test.skip></properties><dependencies><!-- 引入自定义的启动器 --><dependency><groupId>com.huitian</groupId><artifactId>huitian-spring-boot-starter</artifactId><version>1.0.0-SNAPSHOT</version></dependency></dependencies></project>
编写 application.yml 配置文件
server:servlet:context-path: /huitianport: 8080huitian:starter:taskName: "测试任务01"# 每秒一次taskCron: "* * * * * *"
启动 test 工程
直接启动HuitianSpringBootStarterTestApplication#main()
- 启动器已按配置执行了定时任务,控制台日志如下:
Connected to the target VM, address: '127.0.0.1:6375', transport: 'socket'
2021-02-04 16:27:22.428  INFO 7896 --- [           main] .HuitianSpringBootStarterTestApplication : Starting HuitianSpringBootStarterTestApplication on MSI with PID 7896 (E:\Workspase-damo\huitian-spring-boot-starter-demo\huitian-spring-boot-starter-test\target\classes started by Onovo in E:\Workspase-damo\huitian-spring-boot-starter-demo\huitian-spring-boot-starter-test)
2021-02-04 16:27:22.432  INFO 7896 --- [           main] .HuitianSpringBootStarterTestApplication : No active profile set, falling back to default profiles: default
2021-02-04 16:27:23.261  WARN 7896 --- [           main] io.undertow.websockets.jsr               : UT026010: Buffer pool was not set on WebSocketDeploymentInfo, the default pool will be used
2021-02-04 16:27:23.288  INFO 7896 --- [           main] io.undertow.servlet                      : Initializing Spring embedded WebApplicationContext
2021-02-04 16:27:23.288  INFO 7896 --- [           main] o.s.web.context.ContextLoader            : Root WebApplicationContext: initialization completed in 792 ms
2021-02-04 16:27:23.450  INFO 7896 --- [           main] o.s.s.concurrent.ThreadPoolTaskExecutor  : Initializing ExecutorService 'applicationTaskExecutor'
2021-02-04 16:27:23.589  INFO 7896 --- [           main] s.a.ScheduledAnnotationBeanPostProcessor : No TaskScheduler/ScheduledExecutorService bean found for scheduled processing
2021-02-04 16:27:23.604  INFO 7896 --- [           main] io.undertow                              : starting server: Undertow - 2.0.27.Final
2021-02-04 16:27:23.609  INFO 7896 --- [           main] org.xnio                                 : XNIO version 3.3.8.Final
2021-02-04 16:27:23.620  INFO 7896 --- [           main] org.xnio.nio                             : XNIO NIO Implementation Version 3.3.8.Final
2021-02-04 16:27:23.674  INFO 7896 --- [           main] o.s.b.w.e.u.UndertowServletWebServer     : Undertow started on port(s) 8080 (http) with context path '/huitian'
2021-02-04 16:27:23.677  INFO 7896 --- [           main] .HuitianSpringBootStarterTestApplication : Started HuitianSpringBootStarterTestApplication in 1.732 seconds (JVM running for 2.749)
2021-02-04 16:27:24.007  INFO 7896 --- [pool-1-thread-1] c.h.s.b.s.config.HuitianStarterConfig    : 执行定时任务: [测试任务01]
2021-02-04 16:27:25.004  INFO 7896 --- [pool-1-thread-1] c.h.s.b.s.config.HuitianStarterConfig    : 执行定时任务: [测试任务01]
2021-02-04 16:27:26.013  INFO 7896 --- [pool-1-thread-1] c.h.s.b.s.config.HuitianStarterConfig    : 执行定时任务: [测试任务01]
2021-02-04 16:27:27.005  INFO 7896 --- [pool-1-thread-1] c.h.s.b.s.config.HuitianStarterConfig    : 执行定时任务: [测试任务01]
- 访问启动器内的Controller:
http://127.0.0.1:8080/huitian/task
至此,测试完成。
原理
这里就需要聊聊SpringBoot的启动方式。
对于本项目启动
SpringBoot 启动类默认的@SpringBootApplication注解中默认包含了@EnableAutoConfiguration注解,启动时就能扫描本项目下被@Configuration注解修饰的类并将其注入IOC容器。
对于引入的 starter 启动
而对于引入的starter项目来说,@Configuration不能在本项目中扫描到,是无法加载的。所以需要启动时读取/META-INF/spring.factories文件,然后读取org.springframework.boot.autoconfigure.EnableAutoConfiguration指向的由@Configuration注解修饰的类并将其注入IOC容器。
如:
org.springframework.boot.autoconfigure.EnableAutoConfiguration=com.huitian.spring.boot.starter.config.HuitianStarterConfig
让我们来一起看看源码:
1. new SpringApplication(XxxApplication.class);
2. getSpringFactoriesInstances();
3. SpringFactoriesLoader.loadFactoryNames();
4. loadSpringFactories();

SpringBoot 的这种配置加载方式是一种类似于 SPI 的方式,SPI可以在META-INF/services配置接口扩展的实现类,SpringBoot中原理类似,只是名称换成了spring.factories而已。
starter 命名规则
Spring 官方命名规则
- 前缀:spring-boot-starter-
{name} - 模式:spring-boot-starter-
模块名 - 举例:spring-boot-starter-
web、spring-boot-starter-thymeleaf
自定义命名规则
- 后缀:
{name}-spring-boot-starter - 模式:
模块-spring-boot-starter - 举例:
mybatis-spring-boot-starter
这篇关于自定义 Spring Boot Starter 启动器的文章就介绍到这儿,希望我们推荐的文章对编程师们有所帮助!


